


3. Menu Operation
⑴
Press “MENU” and it will display menu system
⑵
Revolve “ENTER” to select an item. The selected item will be highlighted display.
⑶
Press “ENTER” to enter the selected item.
⑷
Under menu system, press “MENU” to back to previous menu.
*The menu will automatically save and quit if it remains idle.
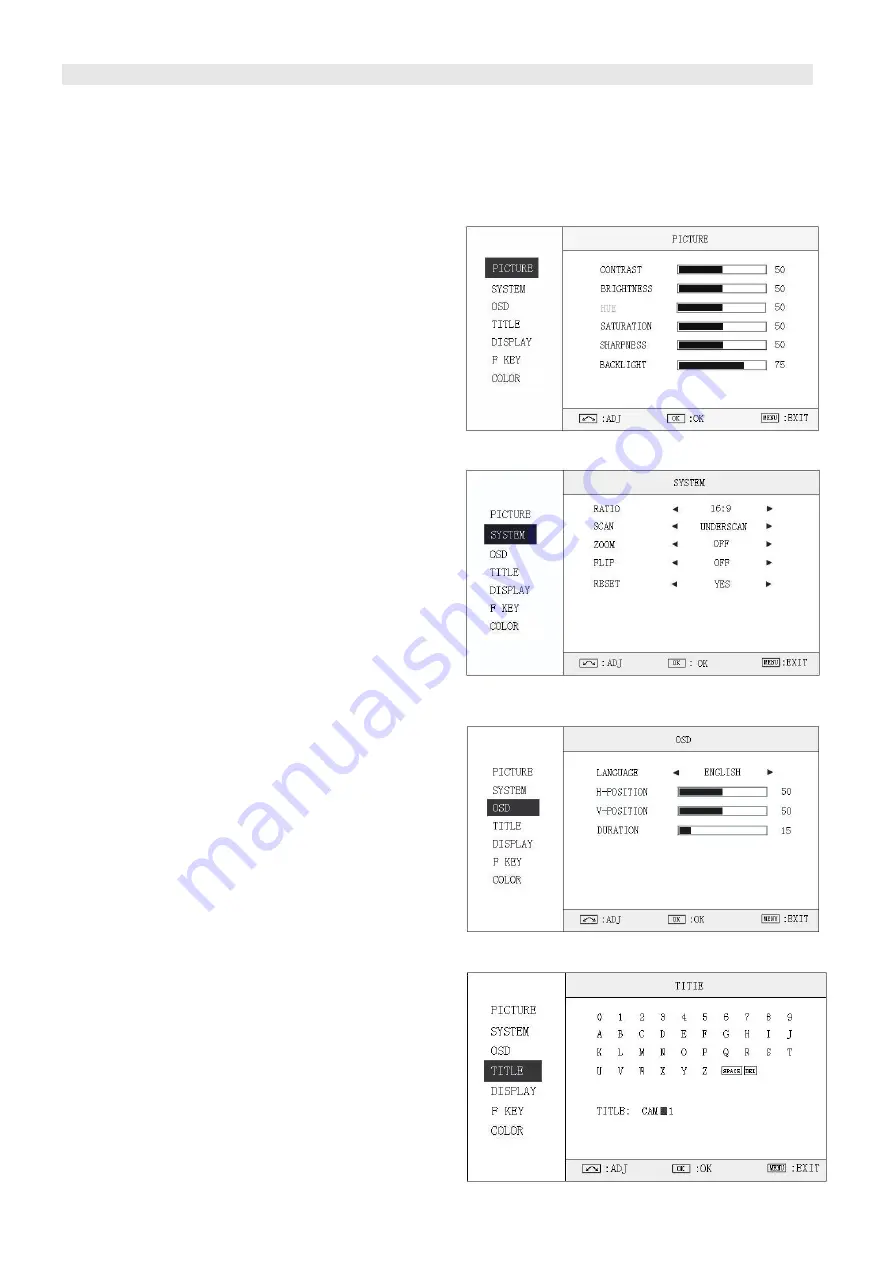
3.1 PICTURE submenu
The PICTURE submenu includes:
⑴
CONTRAST:
0-100 value adjustment
⑵
BRIGHTNESS:
0-100 value adjustment
⑶
HUE:
0-100 value adjustment
(Only available under CVBS NTSC input)
⑷
SATURATION:
0-100 value adjustment
⑸
SHARPNESS:
0-100 value adjustment
⑹
BACKLIGHT:
0-100 value adjustment
3.2 SYSTEM submenu
The SYSTEM submenu includes:
⑴
RATIO:
Aspect ratio “16:9” / “4:3” selection
⑵
SCAN:
“UNDERSCAN” / “OVERSCAN” / “NATIVE”
selection
⑶
ZOOM:
“OFF”, “ZOOM1” and “ZOOM2” selection
⑷
FLIP:
Select “ON” to flip the picture by 180°.
⑸
RESET:
Select “YES” to recover all to factory
setting.
3.3 OSD submenu
The OSD submenu includes:
⑴
LANGUAGE:
Menu language selection
⑵
H-POSITION:
Menu horizontal position (0-100)
adjustment, real-time preview and default value: 50.
⑶
V-POSITION:
Menu vertical position (0-100)
adjustment, real-time preview and default value: 50.
⑷
DURATION:
Menu timeout setting (5-60)
Set a time (in seconds) in which the menu will
automatically quit if remains idle. Default: 15.
3.4 TITLE submenu
Revolve "ENTER" button to select the letters, and press
"ENTER" to input. Select SPACE to input space and
DEL to delete the left letter. Max 10 letters are
supported.
After setting, press "MENU", the system will save data
to current user and quit menu. The menu will
automatically save and quit if it remains idle.


