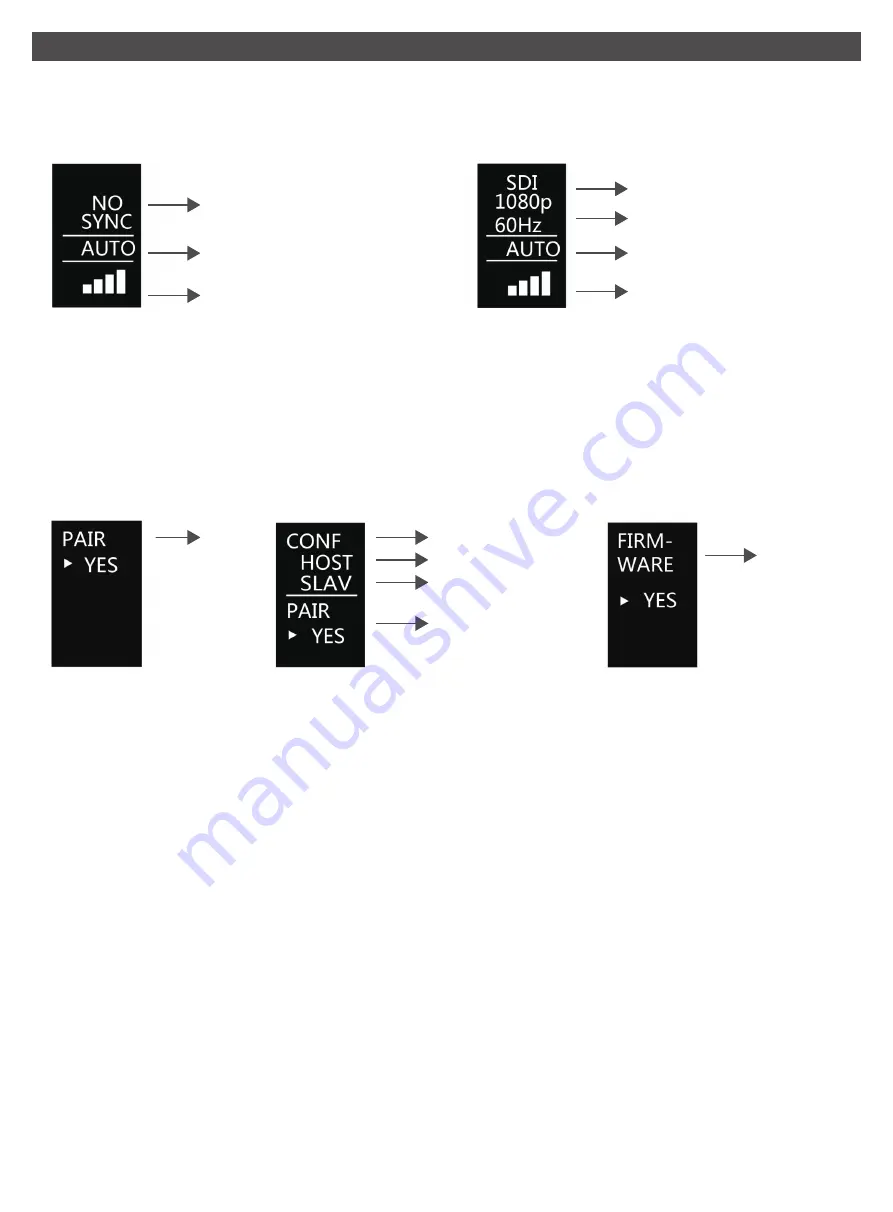
SWIT FLOW2000 Rx User Manual Download Page 7

4. OLED Display 

Boot Screen                                    

(When Tx and Rx both have no signal connection,  

Tx and Rx display the same. Fig.1)             

Main Screen

(When Tx and Rx have normal signal connection,

Tx and Rx display the same. Fig.2)

No Signal

Auto channel mode

Signal strength

Fig 1

Signal source
Signal format
Channel switch

Signal strength

Fig 2

Remark: 

Channel switch is adjusted up or down by the red five-direction adjustment button under OLED, 

7 wireless channels in total.

Switch Screen

a :  (Transmitter : Push the red five-direction adjustment key at the bottom of the display screen. Fig 3 and Fig 5)

b : (Receiver : Push the red five-direction adjustment key at the bottom of the display screen . Fig 4 and Fig 5)

Fig 3

Fig 4

Fig 5

Pair

Firmware

Pair

Remark: 

1. The transmitter and receiver display different contents in the configuration setting interface:

     the transmitter only displays "PAIR", and the receiver displays "CONF", "PAIR" (Fig 3, Fig 4).

2. In one transmitter to one receiver mode, receiver setting is “ HOST ” mode. In one transmitter to 

     multi-receivers mode, one receiver setting is “HOST” mode, other receivers are all been set in “SLAV” 

     mode. In one transmitter to multi-receivers mode, the “HOST” mode receiver must be on. 

3. The setting default options of receiver “CONF” is “HOST”. To set the "HOST" mode, push the five- 

      direction switch up and down, select "HOST" and press the five- direction switch. At the bottom of 

      the screen, "PLEASE REBOOT" prompts to REBOOT. After that, setting is ok.

4. To set several receivers to receive signal from one transmitter simultaneously (one transmitter to 

     multi-receivers mode), we need to set all receivers except for "HOST" mode to "SLAV" mode, and 

     then, push the five- direction switch up and down, select "SLAV" and press the five- direction switch. 

     At the bottom of the screen, "PLEASE REBOOT" prompts to REBOOT. After that, setting is ok. The 

     receiver which have been set to “SLAV’ mode also need to be paired with corresponding transmitter, 

     see details in manual “6. Pairing”.

5. Support firmware upgrade via USB.

6. Both transmitter and receiver support manual switching of frequency points.

Configuration
Host
Slave

Summary of Contents for FLOW2000 Rx

Page 1: ...Model FLOW2000 3GSDI HDMI 600m Wireless HD transmission User Manual Please read this user manual throughout before using Ver A SWIT ELECTRONICS CO LTD...

Page 2: ...al damage to the products 2 Any damage or breakdown caused by use maintenance or storage not according to the user manual s introductions 3 The attenuation of signal quality resulting from being used...

Page 3: ...lectric shock and re Power cable Make sure the power cable is not pressed or tightened by any items or weights Power Load Do not exceed the load on the wall outlet extension cable or other porous rece...

Page 4: ...roduct o ers the AES 128 bit encryption to protect the wireless transmission Please still be aware of the intentional signal interception from third person Do not use it for important communication 3G...

Page 5: ...can be used We recommend SWIT batteries like S 8972 S 8970 S 8770 S 8975 compatible with SONY L series NP F770 970 SDI LOOP SDI Loop out BNC connector SDI in SDI input BNC connector ON OFF Power switc...

Page 6: ...lied articulating arm trestle to install the device to the camera HDMI OUT HDMI output HDMI A type connector SDI out SDI output BNC connector Battery plate F plates can be used We recommend SWIT batte...

Page 7: ...e receiver setting is HOST mode In one transmitter to multi receivers mode one receiver setting is HOST mode other receivers are all been set in SLAV mode In one transmitter to multi receivers mode th...

Page 8: ...ace the pairing interface of the transmitter shown in Fig 6 push down the ve direction adjustment key of the receiver to select YES as shown in Fig 7 Then press down the ve direction adjustment keys o...

Page 9: ...d at still keep the antenna vertically straight up to extend transmission distance and stabilize transmission quality Fig 9 Avoid walls trees and water to reduce signal attenuation Set the receiver as...

Page 10: ...ble connection of both transmitter and receiver Change the output video format of the camera Reconnect reliably Wait for 1 minute or reboot the transmitter and receiver Close the transmitter to the re...

Reviews: