30
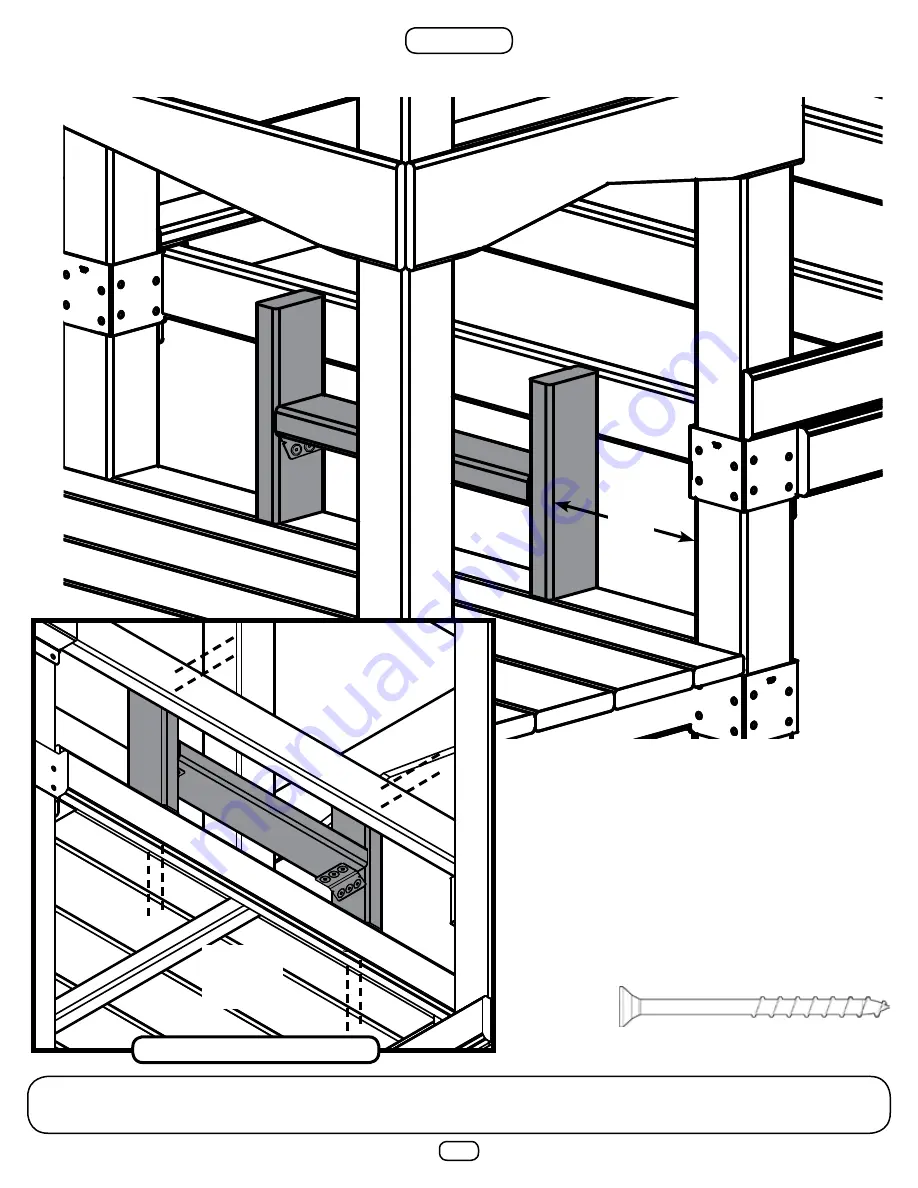
STEP 20
1. Install step as shown.
2-1/2” Deck Screw (x8)
10’’
(2) 2-1/2’’
Screw
per Joint
UNDER DECK VIEW
Page 1: ...ensamblaje lo debe hacer un adulto AVERTISSEMENT L assemblage doit tre ex cut par un adulte IMPORTANT PLEASE READ BEFORE BEGINNING ASSEMBLY Please make sure all lumber hardware and accessory parts ar...
Page 2: ...e top of swing beams railings or roof Not to use equipment in a manner other than intended Not to get off equipment while it is in motion Not to climb on the equipment when it is wet Be sure to go dow...
Page 3: ...nd conditions for a period of 5 years MANUFACTURER S 5 YEAR LIMITED WARRANTY Swing N Slide warrants its No Cut and Wood Complete Ready to Assemble Play Set kits against wood rot and termite damage and...
Page 4: ...20 10 6 DIMENSIONS MINIMUM USE ZONE FOR PLAY EQUIPMENT SHALL EXTEND NO LESS THAN 72 FROM ALL SIDES OF THE PLAY STRUCTURE SWING USE ZONE EXTENDS NO LESS THAN 168 SWINGS MUST HAVE A MINIMUM CLEARANCE OF...
Page 5: ...SSES 1 8 DRILL BIT SCREWDRIVER INCLUDED HARDWARE 1 1 4 Lag Screw x44 2 1 2 Deck Screw x330 2 Lag Screw x42 8 x 1 2 Pan Screw x2 5 16 x 1 1 2 Lag Screw x4 5 16 Washer x7 T 30 Bit x1 T 20 Bit x1 5 16 Lo...
Page 6: ...INCLUDED HARDWARE INCLUDED COMPONENTS 1 4 20 x 1 1 4 Hex Head Bolt x8 4x4 Wrap Loc x10 4x4 Shelf Loc x2 2x4 Shelf Loc x8 3 8 DRILL BIT Weld Nut x8 8mm Loc Washer x8 8mm Washer x8 3 16 Tarp Washer x22...
Page 7: ...NENTS Anchor It Strap x4 Anchor It x4 Play Handle x2 ID Tag x1 Tarp Large x1 Plan x1 Window x4 Climbing Rock x4 23 1 4 Rungs x3 Tarp Small x1 Staple x6 Bolt Caps x3 Net Climber x1 Step Bracket R x1 St...
Page 8: ...x 4 x 4 1 4 4 PF 4903 5 4 x 4 x 10 1 2 2 PF 4929 1 x 4 x 47 1 2 2 PF 4932 1 x 4 x 42 7 8 2 PF 4928 1 x 4 x 45 3 4 2 PF 4926 1 x 4 x 31 1 2 2 PF 4927 1 x 4 x 31 1 2 2 PF 4925 1 x 4 x 25 1 4 4 PF 4913...
Page 9: ...4 3x3 3 2 1 2 screws per attachment point 1x4 to 1x4 2 30mm screws per attachment point English Metric Cm English Metric Cm 1x4 2 5x10 2 5 8x3 3 8 1 59x8 57 1x5 2 5x12 7 5 8x4 1 2 1 59x11 43 5 4x4 3 2...
Page 10: ...bracket 1 2 3 CORRECT INCORRECT Bracket mounting 1 Always use lag screws 2 Brackets interlock with each other NEVER position them in a non interlocking position 3 Place lag screws in brackets only wh...
Page 11: ...11 STEP 1 1 Attach brackets to posts as shown 4 x 4 x 120 4 x 4 x 120 47 59 2 1 1 4 Lag Screws per bracket 1 1 4 Lag Screw x8 FRAME 1...
Page 12: ...as shown Note the bracket orientation 2 1 2 Deck Screw x12 Check to make sure structure is square FRAME 1 PF 4924 5 8 x 6 x 47 1 2 PF 4933 5 4 x 4 x 47 1 2 108 103 1 2 4 x 4 x 120 4 x 4 x 120 3 2 1 2...
Page 13: ...ch support board to Frame 1 as shown Check to make sure structure is square FRAME 1 3 1 1 4 Lag 2 2 Lag per 2x4 Shelf Loc bracket PF 4944 2 x 4 x 47 1 2 FLIP FRAME OVER 2 Lag Screw x4 1 1 4 Lag Screw...
Page 14: ...14 STEP 4 4 x 4 x 96 4 x 4 x 96 59 2 1 1 4 Lag Screws per bracket 1 1 4 Lag Screw x4 FLUSH 2 Lag Screw x4 Gap 2 2 Lag Screws per bracket 1 Attach brackets to posts as shown FRAME 2...
Page 15: ...15 STEP 5 96 3 1 8 9 3 8 9 3 8 3 1 8 12 1 2 21 7 8 1 Drill 3 3 8 holes in 1 4 x 4 x 96 as shown This will be used as the tower accessory arm CENTER HOLES CENTER HOLES...
Page 16: ...o make sure structure is square FRAME 2 PF 4929 1 x 4 x 47 1 2 4 x 4 x 96 62 1 2 PF 4913 5 8 x 4 x 47 1 2 4 x 4 x 96 4 x 4 x 96 4 2 Lag per 4x4 Shelf Loc bracket TIP Flex bracket s to make installatio...
Page 17: ...17 STEP 7 1 Attach support board to Frame 2 as shown FRAME 2 3 1 1 4 Lag 2 2 Lag per 2x4 Shelf Loc bracket PF 4944 2 x 4 x 47 1 2 FLIP FRAME OVER 2 Lag Screw x4 1 1 4 Lag Screw x6 FLUSH...
Page 18: ...hown 2 1 2 Deck Screw x10 PF 4928 1 x 4 x 45 3 4 PF 4928 1 x 4 x 45 3 4 PF 4913 5 8 x 4 x 47 1 2 PF 4913 5 8 x 4 x 47 1 2 1 3 4 1 3 4 3 2 1 2 Screw 3 2 1 2 Screw 2 2 1 2 Screw 2 2 1 2 Screw FRAME 1 Ch...
Page 19: ...19 STEP 9 1 Attach Frame 1 to Frame 2 as shown 2 1 2 Deck Screw x12 3 2 1 2 Screw 3 2 1 2 Screw FRAME 1 FRAME 2 3 2 1 2 Screw 3 2 1 2 Screw 47 1 2...
Page 20: ...20 STEP 10 1 Attach boards as shown 2 1 2 Deck Screw x8 2 2 1 2 Screw per joint PF 4931 5 4 x 4 x 40 1 2 PF 4931 5 4 x 4 x 40 1 2 2 2 1 2 Screw per joint...
Page 21: ...21 STEP 11 1 Attach brackets to posts as shown 2 1 1 4 Lag Screws per bracket 1 1 4 Lag Screw x4 x2 47 4 x 4 x96...
Page 22: ...me 3 as shown Note the bracket orientation 2 1 2 Deck Screw x12 Check to make sure structure is square FRAME 3 PF 4923 5 8 x 6 x 47 1 2 78 4 x 4 x96 4 x 4 x96 PF 4929 1 x 4 x 47 1 2 3 2 1 2 Screw per...
Page 23: ...crew Check to make sure structure is square 3 1 1 4 Lag 2 2 Lag per 2x4 Shelf Loc bracket 2 Lag Screw x4 1 1 4 Lag Screw x6 PF 4917 5 8 x 6 x 27 PF 4943 2 x 4 x 27 PF 4943 2 x 4 x 27 PF 4925 1 x 4 x 2...
Page 24: ...14 1 Attach Frame 3 to Frame 1 as shown 2 1 2 Deck Screw x10 3 1 1 4 Lag 2 2 Lag per 2x4 Shelf Loc bracket 2 Lag Screw x4 1 1 4 Lag Screw x6 FRAME 3 2 2 1 2 Screw 2 2 1 2 Screw 3 2 1 2 Screw 3 2 1 2 S...
Page 25: ...25 STEP 15 1 Attach boards as shown 2 1 2 Deck Screw x8 2 2 1 2 Screw per joint 2 2 1 2 Screw per joint 2 PF 4931 5 4 x 4 x 40 1 2...
Page 26: ...Screw x10 2 2 1 2 Screw per joint 2 2 1 2 Screw per joint 18 TOP VIEW Flush 2 1 1 2 Screw per joint 1 1 2 Deck Screw x4 1 2 1 2 Screw 1 2 1 2 Screw 1 2 1 2 Screw 1 2 1 2 Screw 2 PF 4930 5 4 x 4 x 40...
Page 27: ...27 STEP 17 1 Attach boards as shown 2 1 2 Deck Screw x16 4 2 1 2 Screw per board 3 PF 4937 5 4 x 6 x 47 1 2 1 PF 4933 5 4 x 4 x 47 1 2 2 1 1 2 Screw per board 1 1 2 Deck Screw x8...
Page 28: ...boards as shown 2 1 2 Deck Screw x16 TOP VIEW 18 PF 4930 5 4 x 4 x 40 1 4 2 2 1 2 Screw per joint PF 4944 2 x 4 x 47 1 2 2 2 1 2 Screw per joint PF 4930 5 4 x 4 x 40 1 4 2 2 1 2 Screw per joint 2 2 1...
Page 29: ...n STEP 19 30mm Deck Screw x12 DETAIL OF STEP BRACKETS Left Bracket Shown 4 1 2 PF 4941 2 x 4 x 11 PF 4941 2 x 4 x 11 PF 4942 2 x 4 x 17 1 2 3 30 mm screws each bracket Step Bracket L Step Bracket R 3...
Page 30: ...30 STEP 20 1 Install step as shown 2 1 2 Deck Screw x8 10 2 2 1 2 Screw per Joint 2 2 1 2 Screw per Joint UNDER DECK VIEW...
Page 31: ...31 STEP 21 UNDER DECK VIEW 1 Install Spacer Board as shown 2 1 2 Deck Screw x6 3 2 1 2 Screw per Joint 3 PF 4913 5 8 x 4 x 47 1 2...
Page 32: ...2 Deck Screw x42 PF 4937 5 4 x 6 x 47 1 2 PF 4937 5 4 x 6 x 47 1 2 PF 4937 5 4 x 6 x 47 1 2 PF 4937 5 4 x 6 x 47 1 2 PF 4935 5 4 x 6 x 44 PF 4935 5 4 x 6 x 44 PF 4935 5 4 x 6 x 44 1 4 Gap Between All...
Page 33: ...Install Boards as shown 2 1 2 Deck Screw x8 PF 4940 1 1 2 x 1 5 8 x 35 1 2 PF 4940 1 1 2 x 1 5 8 x 35 1 2 5 8 5 8 4 2 1 2 Screw per board TOP VIEW 1 1 2 5 8 OUTSIDE OF TOWER BOTTOM OF PF 4940 FLUSH TO...
Page 34: ...940 1 1 2 x 1 5 8 x 35 1 2 PF 4940 1 1 2 x 1 5 8 x 35 1 2 PF 4938 1 1 2 x 1 5 8 x 10 1 4 PF 4938 1 1 2 x 1 5 8 x 10 1 4 4 2 1 2 Screw per board 4 2 1 2 Screw per board 2 2 1 2 Screw per board 2 2 1 2...
Page 35: ...35 STEP 25 1 Install Boards as shown 2 1 2 Deck Screw x10 30mm Deck Screw x10 5 PF 4919 5 8 x 6 x 36 2 30mm Screw per board 2 1 8 Gap Between Barrier Boards FLUSH 2 2 1 2 Screw per board...
Page 36: ...920 5 8 x 6 x 40 1 2 PF 4920 5 8 x 6 x 40 1 2 PF 4920 5 8 x 6 x 40 1 2 PF 4914 5 8 x 6 x 12 7 8 PF 4914 5 8 x 6 x 12 7 8 PF 4914 5 8 x 6 x 12 7 8 PF 4914 5 8 x 6 x 12 7 8 PF 4907 5 8 x 4 x 12 7 8 1 8...
Page 37: ...920 5 8 x 6 x 40 1 2 PF 4920 5 8 x 6 x 40 1 2 PF 4920 5 8 x 6 x 40 1 2 PF 4914 5 8 x 6 x 12 7 8 PF 4914 5 8 x 6 x 12 7 8 PF 4914 5 8 x 6 x 12 7 8 PF 4914 5 8 x 6 x 12 7 8 PF 4907 5 8 x 4 x 12 7 8 1 8...
Page 38: ...38 STEP 28 2 Window Frames 16 3 4 Flat Head Screws 2 Window Frames 16 3 4 Flat Head Screws 1 Attach window frame as shown 3 4 Flat Head Screw x32...
Page 39: ...39 STEP 29 1 Attach Boards as shown 3 4 Flat Head Screw x8 SECURE BOARD THROUGH WINDOW FRAMES 4 3 4 Flat Head Screws Per Board PF 4904 5 8 x 3 x 14 3 4 PF 4904 5 8 x 3 x 14 3 4...
Page 40: ...was not purchased please see barrier assembly on page 55 30mm Deck Screw x8 2 1 2 Deck Screw x6 1 1 2 Deck Screw x2 2 1 1 2 Screws Pre Drill 2 PF 4918 5 8 x 6 x 30 2 30mm Screws Per Joint FLUSH 2 PF 4...
Page 41: ...SH 30mm Deck Screw x16 2 1 2 Deck Screw x6 1 1 2 Deck Screw x2 2 PF 4911 5 8 x 4 x 42 2 30mm Screws Per Joint 2 1 1 2 Screws Pre Drill 2 PF 4906 5 8 x 4 x 12 3 8 3 2 1 2 Screws Per Board FLUSH 2 PF 49...
Page 42: ...4 1 1 2 Screws 2 PF 4940 1 1 2 x 1 5 8 x 35 1 2 4 1 1 2 Screws Per Board Secure boards in place by mounting from inside tower PF 4912 5 8 x 4 x 43 1 4 2 1 1 2 Screws Per Joint PRE DRILL 3 4 FROM TOP...
Page 43: ...8 PF 4915 5 8 x 6 x 17 7 8 2 1 1 2 Screws PF 4910 5 8 x 4 x 4 1 4 2 1 1 2 Screws PF 4927 1 x 4 x 31 1 2 PF 4926 1 x 4 x 31 1 2 PF 4926 1 x 4 x 31 1 2 PF 4927 1 x 4 x 31 1 2 PF 4939 1 1 2 x 1 5 8 x 30...
Page 44: ...44 STEP 34 1 Attach Boards as shown 2 1 2 Deck Screw x12 2 2 1 2 Screws 4 30mm Screws Per Side 2 2 1 2 Screws Per Joint PF 4933 5 4 x 4 x 47 1 2 30mm Deck Screw x8 1 1 4 2 2 1 2 Screws...
Page 45: ...wn 30mm Deck Screw x4 FLUSH FLUSH PF 4932 1 x 4 x 42 7 8 PF 4932 1 x 4 x 42 7 8 PF 4933 5 4 x 4 x 47 1 2 2 2 1 2 Screws 2 2 1 2 Screws 2 1 2 Deck Screw x16 3 2 1 2 Screws Per Joint 3 2 1 2 Screws Per...
Page 46: ...46 STEP 36 1 Attach Tarps as shown 12 x 3 4 Pan Screw 3 16 Tarp Washer 12 x 3 4 Pan Screw x22 12 x 3 4 Pan Screw Tarp Large Tarp Small 12 x 3 4 Pan Screw 3 16 Washer 3 16 Tarp Washer...
Page 47: ...pacer Boards as shown UNDER DECK VIEW 2 Lag Screw x6 10 3 8 11 1 8 11 1 8 2 2 Lag Screws Per Rung 3 23 1 4 Rungs 2 PF 4908 5 8 x 4 x 27 1 3 8 3 2 1 2 Screws Per Joint 2 1 2 Deck Screw x12 CURVED SIDE...
Page 48: ...ocations are clear of wall supports before drilling 3 Drill holes through the wall at the desired locations using a 3 8 drill bit 4 Attach Climbing Rocks as shown 5 Attach Rock Wall as shown 2 1 2 Dec...
Page 49: ...Joint 2 1 1 2 Screws Per Joint 2 1 2 Deck Screw x12 1 1 2 3 1 1 2 3 1 2 PF 4922 5 8 x6 x47 2 PF 4903 5 4 x4 x10 1 2 2 PF 4903 5 4 x4 x10 1 2 PF 4936 5 4 x6 x47 3 1 2 3 PICNIC TABLE PICNIC BENCH 3 2 1...
Page 50: ...STEP 40 3 2 1 2 Screws Per Joint PICNIC TABLE 28 1 2 1 Attach Picnic Table and Climber Support Board as shown 2 1 2 Deck Screw x6 2 Lag Screw x4 4 2 Lag Screws 4 x 4 x 96 FLUSH FLUSH WITH FACE OF UPRI...
Page 51: ...dder rope Tap two staples in place approximately 1 apart Wrap the rope under the 4 x 4 Then thread the rope through both staples Double the rope back on itself and through the first staple Pull the ro...
Page 52: ...52 STEP 42 1 Attach slide as shown 30mm Deck Screw x2 2 30mm Deck Screws 14 x 1 Truss Screws PF 4338 2 x2 x17 Slide Stake Grade 2 With hammer pound stake into ground as shown 14 x 1 Truss Screw x3...
Page 53: ...43 1 Attach Play Handle as shown centered on upright 2 Attach ID Tag as shown 1 2 Pan Screw x2 1 1 4 Lag Screw x4 11 2 1 1 4 Lag Screw 11 2 1 1 4 Lag Screw 2 1 2 Pan Screw 1 Play Handle 1 Play Handle...
Page 54: ...possible using any of the holes in the strap that work best TIP When installing Anchor Its in rocky or hard soil create a starter hole at the desired locations using either a 16 Concrete Drill Bit or...
Page 55: ...emove 2 Barrier Boards and 2 Support Boards as shown 3 Attach support board and re attach 2 barrier Boards as shown above 4 Attach 4 barrier boards as shown above 1 1 x 4 x 96 47 1 2 1 5 4 x 6 x 120 3...
Page 56: ...r Support Representatives Available Monday Friday 7am 5pm CST Weekend support available April through Labor Day Also available on Memorial Day Fourth of July Labor Day Technical Support from experienc...