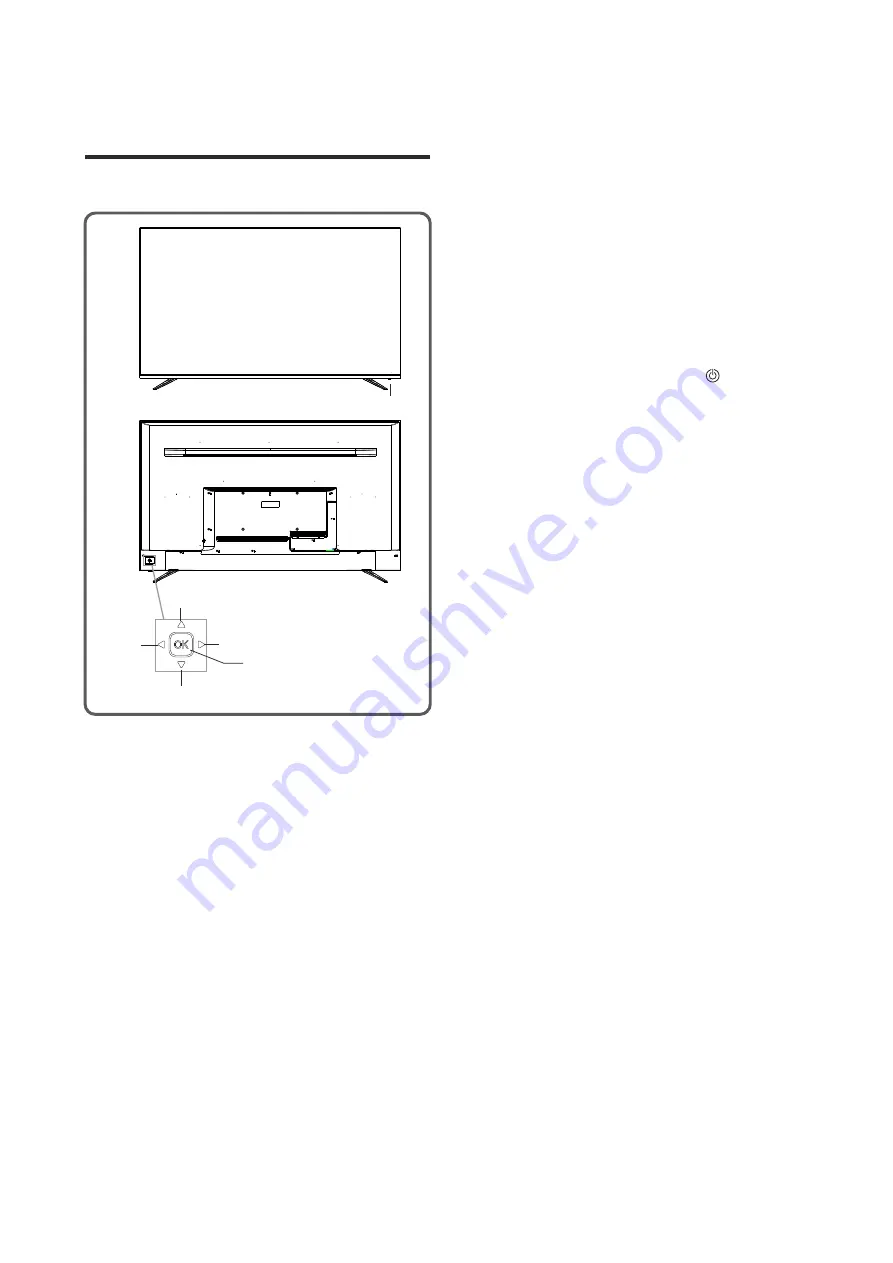
SWEDX SSM-65K5-01 User Manual Download Page 6

5


Panel Control Keys

1

Up

Right

Left

Down

2

After turn on the TV, Press

 OK

 Rocker:

Move rocker

 Up/Down

In non-OSD menu operation, long press 

OK 

rocker 2 seconds to 

display the function menu 

which includes 9 sorts. During the menu 
operation, press 

OK 

rocker to 

confirm the 

operation and the function is the same as [

OK

key on the remote control.


. The appearance varies depending on the model, 

and the actual product shall prevail.

Power on or standby with 

OK

 rocker

:

Remark

. In smart mode, please operate with the remote 

control.

. In power on state, long press 

OK

 rocker 2 

seconds to display the function menu, then 
move rocker Left/Right to select      and press 

OK

 rocker to switch to standby mode.

2. Rocker button combination key:

In non-OSD menu operation, move rocker


Up

/

Down 

to 

select the channel, the function is 

the same as  [

CH+

]/[

CH-

] key on the remote 

control.

In


non

-

OSD


menu


operation,


press


OK


key


to


display


input


source


and


the


function


is


the


same


as

 [

SOURCE

key


on


the


remote


control

.

. In OSD menu operation, move rocker 

Up

/

Down


to select the adjustment items, the function is 
the same as  [

]/[

] key on the remote control

.

1. Power LED indicator and remote receiving window.

. When Plugged power cord into the electrical 

socket, you can press 

OK

 rocker to turn on the 

TV.

Move rocker

 Left/Right

:

. In non-OSD menu operation, move rocker


Left

/

Right 

to decrease/increase the volume, the 

function is the same as [

VOL-

]/[

VOL+

] key on 

the remote control.

. In OSD menu operation, move rocker 

Left

/

Right


to adjust the analog value of selected item, the 
function is the same as [

t

]/[

u

] key on the 

remote control.

Summary of Contents for SSM-65K5-01

Page 1: ...manual carefully for proper usage before installation and use It is recommended to keep this manual properly for future check The pictures in this manual are only for reference LED TV Monitor SST 65K...

Page 2: ...C power cord is damaged Any liquid or foreign matters enter into the TV set If coal gas or other flammable gases leak do not unplug the power cord of the TV set or other electric appliances instead cl...

Page 3: ...time please turn off the device and unplug the power cord Do not let children climb onto the TV set Keep the small accessories away from children s reach to avoid swallowing Before cleaning the TV se...

Page 4: ...this space at least around the TV as shown in the figure Mounting and Connecting Warning Never place a television set in an unstable location A television set may fall causing serious personal injury...

Page 5: ...ector function with external HDMI DVI commutator 2 When you need to connect the device which support the ARC function please select the HDMI 1 interface ARC function is optional and please refer to th...

Page 6: ...de 2 Rocker button combination key In non OSD menu operation move rocker Up Down to select the channel the function is the same as CH CH key on the remote control In non OSD menu operation press OK ke...

Page 7: ...he volume Return to previous page Exit the current interface Change program channel Show the information of the TV program Select subtitle language Select audio language Turn on off the associated aud...

Page 8: ...the power supply is stable Signal source selection In display showing interface you can select country where you are by pressing p q t u key then press OK key to confirm The machine starts automatic s...

Page 9: ...o confirm or select NO and press OK key to cancel Auto Tuning menu when the TV display the submenu Press MENU key and Select Channel DTV Manual Tuning then Press OK key to enter DTV Manual Tuning menu...

Page 10: ...ng the left mouse key has the same effect as pressing OK key on the remote control 9 Instructions for Intelligent Platform Operation the TV provided time will be used by choosing Use TV provided time...

Page 11: ...een may be still or certain functions may be invalid due to the compatibility and stability of the USB device in this case 3 Do not remove the USB device while playing or else the system or device may...

Page 12: ...vice Network PPPoE and press OK key 2 Input the user name acquired from the network operator 3 Input the password acquired from the network operator All contents and services obtained from this TV set...

Page 13: ...ouble images occur on the TV screen 1 Use high oriented antenna The remote control distance is short or out of control The TV has no accompanying sound Check if the power line is connected 2 The compu...

Page 14: ...lution Refresh rate Mode HDMI display mode Video mode Technical Specifications Master unit 640 480 800 600 1024 768 1280 1024 1600 900 1920 1080 VGA 1 2 3 4 5 6 7 8 60Hz 60Hz 60Hz 60Hz 60Hz 60Hz 30Hz...

Page 15: ...rews are found in the screw hole for wall mount behind the TV set before installing the wall mount the screws shall be removed and put in place for later use Please buy the wall screws according to th...

Reviews: