background image

Design and specifications are subject to change without notice.

Time Shift Function

With the 

Time Shift 

Function you 

can pause a program while it is 
broadcasted and continue to watch 
it again at your convenience. The 
maximum time shift depends on 
the USB-memory or hard drive 
size.

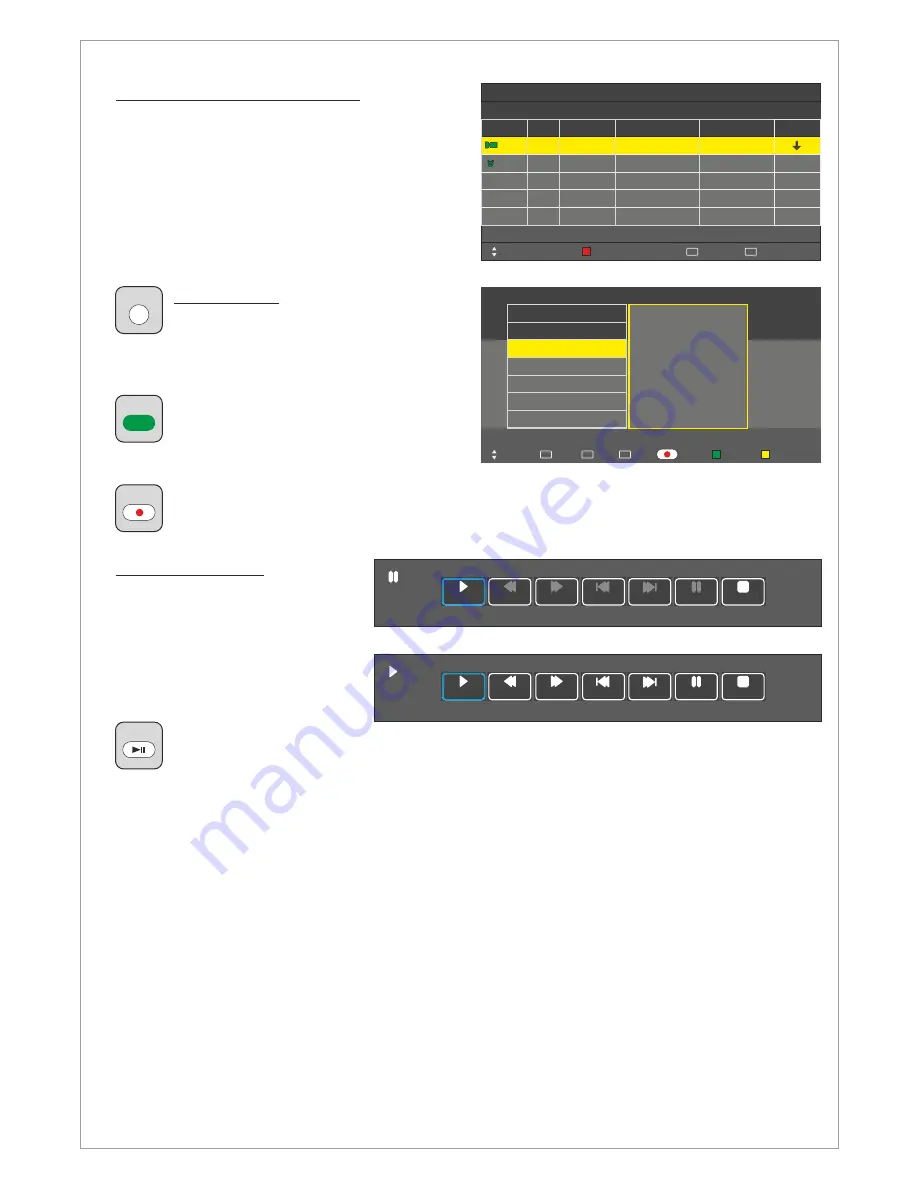
To start the Time Shift 
while watching a program press the PLAY/PAUSE button to start the time shift, the LCD will 
start recording the program and a menu indicating that is displayed. To continue watching 

the program press PLAY/PAUSE again and the LCD will continue to play the program from 

where it was paused and a menu will be displayed where you can control differenct functions such 
as pause, fast forward and stop etc.

Menu > Channel > Schedule List

In the 

Schedule List Menu

 you can review the 

scheduled recordings and reminders

A reminder can be scheduled in the 

EPG Menu

Press the RED button to delete a recording or a 
reminder

Mode

Once

Time

18:00

Delete

Move

Date

Mon 12 Dec

Programme Title

Channel Name

BBC

Back

MENU

Exit

EXIT

Schedule List

Result

60 Minutes

15:30 12th Dec

Once

13:00

Mon 13 Dec

Tv5

Idol

EPG Function

The 

EPG

 (Electronic Program Guide) 

function displays the programs 

information. In this menu you can 

schedule a recording or a reminder.

Press the GREEN button to schedule a 
reminder. The LCD will switch 
automatically to the scheduled program 

when the reminder is due.

Press the RECORD button to schedule a recording. The LCD will switch automatically to 
the scheduled program and record it when the recording is due.

12 Dec 18:00

100 TV1    News

Index

INDEX

Move

Schedule

Remind

Quit

MENU

Select

OK

Programme Guide

Time

101 TV2    Sport

102 TV3    Movie

103 TV4    TV-serie

104 TV5    Entertainment

Information about the
current program

Record

EPG

GREEN

SIZE

Prev.

Next

Stop

FB

Play

FF

Pause

Shift Time/Max Shift Time: [01:51:40/00:01:50]

Prev.

Next

Stop

FB

Play

FF

Pause

Shift Time/Max Shift Time: [01:51:40/00:01:50]

S

MIX

14

Summary of Contents for SG-xxT20

Page 1: ...User s Guide SG xxT20 X20 SG xx www swedx com Design and specifications are subject to change without notice ...

Page 2: ...ilt Wall mount Retractable Wooden Wall mount SWEDX shelves SWEDX Soundbar SWEDX Matrix Screens SWEDX offers a wide range of accessories with professional design and functionality for LCD LCD TVs Design and specifications are subject to change without notice ...

Page 3: ...nd Service 21 21 22 INDEX Page Introduction 4 Basic operation 5 Contents 6 7 Menu OPTION Menu Channel Menu Channel Recorded List Menu Channel Recorded Mode Menu Channel Schedule List EPG Function Time Shift Function Menu Picture Control buttons 6 Remote control buttons Mai Operations 8 Volume Control 8 OSD Menu Structure 8 OSD Menu Operation 8 9 9 Menu Channel DVB T Auto Scan 9 Menu Channel DTV Ma...

Page 4: ... the guidance of professional staff When used or exhibit please do not place the TV horizontally or vertically on the ground This device complies with Part 15 of the FCC Rules Operation is subject to the following two conditions 1 this device may not cause harmful interference 2 this device must accept any interference received including interference that may cause undesired operation This equipme...

Page 5: ...ong periods of time Use AC 100 240V 50 60 Hz power outlet for the TV power supply lf the screen of TV is not on please press the power button on the remote control or on the TV lf you want to shut off the TV temporary please press the power button on the remote control or on the TV lf you want to shut off the TV completely please switch off the power switch ON OFF In TV AV state the TV will enter ...

Page 6: ...annels input 11 SAT DVB S S2DVB S S2 Satellite channels input 12 Sp Out Speakers output 13 Power Power Input 110 240 V 50 60Hz 14 On Off Main On Off Switch 5 8 AV 9 1 ON OFF Power switch ON OFF 2 CH Zap the channels Navigate the OSD menu 3 Vol Decrease and increase the audio volume Navigate the OSD menu Adjust values in the OSD 4 Select Menu Activate the OSD menu Select in the OSD menu or Sources ...

Page 7: ...n the channel list is displayed it scrolls up to previous page in the list Navigation adjust button RIGHT Shortcut to Scart 43 Display Recorded List and Hold Teletext 44 Instant Recording and Teletext size selection 45 Next Title and Reveal Teletext 46 Previous Title and Display time in Teletext 47 Fast text topic selection in Teletext Blue 48 Fast text topic selection in Teletext Yellow 49 Alter ...

Page 8: ...ub Menu Each menu item has its own sub menu items to set Sub Menu items A If there is no value to adjust it means there is a sub menu which you can access by pressing Enter and modify the menu values Select sub menu item with buttons on the remote control and press button to enter the submenu or change the value buttons Enter B If there is no part the item has adjustable values Use the buttons to ...

Page 9: ...ned parameters matching your country Restore Settings This function will restore the TV to the original settings In this you can choose the setup settings for your TV OSD Language Choose the OSD language Audio Languages 1st Choose the first preferred audio language for digital channels Subtitle Languages 1st OSD Duration OPTION Move Menu MENU OK OK Exit EXIT OSD Language Audio Languages 1st Audio ...

Page 10: ...ning Frequency Symbol ks s QAM Type Bad Select Exit EXIT Move Normal Good 10 ATV Manual Tuning System BG Current CH 4 Search Fine Tune Save Exit EXIT Move Storage To X Frequency 100 00 Menu Channel ATV Manual Tuning Choose ATV Manual Tuning to start searching for TV Channels analog manually Press Menu Choose Channel Menu Press Enter or Move down with the down arrow Choose ATV Manual Tuning Choose ...

Page 11: ...ite HOTBIRD 6 7 ATRA 1H ASTRA 2A SIRIUS 5 NILESAT 101 EUTELSAT W3A EUTELST W1 BADR 2 3 4 TransPonder 001 10723 H 29900 001 10750 H 27500 001 10775 H 27500 001 10830 V 28000 001 10892 H 30000 001 10930 H 15000 001 11747 V 29900 001 12015 V 27500 LNB Type LNB Power 22 KHz Toneburst DISEqC1 0 DISEqC1 1 Motor HOTBIRD 6 7A 8 09750 10600 On Auto None None None None Add Move Select OK Exit EXIT Delete Ed...

Page 12: ...nformation Menu to display detailed information about the Common Interface Module you have inserted in the CI slot To watch paid channels the CI or CI CARD must be inserted If you don t insert the CI or CI CARD some channels will display the message Scrambled Signal Menu Channel PVR File System Use the PVR File System Menu to prepare your LCD to record DVB T programs and use the Time Shift functio...

Page 13: ...B Disk It provides information if the disk is status Format Choose to format the disk Two formatting standards are available FAT32 and Hi Speed FS You can also choose the PVR File System Size you want to format After formatting the LCD will report the estimated recording time for the formatted disk both for Standard Definition and High Definition recording and let you choose the Time Shift Size se...

Page 14: ...nu Press the RED button to delete a recording or a reminder Mode Once Time 18 00 Delete Move Date Mon 12 Dec Programme Title Channel Name BBC Back MENU Exit EXIT Schedule List Result 60 Minutes 15 30 12th Dec Once 13 00 Mon 13 Dec Tv5 Idol EPG Function The EPG Electronic Program Guide function displays the programs information In this menu you can schedule a recording or a reminder Press the GREEN...

Page 15: ...the screen Menu Picture Screen only in PC When the TV is in PC Mode additional settings are available for PC Setup Horizontal Pos Adjust the PC s screen positioning horizontally Vertical Pos Adjust the PC s screen positioning vertically Size Adjust the screen sizeclock Phae Adjust the signal phase Menu Sound Use the Sound menu to adjust the sound settings to meet your requirements Menu Sound Sound...

Page 16: ...r T20 X20 Menu Time Use the Time menu to set the TV time and adjust some other settings related to time settings Menu Time Clock Adjust the time Menu Time Off Time Set a certain time to turn off the TV automatically The available time intervals are Once Everyday Mon Fri Mon Sat Mon Sun and Sunday Menu Time On Time Set a certain time to turn On the TV automatically The available time intervals are ...

Page 17: ...ostions Navigation Key to navigate in the diffrent postion of the menu and press enter for activating the function 16 Stop 17 Play Pause 18 Fast forward 19 Fast Backward 43 Record list 44 Record 45 Next 46 Previous 49 Repeat The AUDIO button will alter audio track if several audio tracks are available in the played file The SUB T button will alter the subtitles or turn it off if several subtitles ...

Page 18: ...mal screen press it again MIX Press to activate teletext mode after selecting the channel providing the teletext service Press it twice to overlap the teletext with the current broadcasting screen HOLD Used to hold the display on a given page if the selected page is linked with several secondary pages which follow on automatically To resume press it again CANCEL Used to display the broadcast when ...

Page 19: ...semble the TV base Wall mount assembly with the TV SWEDX offers several wall mount devices for the camo TV which can be purchased from your dealer or www swedx com To assemble the wall mount with the TV review the illustrations to the right Use the screws included in the wall mount box Notice Make sure to avoid any damages to the LCD panel when you assemble the wall mount Lock screw 19 Screws Conn...

Page 20: ...indoor aerial Replace the remote control batteries Clean the upper edge of the remote control transmission window Check the battery terminals Turn off the TV and unplug the AC cable from the wall socket and then plug the AC cable and turn on the TV Check that the signal cable is firmly connected to the source input Check that the source is turned on Check the maximum resolution and the frequency o...

Page 21: ...eterioration or malfunction resulting from A Accident misuse neglect fire water lightning or other acts of nature unauthorized product modification or failure to follow instructions supplied with the product B Repair or attempted repair by anyone not authorized by SWEDX C Any damage of the product due to shipment D Removal or installation of the product E Causes external to the product such as ele...

Page 22: ...ams are subject to change without prior notice Limitation of liability If your SWEDX product fails to work as warranted above your sole and exclusive remedy shall be repaired or replaced SWEDX s maximum liability under this limited warranty is expressly limited to the lesser of the price you have paid for the product or the cost of repairing or replacement of any hardware components that malfuncti...

Page 23: ...Design and specifications are subject to change without notice 19 www swedx com SV88T8 SWEDX TV Table ...

Reviews: