


13
12
User Manual
User Manual
Commissioning
Starting the Engine
(For more detail information follow engine manual)
Mowing Height Adjusting
Machine Work Termination
Drive - Mower is Controlled by Three Levers
1. Before starting the engine for the very fi rst time, pour oil, which is included in the package (oil SAE 30 - can No. 1),
into the yellow plug hole (front and rear holes are identical)
16
+
18
(A or B). The can contains 16.9 fl oz of oil. Pour
the oil slowly into the engine oil fi ll. Insert the dipstick but do not screw in. Oil level should be at the FULL mark on
the dipstick.
2. Pour unleaded gasoline with octane rating 87 or higher and with low-ethanol blends of less than 10% into the fuel
tank through the fi ller
3
(B). The fuel tank has a capacity of 0.5 gal.
3. Open the fuel supply to the engine. Turn the lever
20
(E) downwards to the position „on“.
4. Start – turn the button
19
(H) on the engine to the “I” position. Turn the choke lever
21
(A) to the forward position
(see Fig. 3).
5. Turn the throttle lever
5
to the “START” position (see Fig. 3) or in the fast position
(highest RPM) for cold
start. Grasp the starter cord
24
(E) and yank it to start the engine.
6. If the engine fails to start after three attempts, check adjustments according to the above points.
7. If the engine starts, turn the choke lever
21
(A) to the intermediate position. After approx. 30 seconds, turn the
choke lever
21
(A) backwards to the run position
.
8. Stopping the engine – set the button
19
(H) to the stop “0” position. The engine shall stop running.
• The throttle lever
5
controls the engine revolutions and primarily serves for speed control. Use it to control
the machine speed - both the drive speed and the mowing blades revolutions. Higher throttle setting = higher
number of engine revolutions = faster drive and higher number of reel revolutions. Lower throttle setting
= lower number of engine revolutions = slower drive and lower number of reel revolutions. Number of cuts
per meter and cut quality remain unchanged. However, it is not recommended to use the minimum engine
revolutions that could cause an excessive engine load, in particular during verticutating or scarifying.
• The left lever
8
controls the sensitive clutch of the machine drive and secondarily serves for speed control, e.g.
during a change in travel direction. Push it to speed up the machine and vice versa. Slowly and softly push the left
lever of drive to activate the clutch and put the machine in motion.
• The right lever controls the clutch of the mowing blades.
• The safety lock
6
of the reel prevents the mowing blades from being started unintentionally. When locked, the
right lever
9
cannot be operated.
Mowing height can be adjusted with the control lever on the left side of the machine. To change the height adjustment,
proceed as follows:
1. The mowing height is locked with the screw
24
in the right-hand side plate; the screw moves along a groove. Before
changing the mowing height, slightly loosen the locking screw.
2. Loosen the quick-release bolt
13
.
3. Adjust the mowing height by moving the lever
12
forwards to decrease and rearwards to increase the mowing
height.
4. After the required height has been achieved, retighten the quick-acting bolt as well as the locking screw. This shall
ensure the constant mowing height over the total machine width.
Next to the control lever for mowing height adjustment, there is an orientation scale with an indicator
14
. The scale
shows the mowing height in inches.
Use the throttle lever
5
to decrease the engine revolutions to minimum (START position) and turn the button
19
(H)
on the engine to the “0” position.
The engine running-in process is completed after
5 hours of work. It is necessary to change the
engine oil. Follow the instructions on page 15.
For the detailed engine maintenance description,
see the Briggs&Stratton engine manual, which is
part of the package.
Commissioning
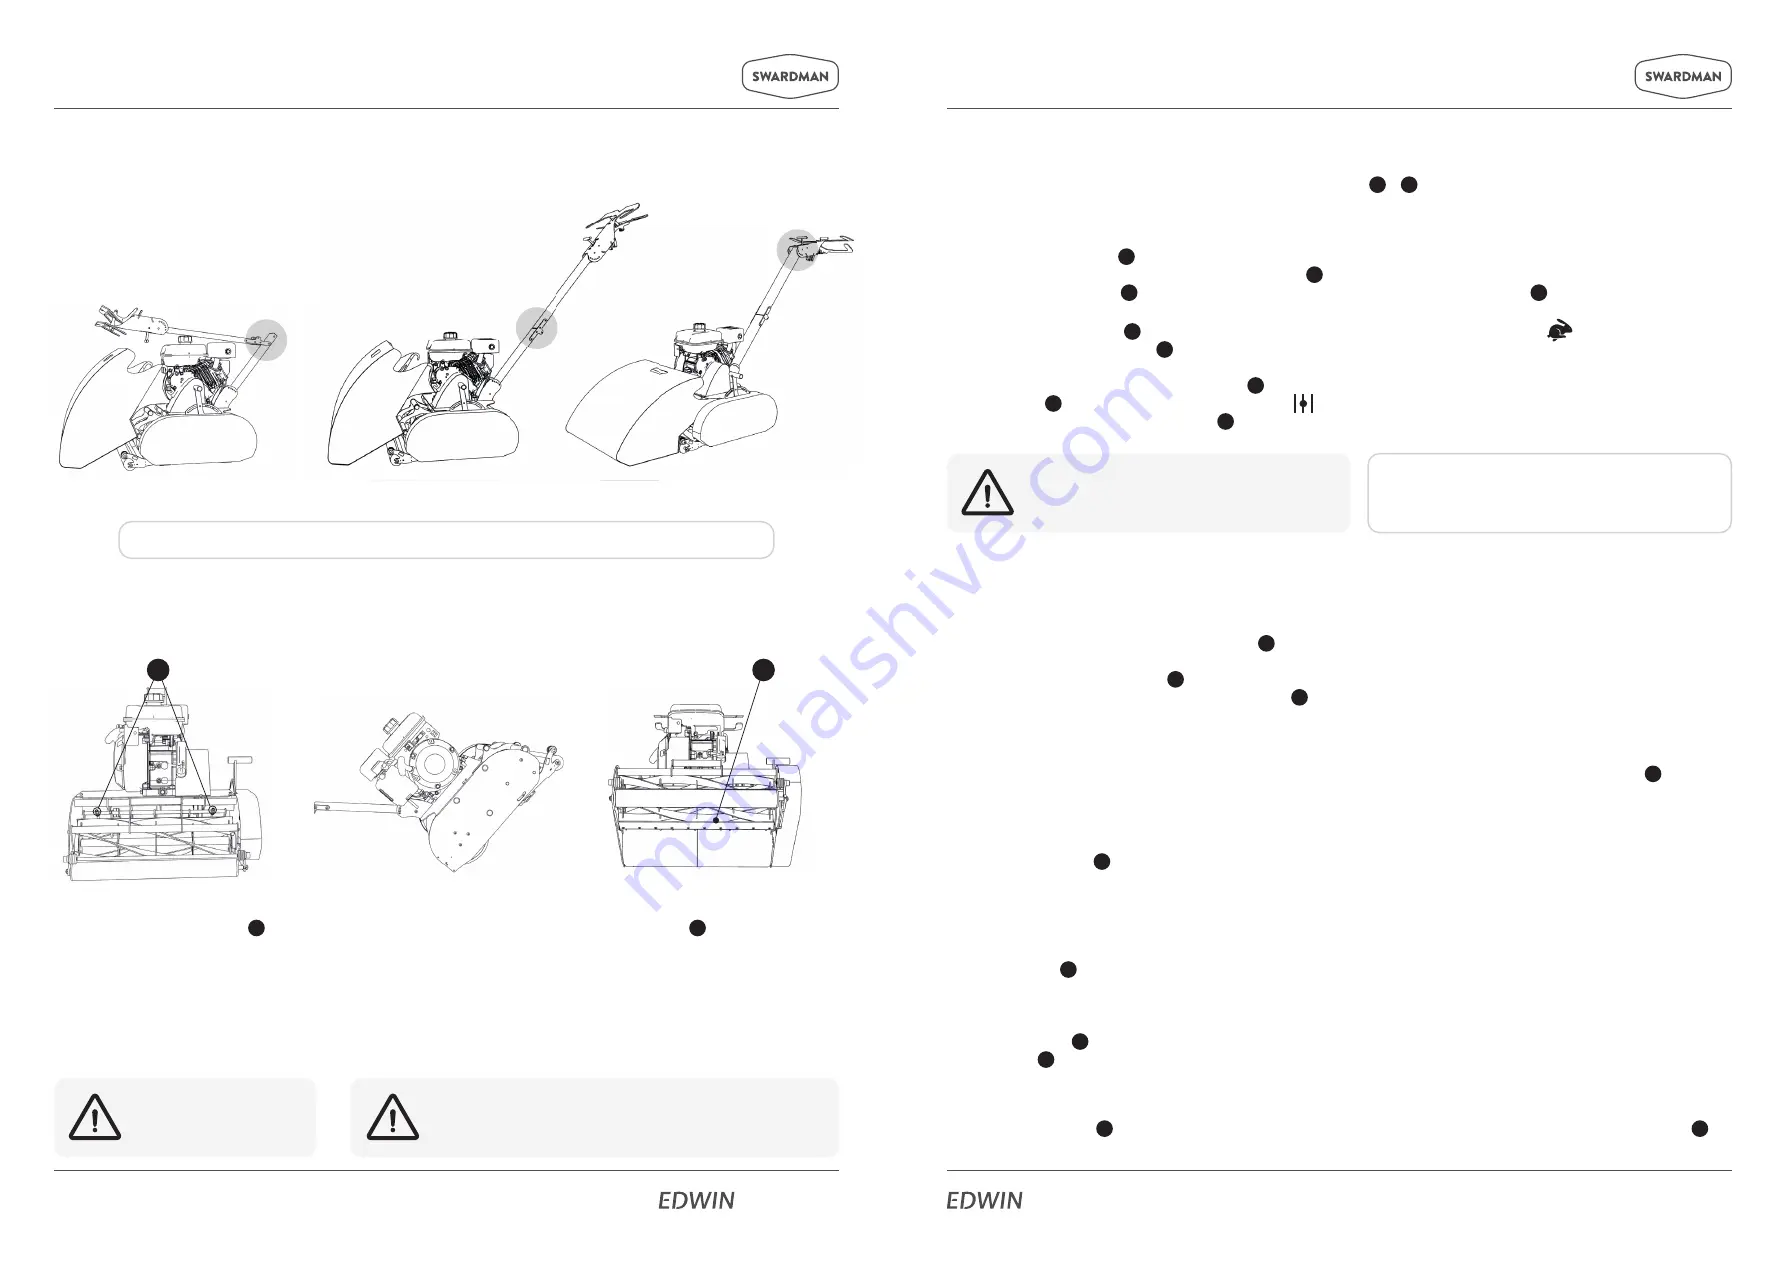
Assembling the Lawn Mower
Checking the Reel Adjustment
Take the mower out of the box. The best way is to carefully cut the box from its front face and push the mower out.
Do not ever use the handle on the mowing cartridge for lifting the mower or its transport.
Regularly check adjustment of the reel against the bed-knife. When adjusting, use the 8 mm wrench.
Mower with 45 cm (18in) cutting width has 2 adjusting screws on the reel and 55 cm (22in) cutting width has
3 adjusting screws.
1. Straighten the handlebars
1. If the reel does not provide
smooth cut mowing, tighten
up the adjusting screws
34
clockwise on a corresponding
reel side. Proceed carefully
by tightening them by
approx. 10°. If required,
repeat the procedure.
Note: There are 3 adjusting
screws on the 22“ model.
2. Close the petrol supply.
3. Tilt the machine onto
the handlebars for only
necessary time period. High
possibility of oil spillage!
4. Insert a piece of double-
folded paper ahead of the
bed-knife
35
and carefully
turn the reel with your other
hand.
5. If the paper has been cut by all
the blades in whole width, the
cylinder is adjusted. A light
touch of reel blades with the
bedknife is normal.
2. Secure with screws
3. Adjust position and angle of
the handlebar body
Install the grass box as shown in Figure 3. The grass box is an integral part of the machine.
Adjust only with
protective gloves on and
the machine stopped.
An excessive pressure between the reel and the bed-knife
will result in an excessive wear of blades as well as the
driving belt. When properly adjusted, the reel should turn
smoothly.
34
35


