background image

4

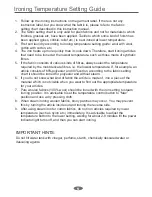
Fabric Setting Chart

Temperature 

Setting

Fabric

SYNTHETIC

WOOL SILK

COTTON

LINEN

Max

Ironing 

Instruction

Steam 

Selection

Temperature control dial

Synthetics, 

Silk, Nylon, 

Arcrylic, 

Acetate

Wool, 

Polyester

Rayon 

cotton, Linen

Rayon cotton, 

Linen

Dry Iron on 

the opposite 

side of the

fabric

Use a press 

cloth and

Steam Iron on 

the

opposite side of 

the fabric

Iron while 

fabric is still 

damp

Steam 

Ironing

Summary of Contents for SI9030N

Page 1: ...Instruction Manual steam generator Model SI9030N ...

Page 2: ...ontal surface or ironing board and then place the iron on the power base 12 Place the iron on the power base Do not allow power cord or supply hose to touch hot surface 13 Burns can occur from touching hot metal parts hot water or steam Use caution when using the appliance If the iron is placed onto the iron rest plate during in use the iron rest plate may become a hot surface Do not touch the iro...

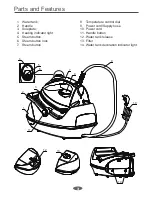
Page 3: ...ating indicator light 5 Steam button 6 Steam button lock 7 Steam button 8 Temperature control dial 9 Power cord Supply hose 10 Power cord 11 Handle button 12 Water tank release 13 Filter 14 Water tank decoration indicator light 4 1 2 3 5 12 11 13 14 6 7 8 9 10 ...

Page 4: ...truction Steam Selection Temperature control dial Synthetics Silk Nylon Arcrylic Acetate Wool Polyester Rayon cotton Linen Rayon cotton Linen Dry Iron on the opposite side of the fabric Use a press cloth and Steam Iron on the opposite side of the fabric Iron while fabric is still damp Steam Ironing ...

Page 5: ...e consists of 60 polyester and 40 cotton according to the fabric setting chart it should be ironed for polyester and without steam 6 If you do not know what kind of fabric the article is made of iron a piece of the material which is not visible when you wear to find out the appropriate temperature for your articles 7 Pure woolen fabrics 100 wool should be ironed with the iron setting to steam iron...

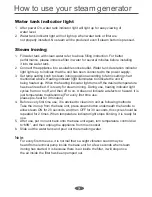
Page 6: ...se Fig 2 2 Take the filter upwards out from the water fill hole Fig 3 3 Fill the water tank up to or below the MAX fill line with clean tap water Fig 4 4 Replace filter back into water filling hole 5 Replace the water tank into the base unit again It will be locked in place with the base unit until a click sound is heard Water tank indicator light will light up to indicate that water tank and filt...

Page 7: ...ready for steam ironing During use heating indicator light cycles from on to off and then off to on It does not indicate a defects or hazard it is just temperature maintenance For every first time use please pre heat for 3 minutes 4 Before every first time use it is advised to clean iron unit as following methods Take the iron up from the base unit press steam button underneath the handle to allow...

Page 8: ...3 minutes 3 After use put iron unit back onto the base unit again turn temperature control dial to MIN 4 Unplug the appliance from main socket Note When changing your Temp setting from higher setting to lower it is proposed that not to start ironing immediately since it may cause burns to your fabrics Please wait until heating indicator light turns on then turn off 8 Dry ironing How to use your st...

Page 9: ...put the iron onto power base Lift handle up Fig 8 There will be a click sound to indicate the handle has been locked in place and you can carry the appliance by the handle The pump has an in built overheat protection circuit When water in water tank has been used up the pump will be hot If temperature of pump exceeds its Max limit overheat protection will automatically activate to protect pump bei...

Page 10: ...on your local water hardness It is advised that the filter is replaced as soon as possible Alternatively use bottled distilled water 1 Disconnect the appliance from the power supply and allow the appliance to cool down for 60 minutes at least 2 After use slide out the water tank and pour out all the remaining water Fig 9 3 The iron should be placed on the iron rest plate and then stored Slide wate...

Page 11: ...Install water tank till a click sound produced Temperature setting knob is set at low temperature position Set temperature setting knob to suitable position refer to Fabric setting chart The set temperature has not been reached or is too low Allow sufficient time for iron to preheat or set higher temperature Solution 1 Unplug the appliance from the main supply and let the iron completely cool down...

Reviews: