Swann QH4 Getting To Know Manual Download Page 3

73

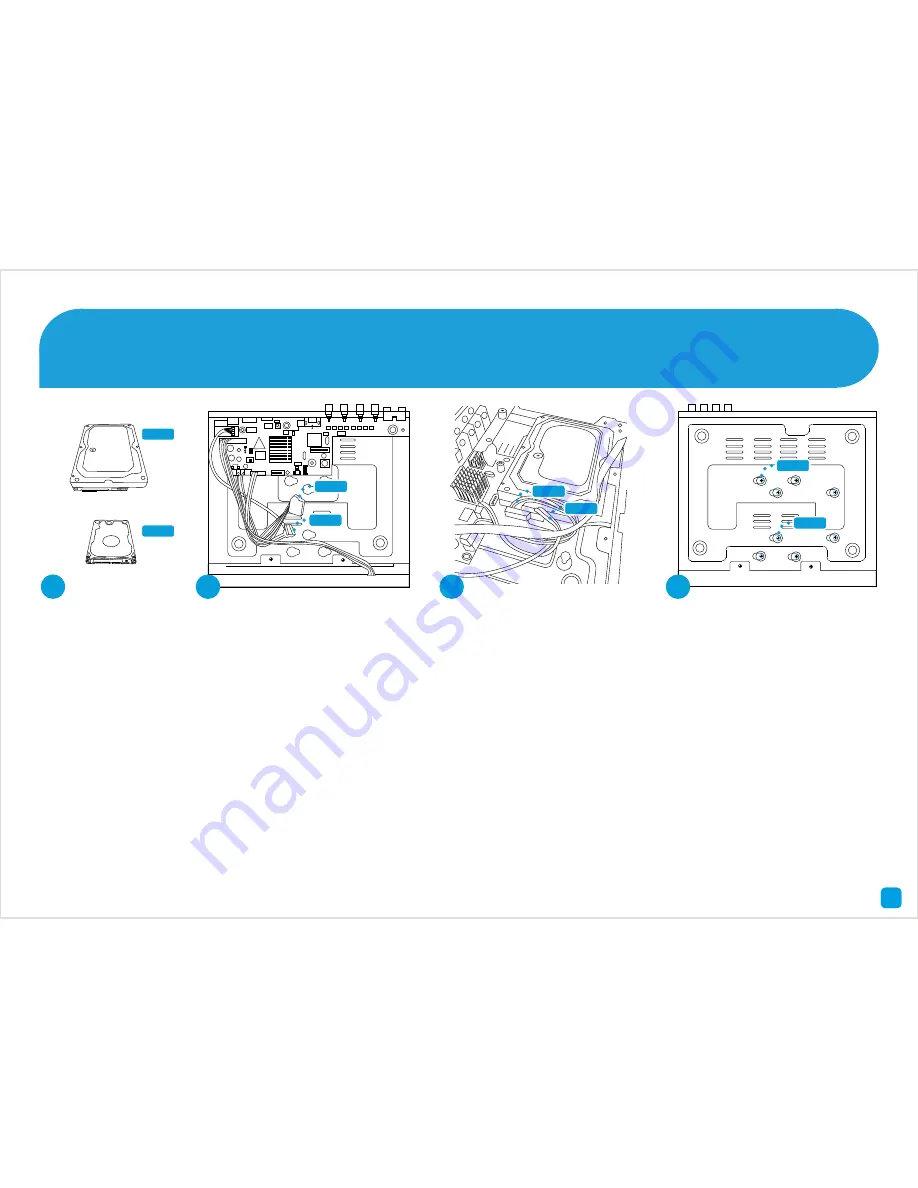
Installing a Hard Drive

1

1.

 The DVR requires either a 3.5” SATA hard drive or a 

2.5” SATA hard drive to record video to. Most brands 

such as Western Digital and Seagate are compatible. We 

recommend an “AV (Audio/Video)” rated hard drive.
Use a Phillips head screwdriver to remove the two screws 

on the left and right-hand sides as well as the screw at 

the rear of the DVR. When finished, gently remove the lid.

2.

 There are two cables to connect to your hard drive. One 

cable is for data (SATA) and the other is for power. There 

are mounting holes for a 3.5” hard drive and a 2.5” hard 

drive. Try minimising any contact with the motherboard.

3.

 Place the hard drive as illustrated and connect the data 

and power cable to the relevant connections on the drive. 

Ensure they are firmly connected and that all cables are 

resting on top of the hard drive and not underneath.

4.

 While holding the hard drive, gently turn over the DVR 

and secure the drive in place using the supplied mounting 

screws. You may have to move the hard drive to align the 

screw holes on the drive with the mounts on the case. Use 

a Phillips head screwdriver to fasten each screw. 
When finished, place the lid back onto the DVR and fasten 

the remaining screws.

2

SATA


Power


3

SATA


Power

3.5”


2.5”

4

3.5”


2.5”


1

Summary of Contents for QH4

Page 1: ...maged during shipping On the other side is a detailed connection map which illustrates the various connections on the DVR 1 Audio In 2 Video In 3 Audio Out 4 VGA 5 HDMI 6 LAN 7 USB 8 PTZ 9 Power Getting to know your DVR AUDIO OUT VGA HDMI LAN USB B A PTZ DC 12V IN VIDEO IN AUDIO IN 1 3 2 4 1 3 5 7 2 4 6 8 1 2 3 4 5 6 7 8 9 10 IR Receiver 11 HDD LED 12 Power LED IR PWR H 264 8CH Digital Video Recor...

Page 2: ...nectthistoyourdigitalTVwithaHDMIinput HDMI cable included 6 LAN Connect this to your home network so your DVR can connect to the Internet 7 USB Connect the mouse here Also able to connect a flash drive to back up your video recordings 8 PTZ For connecting a RS 485 device such as a PTZ camera 9 Power This is where you connect the power adapter 10 IR Receiver Receives a signal from a remote control ...

Page 3: ... mounting holes for a 3 5 hard drive and a 2 5 hard drive Try minimising any contact with the motherboard 3 Place the hard drive as illustrated and connect the data and power cable to the relevant connections on the drive Ensure they are firmly connected and that all cables are resting on top of the hard drive and not underneath 4 While holding the hard drive gently turn over the DVR and secure th...

Page 4: ...nection to lock it in place Connect the other end of the power splitter to the power adapter then connect the power adapter to a spare wall socket Connect your Cameras 2 4 Thenconnecttheprovided powersplittertotheother end of the video power cable AUDIO OUT VGA HDMI LAN USB B A PTZ DC 12V IN VIDEO IN AUDIO IN 1 3 2 4 1 3 5 7 2 4 6 8 DC Power Video Output Power Splitter Power Adapter Video Power Ca...

Page 5: ...this as this allows you to access the DVR from your smartphone or tablet and to send you email notifications It also allows the DVR to connect to the Internet to update its internal clock so the time it shows on the video is always accurate Connect the DVR to your Home Network 3 5 AUDIO OUT VGA HDMI LAN USB B A PTZ DC 12V IN VIDEO IN AUDIO IN 1 3 2 4 1 3 5 7 2 4 6 8 USB Internet 4 3 2 ...

Page 6: ...drive not supplied to the other USB port to back up your video recordings and to perform a firmware update when available Connect the Mouse 4 6 AUDIO OUT VGA HDMI LAN USB B A PTZ DC 12V IN VIDEO IN AUDIO IN 1 3 2 4 1 3 5 7 2 4 6 8 Please note Bluetooth and wireless mice and trackpad devices are not supported ...

Page 7: ...ct the other end to a spare HDMI input on your HDTV Make sure your HDTV input matches the physical connection used to connect the DVR Connect the DVR to your HDTV 5 7 AUDIO OUT VGA HDMI LAN USB B A PTZ DC 12V IN VIDEO IN AUDIO IN 1 3 2 4 1 3 5 7 2 4 6 8 HDMI IN 2 HDMI IN 1 ...

Page 8: ...nnect a VGA cable not supplied to the VGA output on the DVR and connect the other end to the VGA input on your Monitor Connect the DVR to your Monitor optional 6 8 AUDIO OUT VGA HDMI LAN USB B A PTZ DC 12V IN VIDEO IN AUDIO IN 1 3 2 4 1 3 5 7 2 4 6 8 ...

Page 9: ...s for the DVR and not the cameras Connect the power adapter to a spare wall socket All the connections have now been completed You re now ready to run through The Setup Wizard quick start guide to configure the DVR Connect the Power Adapter 7 9 AUDIO OUT VGA HDMI LAN USB B A PTZ DC 12V IN VIDEO IN AUDIO IN 1 3 2 4 1 3 5 7 2 4 6 8 ...

Reviews: