

1
2
3
4
Congratulations on your purchase of this HD
Zoom Security Camera.
•
Use the On-Screen Display (OSD) controller
& built-in software to customize the camera
settings including color, brightness & wide
dynamic range for the best video quality
every time.
•
This camera can be used in combination
with other analog surveillance technology
including AHD, TVI, CVI from Swann &
other brands. It’s the perfect addition if you
already have a recording solution (DVR) &
need extra cameras.
•
The camera joystick is used to set the
signal modes for the camera.
•
The zoom function is controlled by your
DVR’s PTZ controls. Please search the
Support Information at support.swann.
com (search for ‘1080ZLB’) for instructions
on controlling this feature.
Important note:
All jurisdictions have specific
laws and regulations relating to the use of
cameras. Before using any camera for any
purpose, it is the buyer’s responsibility to be
aware of all applicable laws and regulations
that prohibit or limit the use of cameras and to
comply with the applicable laws and regulations.
Warning:
Modifications not approved by the party
responsible for compliance could void user’s
authority to operate the equipment.
Important safety instructions
•
Make sure product is fixed correctly and
stable if fastened in place.
•
Do not operate if wires and terminals are
exposed.
Introduction
Choosing a location for your Camera
This camera has an on-screen configuration menu
to configure various image settings as they apply
to the camera and the scene that you wish to view.
•
You should endeavor to set the camera up
close to the area you wish to view before you
install the camera so that you have access to
the joystick and can adjust the image settings.
•
What you want to monitor and where you’ll
get the best view of it.
•
How you’re going to connect the camera to
your monitoring system; you should plan the
route from the recorder to each camera.
•
How to keep the camera out of harm’s way.
It’s recommended to mount your cameras in
an elevated position to prevent easy access.
•
Place your camera as close to the area of
interest as practicable. The best position
is from about 3-4m (9-13ft) above looking
slightly down.
•
Although the sky looks nice when you look at
the live view from your camera, it is an unlikely
direction for an offender to approach from.
Keep the camera pointed down away from the
sky or ceiling. This will also minimize glare
from lighting affecting the image.
•
Think about the most likely way a potential
offender may approach your home and
position your cameras to give you the best
coverage of these areas.
•
The camera’s casing is resistant to water,
different weather conditions and tampering.
However, the cable and connectors are
vulnerable and require protection.
Positioning the cables
•
When running the cable, try to avoid bending
it at sharp angles
•
Avoid positioning the cable near live electrical
wiring as electrical current generates a
magnetic field which can interfere with the
signal from your camera.
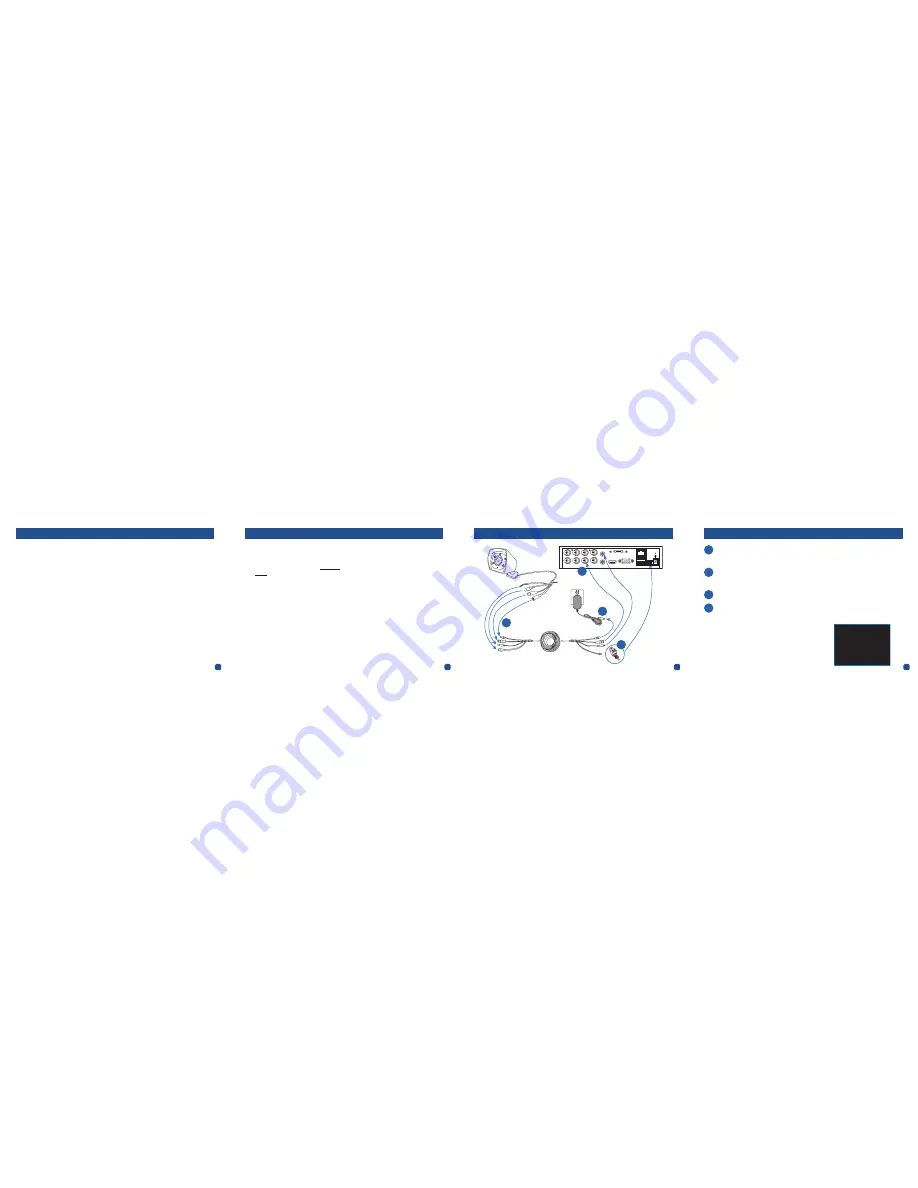
PTZ
7
5
3
1
8
6
4
2
eSATA
HDMI
LAN & USB
B A
DC 12V
IN
VGA
VIDEO IN
AUDIO OUT
AUDIO IN
Connection Guide
Connection Guide
Configuring PTZ settings
The DVR’s default PTZ settings should allow you to use the
camera without any additional configuration. But to be sure,
check that the settings in your DVR’s Device PTZ menu match
the ones shown here.
For more information on configuring PTZ settings, consult your
DVR user manual.
Camera No.:
Channel1
Baud Rate: 9600
Data Bit: 8
Stop Bit:
1
Parity:
None
Flow Ctrl:
None
PTZ Protocol:
Pelco-D
Address(0-255):
1
OSD Joystick
1
2
3
4
Connect the camera’s RS485, Video, Audio and Power connectors to the Video, Audio & Power
cable. Make sure to twist and lock video connectors for a secure connection. Screw in the
RS485 connectors making sure that the red and black line up with the positive and negative
icons on the RS485 connection (check the tag on the camera cable).
Remove the green RS485 terminal block from the PTZ port on the DVR, and then using a
flat-head screwdriver, attach the pair of PTZ wires on the other end of the Video & Power
cable (
RED
to
+
/
A
socket,
BLACK
to
-
/
B
socket) to the RS485 terminal block. When wiring
connections are complete, plug the RS485 terminal block back into the PTZ port on the DVR.
Connect the camera to a video input on the DVR. For ease in configuring the RS485 settings,
we suggest connecting it to channel 1 initially.
Connect the camera to the power adapter. After the camera is powered on, if you do not see an
image or the image is poor, please check that you are using the correct video output signal for
your DVR. Hold for 2 seconds; Up for Analog, Left for AHD, Right for TVI and Down for CVI.
1
2
3
4


