background image

1.
2.
3.
4.
5.
6.

C510R Colour CCD Security Camera
Manual Focus Lens
Adjustable Camera Stand

)

10m (33feet) Cable

12Volt DC Power Adaptor (adaptor design varies depending on country .

Instruction Manual (this document)

Before permanently fixing your C510R in the location which you wish to observe, fix it temporarily and
connect the necessary cables and check using your Video Monitor or TV to ensure you have a clear field
of view. Check also that the camera will not be pointing directly into a strong light source (check at
different times of the day to ensure the sun will not interfere with the image) or that there are any other
obstructions. Once this is complete, adjust the camera for focus and check that you have the correct field
of view. Once you are satisfied that the image is appropriate to your requirements, fix the stand to the
location correctly using the appropriate screws, and if necessary wall anchors. After mounting the
Camera Stand in the location the camera will be used, screw the C510R to the stand and tighten firmly.
Use the mounting hole in the top of the camera if mounting the C510R under a roof, ceiling or similar
surface to make sure that the picture shows correctly on your monitor.

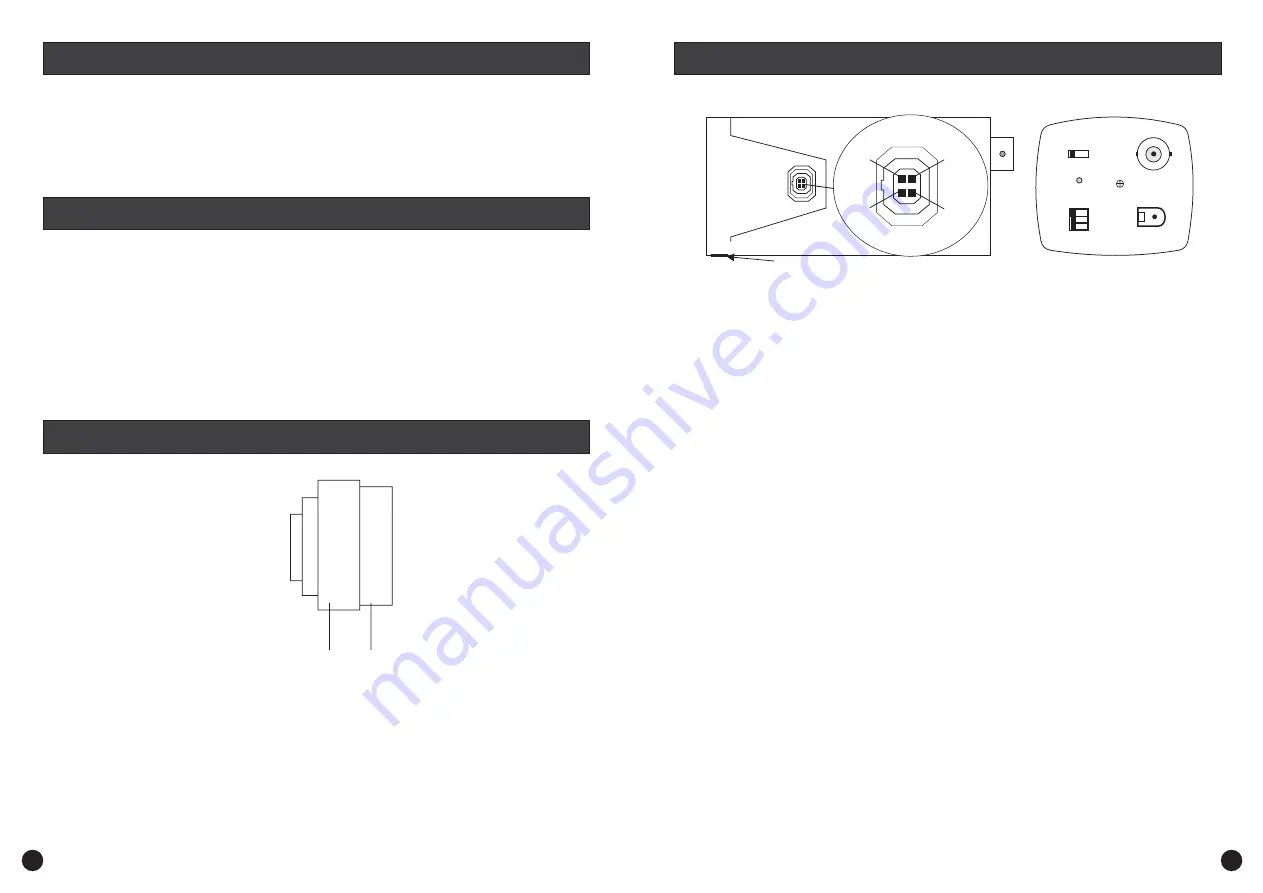
Description of connectors and controls on side of C510R

Description of controls and connectors on the back panel of the C510R camera
Lens:

PL:

Dip Switches:

-

Level:

Video Out:

2V DC IN:

Pin arrangement for Auto Iris lens socket
Pin

- Video AI

DC AI

Pin 2 - Video AI

DC AI

Pin 3 - Video AI

DC AI

Pin 4 - Video AI

DC AI

CS connector locking screw -

Video -
DC -

Power LED -

AWB ON -
AWB OFF -
EE -

AI -

BLC

Phase Adjustment -

BNC Female connector -

Power connector -

1

(+12V)

(DAMP -)

(Not Connected)

(DAMP+)

(VIDEO)

(DRIVE+)

(GROUND)

(DRIVE -)

Tighten this screw to lock the CS connector. Loosen to adjust the CS

connector to assist with focussing the lens if you cannot get a clear image using the focus ring.

Switch to this if using a Video Drive auto iris lens (ignore if using Manual Iris lens)

Switch to this if using a DC (Direct) drive auto iris lens (ignore if using Manual Iris lens)

Lights up when power to camera is on

Auto White Balance ON

Auto White Balance OFF

Electronic Exposure control (

)

Back Light Compensation On/Off (On=Auto BLC, Off=Strong BLC (very bright background))

When using a DC drive Auto Iris lens adjust this control for best image quality

Connects to BNC Male connector as fitted to supplied extension cable

Connect using supplied 12Volt Power Adaptor or extension cable

1

In EE mode, a continuously variable electronic shutter is employed to

automatically control the exposure time of the CCD image sensor according to the incoming light level.
With this mode selected, a fixed or manual iris lens can be used instead of an auto iris lens

In AI mode, the CCD shutter speed is fixed to 1/60(1/50) second. And the incoming light level is

controlled by the auto iris lens.

AWB ON

LENS

EE

BLC ON

VIDEO

DC

OFF

LEVEL

OFF
AI

PL

12V DC IN

VIDEO OUT

Rear View

Side View

1

2

3

4

CS connector locking screw

Fitting the lens:

1

Adjust the lens to suit your application:

Focus Adjustment Ring 2

Make sure the CS Connector Locking Screw is tight, then by holding the

( ) carefully screw

the lens into the CS Connector on the front of the camera body making sure you do not cross the
thread.

Turn the

( ) clockwise or anti-clockwise to focus the camera. If the Lens will

not focus, Loosen the

Lens Body

CS Connector Locking Screw and turn the CS Connector either in or out until

correct focus is obtained. Once you have adjusted the focus correctly, re-tighten the CS Connector
Locking Screw firmly, but do not over-tighten.

2

1

What’s In This Package?

C510R Control and Socket Description

Introduction

Fitting and Setting The Lens

2

3

Summary of Contents for DVR16-NET-PLUS

Page 1: ...original purchase date You must present your receipt as proof of date of purchase for warranty validation Any unit which proves defective during the stated period will be repaired without charge for parts or labour or replaced at the sole discretion of Swann The repair or replacement will be warranted for either ninety days or the remainder of the original one year warranty period whichever is lon...

Page 2: ...rom depending on country 1 x Power Cable design may vary from depending on country 18 x BNC to RCA gender changers 1 x IR Remote Control requires 2 AA batteries which are not included 1 x Software CD 1 x User Manual 1 x HDD Caddy 2 x Keys for HDD Caddy Security Stickers This Instruction Sheet If any of these items are missing please contact your retailer 1 Doorways 5 Reception areas 6 Cash registe...

Page 3: ...recorded video from the earliest oldest recorded area If the system is set to overwrite disabled it will stop recording once the HDD is full 4 Alarm Recording Alarm recording is not started by manually pushing the Record button it is automatically activated once Schedule mode is enabled Alarm recording can be activated by alarm input signal or motion if the connection of alarm input equipment is c...

Page 4: ...ide the time period the alarm recording automatically stops 5 Time Recording Time recording starts and stops recording automatically according to the pre arranged time period It is applied to a fixed timetable for example business hours time recording or outside business hours time recording with fixed start stop time To start the Time Recording function you must have a record schedule setup befor...

Page 5: ...ide the time period the alarm recording automatically stops 5 Time Recording Time recording starts and stops recording automatically according to the pre arranged time period It is applied to a fixed timetable for example business hours time recording or outside business hours time recording with fixed start stop time To start the Time Recording function you must have a record schedule setup befor...

Page 6: ...recorded video from the earliest oldest recorded area If the system is set to overwrite disabled it will stop recording once the HDD is full 4 Alarm Recording Alarm recording is not started by manually pushing the Record button it is automatically activated once Schedule mode is enabled Alarm recording can be activated by alarm input signal or motion if the connection of alarm input equipment is c...

Page 7: ...rom depending on country 1 x Power Cable design may vary from depending on country 18 x BNC to RCA gender changers 1 x IR Remote Control requires 2 AA batteries which are not included 1 x Software CD 1 x User Manual 1 x HDD Caddy 2 x Keys for HDD Caddy Security Stickers This Instruction Sheet If any of these items are missing please contact your retailer 1 Doorways 5 Reception areas 6 Cash registe...

Page 8: ...he fitting or removal of this product by a tradesman or other person or any other costs associated with its use are the responsibility of the end user This warranty applies to the original purchaser of the product only and is not transferrable to any third party Unauthorised end user or third party modifications to any component or evidence of misuse or abuse of the device will render all warranti...

Page 9: ...oosen to adjust the CS connector to assist with focussing the lens if you cannot get a clear image using the focus ring Switch to this if using a Video Drive auto iris lens ignore if using Manual Iris lens Switch to this if using a DC Direct drive auto iris lens ignore if using Manual Iris lens Lights up when power to camera is on Auto White Balance ON Auto White Balance OFF Electronic Exposure co...

Page 10: ...oosen to adjust the CS connector to assist with focussing the lens if you cannot get a clear image using the focus ring Switch to this if using a Video Drive auto iris lens ignore if using Manual Iris lens Switch to this if using a DC Direct drive auto iris lens ignore if using Manual Iris lens Lights up when power to camera is on Auto White Balance ON Auto White Balance OFF Electronic Exposure co...

Page 11: ...he fitting or removal of this product by a tradesman or other person or any other costs associated with its use are the responsibility of the end user This warranty applies to the original purchaser of the product only and is not transferrable to any third party Unauthorised end user or third party modifications to any component or evidence of misuse or abuse of the device will render all warranti...

Reviews: