

Unpack Carton
Use care when opening the box not to damage the sink.
This product is shipped to you or your retail center after
careful inspection. After purchasing the sink, carefully
unpack and inspect the product for any shipping damage that
may have occurred. If damage is found, report it immediately
to the store of purchase. After inspection and during
installation, protect the products from construction damage,
by moving them to another room or area until ready to install.
Please use the model number located on the side of the
box, or the front of this manual, when contacting us with
questions concerning the installation of this unit.
Make sure the sink is the correct size and in good condition.
Installation of damaged product will void the warranty.
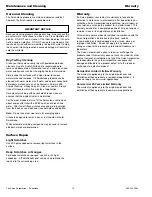
Helpful Hints
Read these instructions carefully and familiarize yourself
with the various parts of the sink.
The variety of installations possible for this sink may require
procedures other than those shown. Ensure construction is
correctly sized, plumb, and square.
Allow sufficient time for the parts in this sink to adjust to
room temperature. We do not recommend installation of
this product at temperatures below 65 degrees.
Store unused materials away from the work area to prevent
accidental damage.
Turn off the hot and cold water supply before starting
installation.
Caulking Tips
Follow the instructions on the caulking tube.
When job is complete, inspect all caulked areas for gaps
and fill as needed.
Clean up excess silicone using denatured alcohol and a
clean cloth.
Be very careful not to disturb caulk joints before they dry.
Installation Procedure
Disclaimer
The information contained in this Installation Manual is
given free of charge. It is based upon technical data which
we believe to be reliable and is intended for use, by
persons having knowledge of this technical area, at their
own discretion and risk. Swanstone assumes no
responsibility for results obtained or damage incurred from
the use of this material either in whole or in part by the
buyer.
This manual will give you basic instructions for the
installation of the product in a step-by-step sequence that
will work in most types of installations. If you have an
installation application that is not covered in this manual,
please call your local Swanstone distributor or contact the
Swan Corporation directly for additional information about
your application.
Follow all installation instructions. Failure to follow these
instructions could result in personal injuries, water damage,
or other damage to floors, pipes, walls, or other portions of
your building or home.
Note:
Read All Instructions Before Beginning
Trial Fit
It may be necessary to trim the edge of the vanity top to fit
snugly against the side wall. Install the trimmed edge against
the wall.
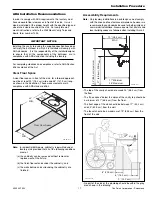
Faucet Holes
Note:
All Swanstone sinks are manufactured with one
predrilled hole. Optional locations for additional holes
are located on the underside of the sink using marks (4”
and 8”) which are cast into the sink. Follow Steps 6 and
7 for drilling additional holes to meet the requirements
of the sink faucet or other accessories.
VI-001
0”
4”
8”
The Swan Corporation – Swanstone
6
800-325-7008
Installation Procedure
Summary of Contents for Chesapeake Vanity
Page 19: ......