background image


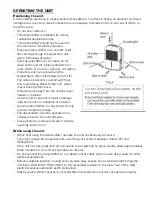
Removing the collected water

There are two ways to remove collected water.

    1. Use the bucket

•  When the bucket is full, the unit will automatically stop running, 
    and the Full indicator light will flash.
•  Slowly pull out the bucket. Grip the left and right handles 
    securely and carefully pull out straight so water does not spill. 
    Do not put the bucket on the floor because the bottom of the 
    bucket is uneven. Otherwise the bucket will fall and cause the 
    water to spill.

•  Throw away the water from the water outlet (See Fig.7) and 
    replace the bucket. The bucket must be in place and securely 
    seated for the dehumidifier to operate.

•  The machine will re-start when the bucket is restored in its 
    correct position. 

    NOTES:


•  When you remove the bucket, do not touch any parts inside of 
    the unit. Doing so may damage the product. 
•  Be sure to push the bucket gently all the way into the unit. 
    Banging the bucket against anything or failing to push it in 
    securely may cause the unit not to operate.

    2. Continuous draining

    Water can be automatically emptied into a floor drain by 
    attaching the unit with a water hose (12mm) (not included). 
•  Remove the rubber plug from the back of the unit and store it 
    in a safe location.
•  Insert the water hose into the unit from the drain outlet in the 

    back of the unit as shown in Fig.8. Attach the water hose to 
    the drain hose outlet of the unit. Make sure the connection of 

    the water hose and the drain hose outlet of the unit is tight 

    and do not let the water leak.
•  Then lead the water hose to the floor drain or a suitable 
    drainage facility. The drainage facility should be lower than the 
    drain outlet of the unit.
•  Be sure to run the water hose sloping downward and let the 
    water to flow out smoothly. Do not install the water hose as 
    shown Fig.9a and Fig.9b.


   NOTE: 

    When the continuous drain feature is not being used, remove 
    the drain hose from the outlet and attach the rubber plug 
    back to the drain outlet.

Summary of Contents for 5055322512538

Page 1: ...Helpline 01703 404703 v1 0 Dehumidifier Model SH5010N SH5010N_front_n_back_IM indd 1 24 06 2015 09 18 ...

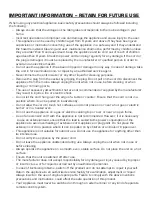
Page 2: ...d hang over the edge of a table or counter Ensure that the cord is not in a position where it can be pulled on inadvertently Do not allow the cord to touch hot surfaces and do not place on or near a hot gas or electric burner or in a heated oven Do not use the appliance on a gas or electric cooking top or over or near an open flame Use of an extension cord with this appliance is not recommended Ho...

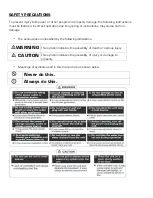
Page 3: ...structions may cause harm or damage SAFETY PRECAUTIONS The seriousness is classified by the following indications Meanings of symbols used in this manual are as shown below This symbol indicates the possibility of death or serious injury This symbol indicates the possibility of injury or damage to property WARNING Never do this Always do this CAUTION ...

Page 4: ...y grounded wall receptacle If the wall receptacle you intend to use is not adequately grounded or protected by a time delay fuse or circuit breaker have a qualified electrician install the proper receptacle Ensure the receptacle is accessible after the unit installation Do not use extension cords or an adapter plugs with this unit However if it is necessary to use an extension cord use an approved...

Page 5: ...evel or auto start stop time 0 24 while setting then shows the actual 5 accuracy room humidity level AS Humidity module sensor error Unplug the unit and plug it back in If error repeats call for service ES Tube Temperature sensor error Unplug the unit and plug it back in If error repeats call for service EC Refrigerant leakage detection With this new technology the display area will appear EC when...

Page 6: ...ious function setting automatically when the power resumes Setting the Timer When the unit is on press the Timer button to activate the AUTO STOP feature When the unit is off press this button to activate the AUTO START feature Press or hold the UP or DOWN button to change the Auto time by 1 5 hour increments up to 10 hours then at 1 hour increments up to 24 hours The control will count down the t...

Page 7: ...cated on the side rear of the unit electrical socket outlet with earth connection Make sure the Water bucket is correctly fitted otherwise the unit will not operate properly Do not use outdoors This dehumidifier is intended for indoor residential applications only This dehumidifier should not be used for commercial or industrial purposes Place the dehumidifier on a smooth level floor strong enough...

Page 8: ...nto the unit Banging the bucket against anything or failing to push it in securely may cause the unit not to operate 2 Continuous draining Water can be automatically emptied into a floor drain by attaching the unit with a water hose 12mm not included Remove the rubber plug from the back of the unit and store it in a safe location Insert the water hose into the unit from the drain outlet in the bac...

Page 9: ...uld be checked and cleaned at least every 30 days or more often if necessary NOTE DO NOT RINSE OR PUT THE FILTER IN AN AUTOMATIC DISHWASHER To remove Pull the water bucket out as shown in Fig 10 Grip the tab on the filter and press them in slightly to take them out from the filter holder and then pull out the filter downward See Fig 11 13 Clean the filter with warm soapy water Rinse and let the fi...

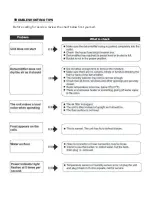
Page 10: ...Before calling for service review the chart below first yourself TROUBLESHOOTING TIPS ...

Page 11: ... proof of purchase The product must be installed and used in accordance with the instructions contained in this instruction guide It must be used only for domestic purposes It does not cover wear and tear damage misuse or consumable parts Swan Products Ltd has limited liability for incidental or consequential loss or damage This guarantee is valid in the UK and Eire Only 2014 30 EU The EMC Directi...

Page 12: ...l items purchased in Ireland The WEEE directive introduced in August 2006 states that all electrical items must be recycled rather than taken to landfill Please arrange to take this appliance to your local Civic Amenity site for recycling once it has reached the end of its life DISPOSAL OF UNIT According to EU Regulation 517 2014 R134A is a gas fluorinated greenhouse under the Kyoto Protocol Its p...

Page 13: ...s Ltd PO Box 3117 Stoke on Trent ST4 9GD Est 1 931 We love what we do s 2year GUARANTEE we re proud of our quality Scan this QR code to hear about our story Find us on Facebook on selected products SH5010N_front_n_back_IM indd 2 24 06 2015 09 18 ...

Reviews: