background image

4

Español
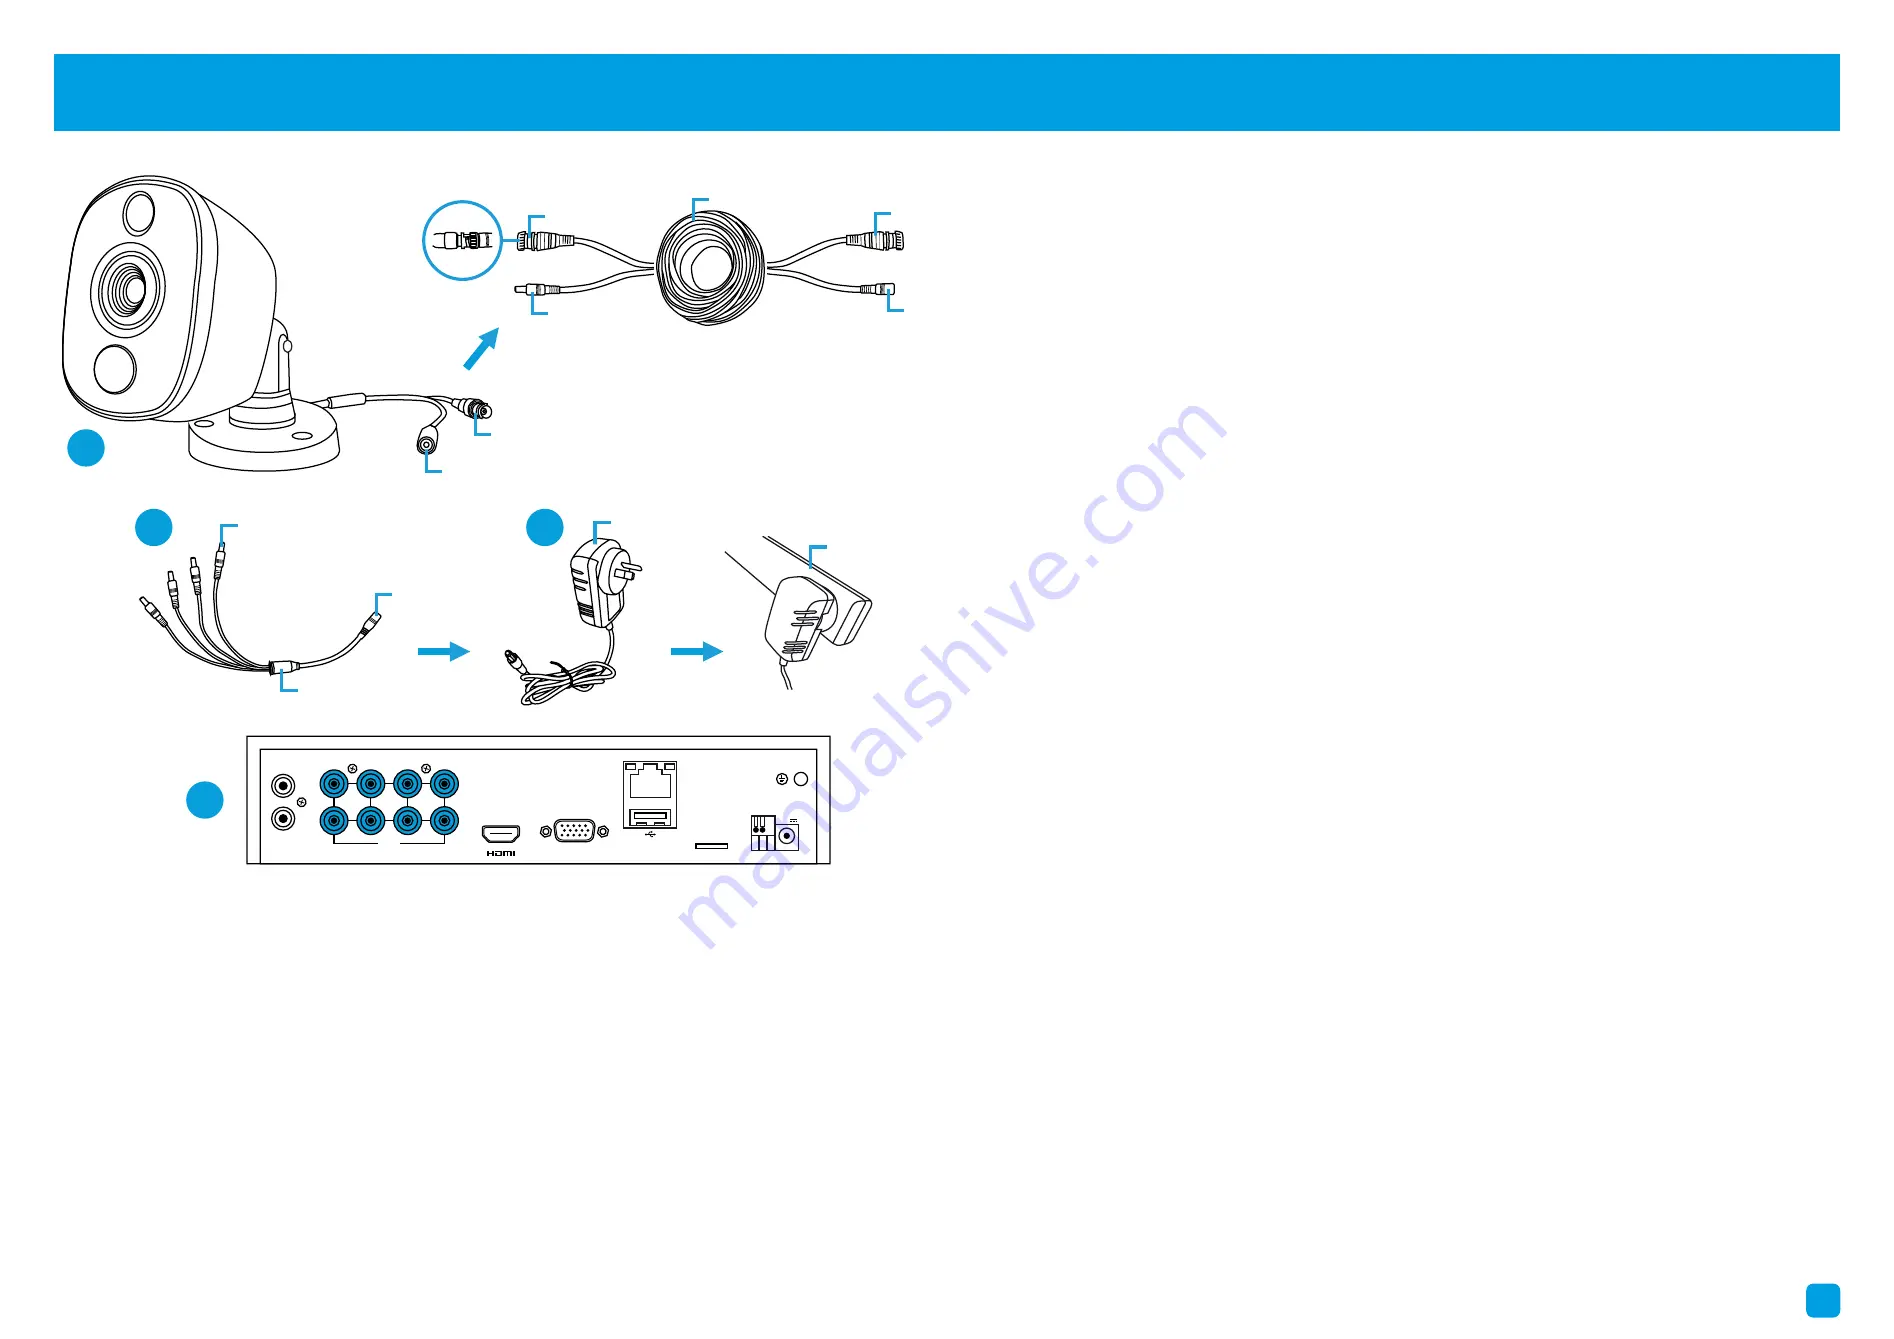
1.


Conecte la salida de vídeo y las conexiones de 

entrada de alimentación de la cámara a los cables 

de vídeo y de alimentación.

2.


Conecte el divisor al otro extremo del cable de 

vídeo y de alimentación. Esto alimentará varias 

cámaras con un solo adaptador de corriente.

3.


Conecte el otro extremo del divisor al adaptador 

de corriente y luego conecte el adaptador de 

corriente a una toma de corriente.

4.


Conecte la salida de vídeo en el cable de vídeo y 

alimentación a cada entrada de su DVR.

Français
1. 

Conecte la salida de vídeo y la entrada de 

alimentación de la cámara a las conexiones del 

cable de vídeo y alimentación.

2.

 Conecte el divisor de potencia al otro extremo 

del cable de vídeo y de alimentación.

3.

 Conecte el otro extremo del divisor de potencia 

al adaptador de alimentación y, a continuación, 

conéctelo a la alimentación.

4.

 Conecte la salida de vídeo en el cable de vídeo y 

alimentación a las entradas de su DVR.

Step/Paso/Étape: 3

1.

 Connect the video output and power input connections on the bullet 

camera to the corresponding connections on the video & power cable.

2.

 Connect the power splitter to the other end of the video & power 

cable. This will power multiple cameras using a single power adapter.

3.

 Connect the other end of the power splitter to the power adapter 

then connect the power adapter to a spare power outlet.

4.

 Connect the video output on the video & power cable to each camera 

input on your DVR. Twist the connection to lock it in place.

2

3

Power Input

Video Output

Twist to lock 

connectors

Video Input

Video & Power Cable

Connect this to your DVR

Power Splitter

connects here

Power Output

Power Adapter

connects here

Power Splitter

Power Adapter

Video & Power 

Cable connects here

Connect to a spare 

power outlet

4

+  -

+  -

12V

12V

RS485

RS485

LAN

LAN

1

3

5

7

2

4

6

8

VIDEO

INPUT

VIDEO

INPUT

AUDIO

INPUT

AUDIO

INPUT

AUDIO

OUTPUT

AUDIO

OUTPUT

VGA

VGA

1

MicroSD

MicroSD

Summary of Contents for 4480

Page 1: ...a utilizar el DVR necesita lo siguiente 1 Un televisor de alta definición con capacidad para mostrar video 720p o 1080p 2 Un enrutador con una conexión de Internet de banda ancha 3 Undispositivomóvil AndroidoiOS paradescargarlaaplicaciónmóvil Français Pour commencer à utiliser votre DVR vous avez besoin des éléments suivants 1 Une TV haute définition capable d afficher une vidéo de 720p ou 1080p 2...

Page 2: ...a permanent installation Español EstaguíaleayudaráaconseguirsuDVRfuncionandotanprontocomoseaposible Paraasegurarsedequenada se dañó durante el envío le recomendamos que conecte todo y lo pruebe antes de realizar una instalación permanente Français Ce guide vous aidera à mettre votre DVR en marche dès que possible Pour vous assurer que rien n a été endommagé lors de l expédition nous vous conseillo...

Page 3: ...Connect the 12V power adapter here 11 Power LED Indicates your DVR has power 12 Hard Drive LED Flashes when the hard drive is active 13 USB Ports Connect a USB flash drive to copy recorded events and to perform a firmware upgrade Step Paso Étape 2 FCC Warning Statement This device complies with part 15 of the FCC Rules Operation is subject to the following two conditions 1 Thisdevicemaynotcausehar...

Page 4: ... alimentación 4 Conecte la salida de vídeo en el cable de vídeo y alimentación a las entradas de su DVR Step Paso Étape 3 1 Connectthevideooutputandpowerinputconnectionsonthebullet cameratothecorrespondingconnectionsonthevideo powercable 2 Connect the power splitter to the other end of the video power cable Thiswillpowermultiplecamerasusingasinglepoweradapter 3 Connect the other end of the power s...

Page 5: ...u DVR y luego conecte el otro extremo a un puerto de repuesto 2 en su router No proceda al siguiente paso hasta que esto se haga Connexion à votre réseau Branchez le câble Ethernet fourni au port Ethernet 1 de votre DVR puis branchez l autre extrémité à un port de secours 2 sur votre routeur Ne passez pas à l étape suivante jusqu à ce que cela soit fait 2 12V 12V RS485 RS485 LAN LAN 1 3 5 7 2 4 6 ...

Page 6: ...osterior Para copiar sus grabaciones de video y realizar una actualización de firmware conecte un unidad flash USB para al puerto superior Connectezvotresouris Connectez la souris fournie 1 au port USB 2 situé à l arrière Pour copier vos enregistrements vidéo et pour effectuer une mise à niveau du micrologiciel connectez un une clé USB aux ports avant 1 12V 12V RS485 RS485 LAN LAN 1 3 5 7 2 4 6 8 ...

Page 7: ... extremo a una entrada HDMI 2 en su televisor Pulse el botón A V del mando a distancia del televisor para seleccionar la entrada HDMI Connectez vous à votre téléviseur Branchez le câble HDMI sur le port HDMI 1 puis branchez l autre extrémité à une entrée HDMI 2 sur votre téléviseur Appuyez sur le bouton A V de votre télécommande pour sélectionner l entrée HDMI 12V 12V RS485 RS485 LAN LAN 1 3 5 7 2...

Page 8: ...imentation 1 àl entréed alimentation 2 devotre DVR puis branchez le bloc d alimentation à une prise de courant 1 YouwillseetheStartupWizarddisplayed Follow the Startup Wizard Quick Start Guide the red colouredguide toconfigureandsetupyourDVR Debe ver el asistente visualizado Siga la Guía de inicio rápido del asistente la guía de color rojo para configurar y programar su DVR Vous devriez voir l Ass...

Reviews: