background image

22

ENGLISH

Cruise Control

Step 1. Accelerate to reach the desired speed.
Step 2. Hold the throttle for ~6 seconds to turn on Cruise Control and maintain speed. 
Step 3. Use the throttle or the handbrake to turn off Cruise Control.

While riding, you can use the front headlight to improve visibility if needed. To use the light, simply press the 
button just above the light to turn it on or off. 

  Using the headlight for extended periods of time may affect scooter’s overall battery life.

4.2 Practicing Guidelines

Practice until you are comfortable with using all of the scooter’s functions. See the following tips below.


Wear casual clothing and flat shoes to maintain your flexibility and stability.


Practice until you can easily get on, move forward, turn, stop, and dismount with ease.


Make sure the pavement is even. Do not operate on a slope until you are experienced.


Ride on relatively smooth, flat terrain.

Summary of Contents for SWAGGER 3

Page 1: ...er to continue serving our customers and providing the best products our product information including our user manuals may receive updates from time to time Please check our website for the latest user manuals and product materials Ver 1 0 10 23 18 FOLDING ELECTRIC SCOOTER ...

Page 2: ......

Page 3: ...r by SWAGTRON To ensure your safety and the safety of others please read the guidelines in this user manual and follow them during riding If you have any questions regarding the Swagger 2 contact us at 1 844 299 0625 for further assistance Happy Riding The SWAGTRON Team ...

Page 4: ... 2 Assembly 08 2 3 Swagger 2 Diagram 09 2 4 Display Overview 10 2 5 Display Indicators 10 2 6 Display Program Settings 14 2 7 Standing Folding and Unfolding 16 SECTION 3 CHARGING 18 3 1 How to Charge 18 3 2 Safety Warnings 19 SECTION 4 USAGE 20 4 1 Getting Started 20 4 2 Practicing Guidelines 22 SECTION 5 MAINTENANCE 23 5 1 Cleaning 23 5 2 Storage 23 SECTION 6 SPECIFICATIONS 24 SECTION 7 WARRANTY ...

Page 5: ... appear throughout this manual and exercise good judgment when using your Swagger 2 scooter Consult this manual before you attempt to use your Swagger 2 1 1 Safety Warnings and Important Information Within this manual the Swagger 2 your Swagger 2 your scooter and the scooter refer to the Swagger 2 Folding Electric Scooter The Swagger 2 is a personal scooter that uses electrical power By riding the...

Page 6: ...n This equipment generates uses and can radiate radio frequency energy and if not installed and used in accordance with the instructions may cause harmful interference to radio communications However there is no guarantee that interference will not occur in a particular installation If this equipment does cause harmful interference to radio or television reception which can be determined by turnin...

Page 7: ...ded disposal for any Swagger 2 Folding Electric Scooter at its end of life is to dispose of the entire unit at or through an e waste recycling center program or facility Local regulations and laws pertaining to the recycling and disposal of lithium ion batteries and or products containing them will vary according to country state and local governments You must check laws and regulations correspond...

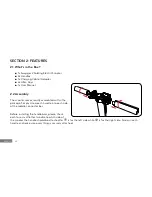
Page 8: ...ooter comes mostly assembled within the package Simply screw each handle into each side of the middle connector bar Before installing the handlebars please check each for a small letter to indicate which side of the scooter the handle should be attached to L is for the left side while R is for the right side Screw in each handle and make sure everything is securely attached ...

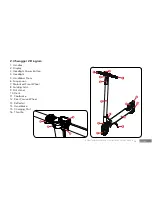
Page 9: ...1 Handles 2 Display 3 Headlight Power Button 4 Headlight 5 Handlebar Stem 6 Suspension 7 Motorized Front Wheel 8 Folding Latch 9 Kickstand 10 Deck 11 Footbrake 12 Rear Passive Wheel 13 Reflector 14 Handbrake 15 Charging Port 16 Throttle 14 15 16 2 1 1 2 12 13 9 6 8 4 3 5 11 10 7 ...

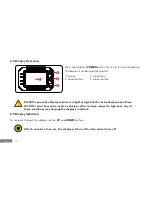
Page 10: ...o high heat Any of these conditions may damage the display s interface 2 5 Display Indicators To navigate through the display use the UP and DOWN buttons After 5 minutes of non use the display will turn off as the scooter turns off 2 3 1 4 Press and hold the POWER button for 3s to turn on the display The display is made up of these parts 1 Screen 2 Up Button 3 Power Button 4 Down Button ...

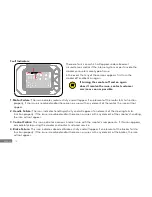
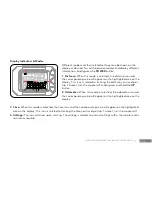
Page 11: ...to display with this unit of measurement 6 Gear Position This icon indicates current gear There are 3 speed gears Gear 1 is 0 3 7 mph Gear 2 is 0 9 3 mph Gear 3 is 0 15 5 mph Use the UP and DOWN buttons to adjust gears as desired 1 Setting This icon will appear when modifying program settings Please see 2 6 Display Program Settings for more information on these settings 2 Battery Level This icon i...

Page 12: ... scooter s components If this icon appears immediately stop using the scooter and contact customer service 4 Brake Failure This icon indicates abnormal brake activity and will appear if an element of the brakes fails to function properly If the issue is resolved and or there are no issues with any element of the brakes the icon will not appear Fault Indicators SET M DISODO VOL Mp h Km h TIME 1 3 4...

Page 13: ...e distance you travel per trip To reset turn the scooter off and or press and hold the UP button 2 Odometer When this mode is selected the odometer icon and the corresponding value will appear on the highlighted area on the display 3 Time When this mode is selected the time icon and the corresponding value will appear on the highlighted area on the display This icon is related to tracking the time...

Page 14: ...ent Setting This setting determines the unit of measurement in which your current speed is displayed Speed may be displayed in either miles per hour MPH or Mp h or kilometers per hour KPH or Km h By default this setting is at 0 with the measurement being kilometers per hour KMH or Km h If changed the display will show the related icons P 2 Cruise Control This setting is for the Cruise Control feat...

Page 15: ...erate please see Section 4 1 P 4 Display Wheel Diameter This setting is related to wheel diameter and should display 6 5 inches Do not attempt to adjust P 5 Display Internal Voltage This setting is related to internal voltage settings within the scooter and should be set at 24V Do not attempt to adjust P 8 Clear Odometer ODO Data The setting is related to odometer readings By default this setting ...

Page 16: ...of the scooter s deck 2 Push the kickstand down and away from the scooter Then carefully lean the weight of the scooter onto the kickstand Folding Step 1 Pull the lever down towards the deck The pin connected to the lever should slide up out of its notch If the lever is hard to move try pulling stem away from the deck slightly in order to ease the tension on the folding mechanism Step 2 With the l...

Page 17: ... lever is hard to move try pulling stem down towards the deck slightly in order to ease the tension on the folding mechanism Step 2 With the lever moved pull the stem up away from the deck line the pin up with the first notch and push the lever back into place as needed Make sure the pin slides into the notch and the lever fully moves back in place otherwise the scooter may fold ...

Page 18: ...hours charging time During charging the charger light will turn red Step 4 When the scooter is fully recharged the charger light will turn green Disconnect the scooter from the charger DO NOT under any circumstances use the scooter while it is charging or connected to the charger The charging time is 5 6 hours Charging longer than that may affect battery life and or performance If the charger s li...

Page 19: ... hot weather If the scooter is to be used by children explain the contents of the user manual to the children You or a caregiver should provide adequate supervision to ensure that the device is used as explained in the user manual Immediately discontinue use if while using charging or storing the battery the battery emits an unusual smell feels hot changes color changes shape or appears abnormal i...

Page 20: ...how or where you may ride 4 1 Getting Started Assuming you have equipped suitable protective gear and that the Swagger 2 has been placed on a level surface is well charged and does not have any issues follow the steps below For your safety please read this entire section before attempting to ride The Manual Acceleration Start feature is off by default which means you may use the throttle immediate...

Page 21: ... gradually coast to a stop then step off the scooter one foot at a time Manual Acceleration Start To use this start setting please refer to P 3 in Section 2 6 then follow the instructions below Step 1 Press the POWER key for 3 seconds to turn the scooter on Step 2 Carefully step on with one foot and stand upright but relaxed Step 3 Keep one foot on the ground and kick off to begin accelerating man...

Page 22: ...t above the light to turn it on or off Using the headlight for extended periods of time may affect scooter s overall battery life 4 2 Practicing Guidelines Practice until you are comfortable with using all of the scooter s functions See the following tips below Wear casual clothing and flat shoes to maintain your flexibility and stability Practice until you can easily get on move forward turn stop...

Page 23: ...ly remove debris or dust The scooter may not come in contact with it in any kind of liquid Never use alcohol or ammonia based cleaning solutions Never spray liquid directly onto any part of the scooter 5 2 Storage The scooter can be stored easily when not in use See the following information below Before storing fully charge the scooter to prevent battery over discharge due to non use Cover the sc...

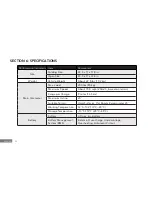
Page 24: ...eter Max Load 200 lbs 90 kg Maximum Speed About 15 5 mph 25km h based on terrain Range per Charge 9 miles 14 5 km Maximum Incline 20 Suitable Terrain Hard Surfaces Flat Roads Ramps under 20 Working Temperature 32 F 104 F 0 C 40 C Storage Temperature 10 F 113 F 23 C 45 C Battery Battery Lithium Ion Battery Battery Management System BMS Balance Over charge Under voltage Overheating Automatic Cutout ...

Page 25: ...IAL CO LTD Address 2 Jili Rd Pingxi Community Pingdi Longgang Shenzhen China 518117 2 Model AOI 30W294100U Input 100 240 VAC 50 60Hz 0 8A Output 29 4V 1A Manufactured by Manufactured by DONG GUAN AOI ELECTRONIC TECHNOLOGY CO LTD Address ZhangYang YinYang Industrial Zone ZhangmutouTown DongGuan City K Building 3 Model FY0422941000 Input 100 240 VAC 50 60Hz 0 8A Output 29 4V 1A Manufactured by Shenz...

Page 26: ...TRON If a hardware defect arises and a valid claim is received within the Warranty Period at its option and to the extent permitted by law SWAGTRON will 1 repair the hardware defect by using new or refurbished parts that are equivalent to new in performance and reliability or 2 exchange the Product with a product that is new or refurbished which is substantially equivalent to the original product ...

Page 27: ...vice on this Product DISCLAIMER OF WARRANTY THE REMEDIES DESCRIBED ABOVE ARE YOUR SOLE AND EXCLUSIVE REMEDIES AND OUR ENTIRE LIABILITY FOR ANY BREACH OF THIS LIMITED WARRANTY OUR LIABILITY SHALL UNDER NO CIRCUMSTANCES EXCEED THE ACTUAL AMOUNT PAID BY YOU FOR THE DEFECTIVE PRODUCT NOR SHALL WE UNDER ANY CIRCUMSTANCES BE LIABLE FOR ANY CONSEQUENTIAL INCIDENTAL SPECIAL OR PUNITIVE DAMAGES OR LOSSES W...

Page 28: ...COPYRIGHT 2018 SWAGTRON ALL RIGHTS RESERVED ...

Reviews: