9
8
2 5 0 0 5 L
•
Make sure that no source of ignition is in your work area (e.g. open fire, burning cigarettes,
nonexplosion- proof lamps etc.).
•
Never spray paint into open fire, glowing surfaces or luminous elements. Atomized spray can-
catch fire on open fire or hot surfaces.
•
Never use oxygen or other inflammable gases as a substitute for your compressed air supply.
•
Remember that cleanser, residual paint or varnish has to be recycled in accordance to
environmental laws. Check the manufacturer’s safety advice for further information.
P R E PA R AT I O N
After opening the packaging, check for completeness of the delivery and proper functioning of all
parts. Connect the spray gun to your compressed air supply. Therefore connect the quick coupler of
the air hose with the inlet connector of the spray gun. To be able to adjust the air pressure, your air
supply has to be equipped with a pressure reducing regulator/valve. The operating pressure of the
spray gun is 3 – 3.5 bar. The higher the air pressure, the higher is the atomization of the paint/varnish
and the harder it is to control the spray gun’s output.
In case of an air pressure that’s too weak, the paint will not be atomized enough to gain the best
possible result (in accordance with the viscosity and the general state of the paint). That’s why we
recommend to test various air pressure adjustments until you get your desired result.
When working with varnish, the use of cleaned, condensate free and oil free compressed air is
necessary. To avoid mechanical defects and a decrease of efficiency we recommend the use of a water
drain valve. A drain valve filters all moisture out of the compressed air and catches small
particles of dust and dirt, caused by friction. This has a huge benefit on the operating life of your air
tool.
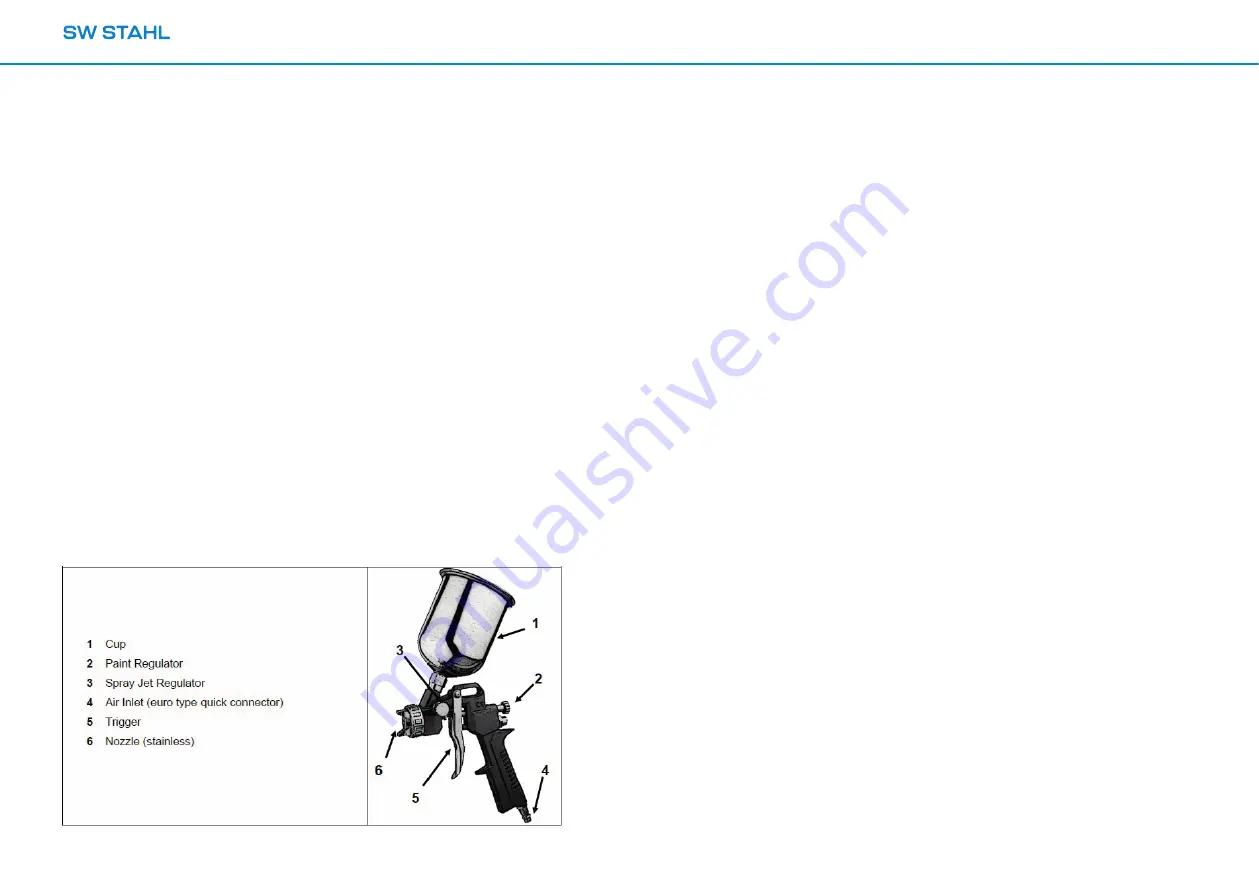
C O M P O N E N T S
O P E R AT I O N
Always use suitable paint/varnish. Before you start your operation, check the instructions of the
manufacturer.
1.
Fill the desired amount of paint into the cup (#1).
2.
Prepare the work piece carefully. Clean it – traces of dust and grease will seriously affect the
result. Cover or mask everything, which is not meant to be painted.
3.
Pull the trigger and start your operation. Keep in mind to always keep a distance of 15 – 20 cm
between the nozzle and the work piece.
A DJ U S T I N G T H E A M O U N T O F PA I N T
You can adjust the amount of sprayed paint in accordance to the surface of the work piece.
Turn the paint regulator (#2) clockwise to increase the amount of paint. Turn it counter clockwise to
reduce it.
A DJ U S T I N G T H E S P R AY J E T
You can adjust the spray jet from a round jet to a rather wide jet. For larger work pieces the latter will
be more convenient. This can be adjusted vertically as well as horizontally. To get a round spray jet
turn the spray jet regulator (#3) clockwise. Turn it counter clockwise to get a wide spray jet.
N O T E
The professional operation of a spray gun takes some experience. Therefore we recommend that you
experience the spray gun’s functions and its handling on a piece of paper or cardboard before you
start. Make a test run before each operation.
S TO R AG E
Contamination caused by dust or dirt can affect the gun’s efficiency. Wrap up the spray gun with a
piece of plastic or kitchen foil before you store it so that it is secured against any type contamination
and later damage.
M A I N T E N A N C E / C L E A N I N G
The spray gun does only work properly when it is kept clean. Clean your spray gun carefully and
thoroughly after each use. Follow these steps:
•
Clean your tool by using paint thinner. Run the gun with paint thinner instead of paint to clean
its interiors.
•
The nozzle thread and all moving parts should be lubricated with acid-free oil.
•
Never use hydrocarbon halogen solvents to clean the gun. This may cause a chemical reaction.
•
Never dip the gun completely into paint thinner.


