Page 4
Page 5
3.
The following screen displays.
4.
Use the wizard to:
•
Assign a
KVM Name
to the devices.
•
Assign passwords to your N2143 HD Encoders.
•
Assign permission levels to your N2243 HD Decoders.
•
Associate Encoders with Decoders by assigning hotkeys.
•
View a configuration status summary of all KVM units on your network.
•
Import and export CSV files (useful for security features and larger installations).
5.
Once all changes are made, click the
Export KVM CSV
button to download the CSV file to
your computer. The file must then be uploaded to each unit. See the section
CSV File Use
for
details on how this is done.
Understanding the Use of Hotkeys, Passwords, and Permission Levels in the Wizard
•
Hotkeys
: Click on the
Hotkeys
tab to assign Encoder hotkey numbers (1-999) for each
Decoder. See the section
Using the N2X43 Hotkey Feature
for more information.
•
Passwords
: Click on the
Encoders
tab to assign a password to the Encoder, allowing for
data encryption. A Decoder must know the password in order to communicate with the
Encoder.
•
Permission Levels
: Click on the
Decoders
tab to assign a permission level to each Decoder.
This feature determines which Decoder takes precedence in the event that multiple Decoders
attempt to communicate with the same Encoder. The Decoder with the highest assigned
Permission Level
takes over communication. In the case of a tie, the Decoder attempting to
gain communication takes over from the previously-connected Decoder (unless Multiaccess is
enabled on the Encoder, in which case both Decoders are allowed to connect).
Note: By default, the KVM streams are encrypted with a common password. You can change
the password using the
KVM Wizard
. If you change Encoder passwords, you will need to sup-
ply the new information to the Decoders to allow communication to continue. See the section
CSV File Use
for more details.
Note: A Decoder only receives password information for the Encoders on the network that
have been associated with that Decoder via the
Hotkey
assignment.
Basic Configuration (continued)
6.
Click the
Auto Discover
button to discover your new devices (if you have not already done
so).
7.
Once discovery is complete (and you see the new units listed in N-Able), click the
Video
Matrix
tab.
8.
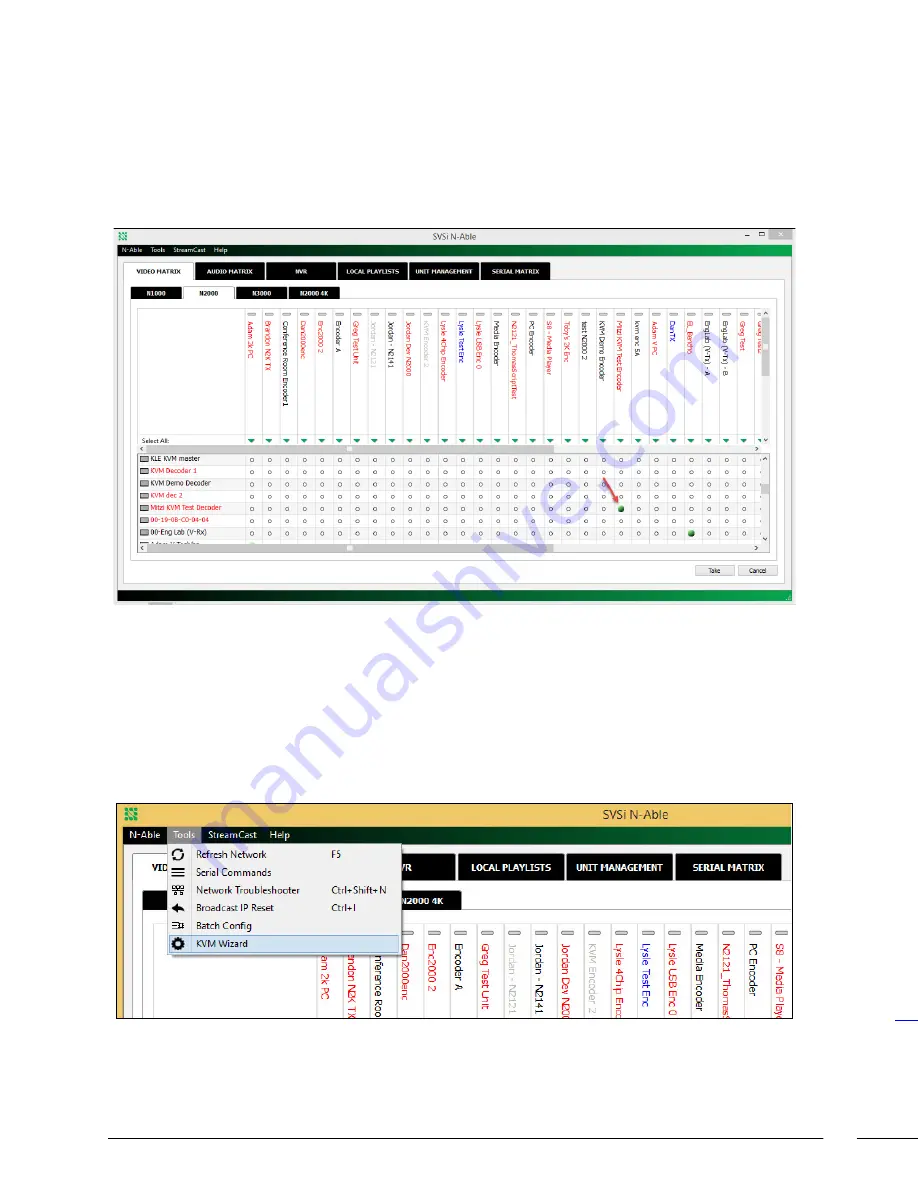
On the matrix, click the cross-point for the Encoder/Decoder combination. See the screen shot
below.
9.
Click the
Take
button to make the change to your matrix. The radio button turns green to indi-
cate the connection was successful.
Note: By default, units can be switched using N-Able without modifying configuration.
Note: Switching video streams in N-Able forces the audio and keyboard/mouse on N2X43 units to follow the
video
Advanced Configuration (With Security Features)
1.
Follow step 1-6 (in the previous section) to connect the units physically and discover them in
N-Able.
2.
Once discovery is complete, select
Tools
> KVM Wizard
from N-Able’s main menu bar.


