background image

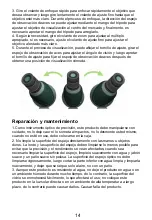
3.Adjust the coarse focus knob for fast focus, then adjust the fine focus knob 
slowly until the image in the eyepiece is clear and sharp. You can adjust the 
tripod handle to make the target in the central of your field of view, then lock the 
tripod handle.
4.If you adjust the power ring, refocusing is usually require. Refocus as needed.
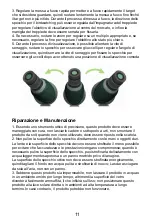
5. During the observation, you can also loose the screw on the tripod mount 
collar and rotate the scope body to get flexible viewing angle. Lock the screw 
after finding the comfortable viewing angle.

How to Care Your Spotting Scope

1.Spotting scope is a precision optical instrument. Please handled with care, 
protect your spotting scope from any shock, and DO NOT disassemble the 
scope by yourself. Storage it in the box when not in use.
2.Please do not clean the lenses with your hand or hard objects. Wipe the 
lenses as less as possible for wipe may affect the scope accuracy and 
performance. If the lenses do need clean, you can use mild soap water and soft 
lintless cloth. After that, wipe the scope again with cleaning water. Let it dry by 
itself in the air, do not dry it with cloth.
3.Although this is a waterproof spotting scope, do not leave your scope in water 
or a humid environment for a long time, otherwise the lens surface will easily 
become moldy. Please do not place this product in sunlight directly or high tem- 
perature environment for a long time, otherwise it may cause the product to fail.

2

Summary of Contents for SV411

Page 1: ...User Manual Spotting Scope SV411 EN 1 3 DE 4 6 FR 7 9 IT 10 12 ES 13 15...

Page 2: ...EU Importer Germany Retevis Technology GmbH Address Uetzenacker 29 38176 wendeburg...

Page 3: ...ore using your spotting scope to ensure proper use and care Product Structure 1 Objective Lens 2 Sunshade 3 Main Body 4 Fine Focus Knob 5 Coarse Focus Knob 6 Power Ring 7 Eyepiece 8 Eyecup 9 Tripod Mo...

Page 4: ...lease handled with care protect your spotting scope from any shock and DO NOT disassemble the scope by yourself Storage it in the box when not in use 2 Please do not clean the lenses with your hand or...

Page 5: ...nd eyepieces are kept clean Dirty objectives and or eyepieces mean less light transmission and loss of brightness as well as unsharp images Keep your optics clean When not using your item store those...

Page 6: ...nde 3 Produktk rper 4 Feinabstimmung des Handrads 5 Handrad mit Schnellfokus 6 Zoom Handrad 7 Okular 8 Augenmaske 9 Ziehen Sie die Schrauben fest 10 Halterung Installation und Verwendung 1 Verbinden S...

Page 7: ...Reparatur und Wartung 1 Als optisches Pr zisionsinstrument sollte dieses Produkt mit Vorsicht behandelt werden nicht fallen gelassen oder dem Produkt ausgesetzt werden das Produkt nicht selbst zerleg...

Page 8: ...Produkte in feuchten Umgebungen verwenden Sie keine wasserdichten Produkte in feuchten Umgebungen und trocknen Sie sie nach dem Gebrauch 5 Schlie en Sie das Fenster beim Betrachten in Innenr umen nic...

Page 9: ...f 2 Pare soleil objectif 3 Corps du produit 4 Molette de R glage fin 5 Molette de mise au point rapide 6 Molette de zoom 7 Oculaire 8 Pare soleil 9 Vis de fixed 10 Support Installation et utilisation...

Page 10: ...e manipul avec pr caution ne pas le laisser tomber ni le soumettre un impact ne pas d monter le produit par vous m me lorsqu il n est pas utilis il doit tre plac dans la bo te 2 Ne nettoyez pas la sur...

Page 11: ...tanches dans des environnements humides n utilisez pas de produits tanches dans des environnements humides et s chez les apr s utilisation 5 Lorsque vous regardez l int rieur veuillez ne pas fermer l...

Page 12: ...odotto 4 Regolazione fine 5 Regolazione messa a fuoco rapida 6 Regolazione zoom 7 Oculare 8 Maschera per gli occhi 9 Fissaggio vite 10 Staffa Installazione e utilizzo 1 Collegare il foro filettato nel...

Page 13: ...mento ottico di precisione questo prodotto deve essere maneggiato con cura non lasciarlo cadere o sottoporlo a urti non smontare il prodotto da soli quando non viene utilizzato deve essere riposto nel...

Page 14: ...bili in ambienti umidi utilizzare prodotti impermeabili in ambienti umidi e asciugarli dopo l uso 5 Quando si guarda all interno non chiudere la finestra e guardarla attraverso la finestra il che ridu...

Page 15: ...Ajuste del volante 5 Volante de enfoque r pido 6 Volante de zoom 7 Ocular 8 M scara de ojos 9 Apriete los tornillos 10 Soporte Instalaci n y uso 1 Conecte el orificio roscado en la parte inferior del...

Page 16: ...n y mantenimiento 1 Como instrumento ptico de precisi n este producto debe manipularse con cuidado no lo deje caer ni lo someta a impactos no lo desmonte usted mismo cuando no est en uso debe colocar...

Page 17: ...ientes h medos use productos impermeables en ambientes h medos y s quelos despu s de su uso 5 Al mirar en interiores no cierre la ventana y mire a trav s de la ventana lo que reducir el efecto de obse...

Page 18: ...m the date of purchase 3 The user can get warranty and after sales service as below Contact the seller where you buy 4 For warranty service you will need to provide a receipt proof of purchase from th...

Page 19: ......

Page 20: ...Hong Kong Svbony Technology Co Ltd Add Unit B 5th Floor Gallo Commercial Building 114 118 Lockhart Road Wanchai Hong Kong Facebook facebook com svbony E mail info svbony com Web www svbony com...

Page 21: ...120 160mm...

Reviews: