background image

19

KEYBOARD VOICES

QUICK SELECT

 - There are twelve voices that can be selected quickly

by pressing one of the twelve numeric/voice quick select buttons.

1.

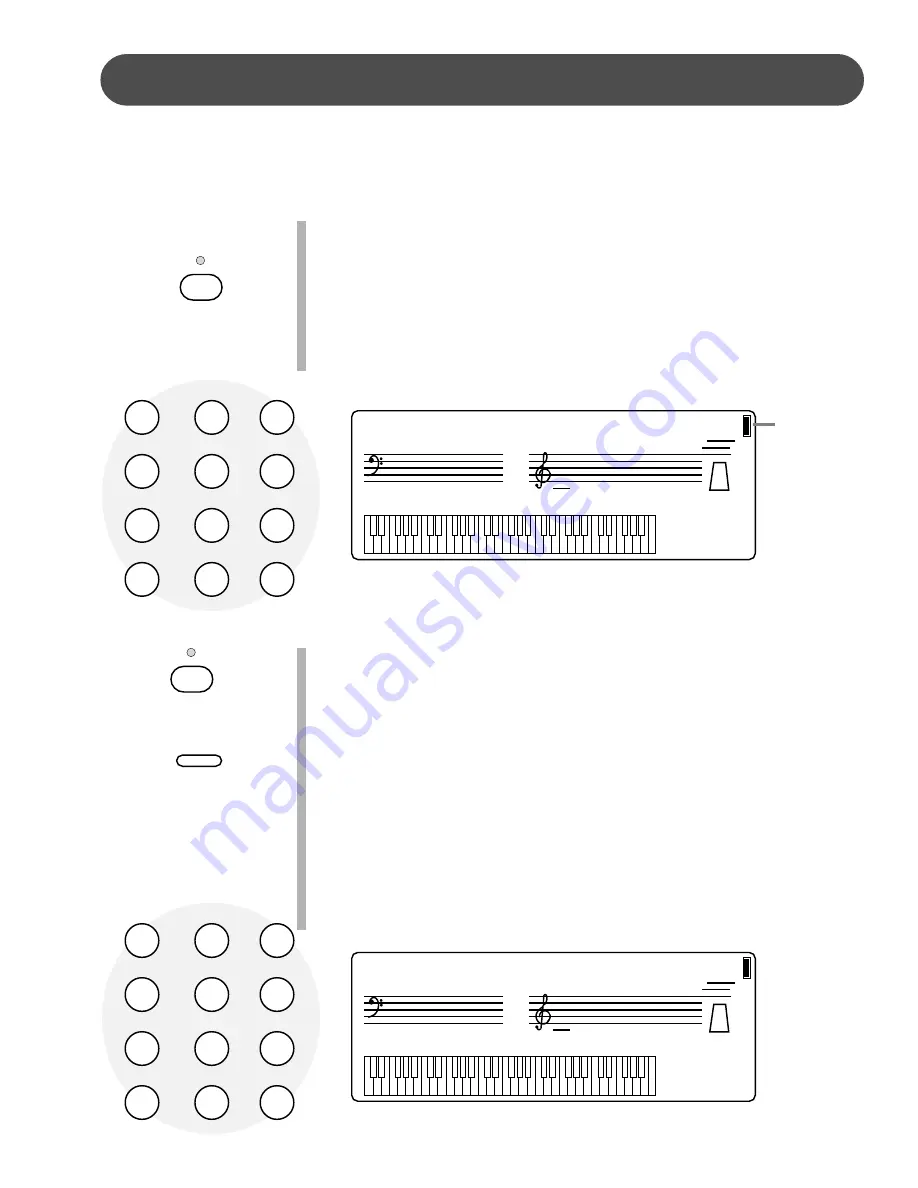
Press the VOICE DIRECT button to engage the voice selection
mode, the indicator will light up.

2.

Press the voice select button that corresponds to the desired
voice.  The voice name and its number will show on the display.

SELECTING ONE OF THE 128 VOICES

1.

Press the VOICE DIRECT button to disengage the voice selec-
tion mode, the indicator will not be lit.

2.

If necessary press the VOICE button to engage the default voice
select display.

3.

Use the numeric pad or the +, – buttons to select a voice num-
ber.

 Please note

, when using the numeric pad, you must enter three

digits to select a voice number from 001-128.  For example, to
select voice No. 2 you must enter “002”.  The voice name and its
number will show on the display.  Please refer to the back of the
manual for a list of all available voices.

VOICE SELECTION

 - There are 128 GM voices on this Suzuki piano.  There is a complete

list of all 128 voices both on the piano, and in the back of this manual.

VOICE DIRECT

G PIANO

VIBRAPHONE

CHOIR

BRASS

E PIANO

STRINGS

SAXOPHONE

STL. DRUMS

ORGAN

NYLON GTR.

FLUTE

SYN. VOICE

1

2

3

4

5

6

7

8

9

0

+

TEMPO


122

001: 

 GrandPno

TEMPO


122

002: 

 BritePno

VOICE DIRECT

G PIANO

VIBRAPHONE

CHOIR

BRASS

E PIANO

STRINGS

SAXOPHONE

STL. DRUMS

ORGAN

NYLON GTR.

FLUTE

SYN. VOICE

1

2

3

4

5

6

7

8

9

0

+

VOICE

Filled in
rectangle
indicates the
upper voice
mode is on
the display
and
available for
selection.

Summary of Contents for SP-47

Page 1: ...1 SUZUKI Pianos SP 47 Portable Keyboard OWNER S MANUAL SUZUKI ...

Page 2: ...2 ...

Page 3: ...n memory to save and recall settings a backlit LCD display screen that indicates note and chord data You will find many more features and functions listed within this owners manual This digital piano also has the latest MIDI features that allow you to interface with a personal computer or other MIDI equipment for endless musical possibilities In order to fully appreciate all the unique features of...

Page 4: ...nstructions in the manual accompanying the product 1 CAUTION Any changes or modifications in construction of this device which are not expressly approved by the party responsible for compliance could void the users authority to operate the equipment 2 NOTE This equipment has been tested and found to comply with the limit for a Class A digital device pursuant to part 15 of the FCC rules These limit...

Page 5: ...es by gripping the plug firmly not by pulling on the cable Disconnect all cables before moving the instrument Physical shocks caused by dropping bumping or placing heavy objects on the instrument can result in scratches and or more serious damage CLEANING Clean the cabinet and panel with a dry soft cloth A wax based polish may be used on the cabinet although you will find that rubbing with a soft ...

Page 6: ...ion 25 AUTO ACCOMPANIMENT 26 Single 27 Fingered 28 Manual Bass Chord 29 Starting and Stopping theAuto Accompaniment 29 Fill In 30 Variation 30 OVERALL CONTROLS 31 DSP Depth 32 Fine Tuning 32 Grade 33 Accomp Volume 33 Vocal Prompt 34 Transpose 35 Touch 35 Split Point 36 Metronome 37 ONE TOUCH 38 REGISTRATION MEMORY 39 TRAINING 40 M I D I 46 MIDI IMPLEMENTATION CHART 48 VOICE LIST 49 STYLE LIST 50 D...

Page 7: ...plifier is reduced as the batteries drop in voltage TO REPLACE THE BATTERIES 1 Open the battery compartment cover located on the instru ments bottom panel 2 Insert eight new batteries be careful of the polarity Please note when the batteries run down replace them with a complete set of eight new batteries Never mix old and new batteries Do not use different kinds of batteries at the same time 3 Re...

Page 8: ...uttons or the numeric pad to adjust the tempo from 40 to 240 bpm beats per minute If you press the buttons simultaneously while holding dowm the TEMPO button you will recall the default tempo value for the selected rhythm style If you want to free set the tempo press the TEMPO TAP button twice the tempo will be set to the time interval between the two pressings When the TEMPO TAP button is pressed...

Page 9: ...e information 5 QUICK SELECT STYLE BUTTONS There are ten rhythm styles that can be selected quickly by pressing one of the ten style quick select buttons The style name and its number will be shown on the display for three seconds then the display will return to the selected voice While the current style is displayed you can use the numeric pad to enter any of the 100 rhythm styles and the corresp...

Page 10: ...YNC START button again to stop the auto accompaniment and return the keyboard to standby mode Please see the Rhythm section of this manual for more informa tion 7 START STOP This button starts the selected rhythm style imme diately with the percussive rhythm The auto accompaniment will start with the first recognized chord played in the auto accompani ment section of the keyboard depending on the ...

Page 11: ... the FILL IN button the fill in pattern will repeat until the button is released then the main pattern will play from the beginning of the next measure Please see the Rhythm section of this manual for more information 10 VARIATION All of the rhythm styles include a variation of that style that can be played simply by engaging the VARIATION button If you press the VARIATION button then the INTO END...

Page 12: ...e name and number will be shown on the display There is a complete list of all 128 voices in the back of the manual as well as on the piano cabinet This button can also be used to return to the default display Please see the Keyboard voices section of this manual for more information 13 LAYER The LAYER button creates a dual voice combining the selected upper main voice and the selected layer voice...

Page 13: ...istration is used to save keyboard settings Press the REG button until the panel screen is engaged then press one of the numeric buttons 1 4 to engage the registration memory mode The stored setting will be recalled instantly Please see the Registration Memory section of the manual for more information 16 ONE TOUCH REGISTRATION BUTTONS These buttons are used in conjunction with the one touch and r...

Page 14: ...ton is engaged there are twelve voices that can be selected quickly by pressing one of the buttons of the numeric pad as voice quick select buttons The voice name and its number will be shown on the display Please see the Keyboard Voices section of this manual for more information NUMERIC PAD When the VOICE DIRECT button is not en gaged use the buttons or the numeric pad to input numbers directly ...

Page 15: ...ect a song for the lesson program Please see the Training section of this manual for more information 22 LESSONS The LESSONS button turns the music training pro gram on and off Please see the Training section of this manual for more information 23 LEVEL Use the LEVEL buttons in conjunction with the LESSON button to select a lesson level in the music training program Please see the Training section...

Page 16: ...to smoothly rise or lower the played instruments pitch During or immediately after a note or notes have been played on the keyboard roll the PITCH BEND wheel up away from you to raise the pitch or down towards you to lower the pitch of the note s played The PITCH BEND wheel does not affect the auto accompaniment or the keyboard percussion sound 24 PITCH BEND ...

Page 17: ...ODE A rectangle adjacent to the voice mode select buttons located to the right of the display screen indicates that mode is currently engaged A block within the rectangle means that voice is showing in the parameter display and is available for selection 4 NOTE PLAYED ON SCALE The melody notes and accompaniment chord notes that are playing are indicated by dots on the great stave of the display If...

Page 18: ...display will show the current song number with the SONG prompt after Use two numeric buttons or the buttons to select a song Press the START STOP button to hear the song you have selected the song will repeat until you change the song number or press the START STOP button again to end the demonstration Press the LESSONS button twice to exit the training mode Please see the Training section of this...

Page 19: ...lease note when using the numeric pad you must enter three digits to select a voice number from 001 128 For example to select voice No 2 you must enter 002 The voice name and its number will show on the display Please refer to the back of the manual for a list of all available voices VOICE SELECTION There are 128 GM voices on this Suzuki piano There is a complete list of all 128 voices both on the...

Page 20: ...se the buttons or the numeric pad to select the desired voice while the layer voice is shown on the display The display will show the new layer voice name and its number after three seconds the display will revert to the selected main voice 3 Press the LAYER button again twice to turn the feature off TEMPO 240 001 GrandPno TEMPO 240 025 NylonGtr Filled in rectangle indicates the layer voice is cur...

Page 21: ...onds the display will revert to the main voice 3 Press the LOWER button again twice to turn the feature off ASSIGNING THE SPLIT POINT FOR VOICE The keyboard is split into two sections at the split point The default split point is the G2 key number 55 both for voice and auto accompaniment A different split point can be assigned with the OVERALL button menu Split Point Please see the Overall section...

Page 22: ...when using the number pads you must enter two digits to select a style number from 00 99 For example to select style No 4 you must enter 04 The style name and its number will be shown on the display The display will revert to the cur rently selected voice after three seconds Please refer to the back of the manual for a list of all available styles RHYTHM SECTION RHYTHM STYLE SELECTION This piano o...

Page 23: ...button you will recall the default tempo value for the selected rhythm style FREE SET THE TEMPO If you want to free set the tempo press the TEMPO TAP button twice the tempo will be set to the time inter val between the two pressings When the TEMPO TAP button is pressed you will hear a percus sive tap Press the TEMPO TAP button three or four times depending on the selected rhythm style to start the...

Page 24: ...e beat indicator in the display will blink at the current tempo showing that the synchronized start mode is ready Pressing the SYNC START button will automatically engage the fingered auto accompani ment mode Use the ACCOMP MODE button to turn the auto accompaniment off if desired The rhythm style will start as soon as you play in the auto accompaniment section of the keyboard if auto accompanimen...

Page 25: ...n pattern press the VARIATION button While engaged the variationS of the main pattern the introduc tion the ending and the fill in will play when engaged ASSIGNING THE SPLIT POINT FOR THE AUTO ACCOMPANIMENT The keyboard is split into two sections at the split point The default split point is the G2 key key number 55 for the auto accompaniment A different split point can be assigned using the OVERA...

Page 26: ...the display screen Press the ACCOMP MODE button again and the single mode will engage and the icon will appear on the display screen 2 Press the START STOP or the SYNCH START buttons to start the rhythm style or press the INTRO ENDING button to start with an introduction The auto accompaniment will start with the percus sive rhythm as soon as a recognized chord is played If the ACCOMP MODE button ...

Page 27: ...hord Press any key in the auto accompaniment section of the keyboard The key you press determines the root note of the major chord Press the C key in the auto accompaniment section of the keyboard to get a C Major accompaniment Minor Chord Press the root key and a black key to its left minor 3rd key in the auto accompaniment section of the keyboard simulta neously Here a C minor chord is played Se...

Page 28: ...b7 Suspended fourth sus4 1 4 5 Please note the notes listed in parentheses can be omitted The listed chord fingerings are all in root note position other inversions can be used with the exception of 1 The M6 chords are only recognized in root note position All other inversions are interpreted as m7 2 The 6 9 chords are only recognized in root note position All other inversions are interpreted as m...

Page 29: ...hord in the auto accompaniment section of the keyboard as long as the introduction of the percussive rhythm is still engaged Press the START STOP button to stop the accompaniment or the INTRO ENDING button again to stop with an ending pattern Please note if you want the auto accompaniment to be engaged again after the ending pattern has been completed press the FILL IN button while the ending patt...

Page 30: ... the INTRO ENDING button to stop with an ending pattern FILL IN The fill feature will insert a short rhythmic pattern of one to two measures in length depending on the rhythm style selected and the variation Holding down the FILL IN button will extend the fill indefinitely VARIATION The main pattern of the rhythm style is played in a loop There is a main pattern and a variation for each style To s...

Page 31: ...Overall control mode and recover to the default display of voice The Overall control function is used to set up or to adjust various parameters related to the operation of this keyboard The OVERALL button will access a menu for the DSP depth fine tuning the grading of the music training course the auto accompaniment volume the talking vocal prompt for the music training course transpose touch re s...

Page 32: ... FINE TUNING The pitch of this piano is very accurate and stable it is automatically set to standard A440 pitch when the piano is turned on The tuning feature makes it possible to tune the pitch of the instrument in fine intervals If neces sary you can match the piano to another instrument or singer Tuning can be accomplished over or 16 semitone steps or cents 1 Press the OVERALL button twice unti...

Page 33: ...d independently from the overall keyboard volume The accompaniment volume can be adjusted from 00 no sound to 24 maximum level The keyboard voice will not be affected by the accompaniment volume adjustment Please note if the piano is in the training mode accompaniment volume will not be avaiable for adjustment 1 Press the OVERALL button four times until the triangle in the display screen moves to ...

Page 34: ...tton to increase the level or the button to decrease the level The number pad can also be used to directly enter a value ranged from 00 24 Press the buttons simultaneously to recover the default setting of 21 4 After three seconds the display screen will recover to the default voice screen VOCAL PROMPT for SP 67e only If you don t want to hear the vocal prompting you may disable it 1 Press the OVE...

Page 35: ...00 3 After three seconds the display screen will recover to the default voice screen TOUCH The piano offers four types of keyboard touch sensitivity settings soft nor mal hard and fixed These are also known as velocity or dynamic curves and are designed to suit your style of playing The normal setting is selected auto matically when the piano is turned on The touch response can be changed with the...

Page 36: ...d voice is available for normal melody play The split point is set at key number 55 the G2 key when the piano is turned on 1 Press the OVERALL button eight times until the triangle in the display screen moves to the SPLIT POINT position The current split point key number fol lowed by Split will appear on the display screen 2 Use the button to increase key number and move the split point up the key...

Page 37: ...e metronome sound will be mingled with the rhythm The default setting for the metro nome is off and starting or stopping the rhythm style will reset the metronome to off If the metronome setting is in the off position the metronome will not sound 1 Press the OVERALL button nine times until the triangle in the display screen moves to the METRO position The current metro nome status followed by Metr...

Page 38: ... for more information about choosing a rhythm style there is a complete list of all the rhythm styles in the back of this manual and on the piano cabinet 2 PRESS THE ONE TOUCH BUTTON Press the REG OTS button until the current one touch setting followed by One Touch ap pears on the display screen 3 PRESS THE NUMBER BUTTON DESIRED Press the registra tion one touch number button 1 4 that corresponds ...

Page 39: ... pad 1 4 The display will briefly show the current registration memory number with a b prefix Your panel setting will be saved into that registration memory button instantly and the display will recover to the default screen with the newly stored voice RECALL CONTENTS IN THE REGISTRATION MEMORY 1 Press the REG OTS button twice to engage the registration memory mode the display will read the last s...

Page 40: ...s Please see the Overall controls section of this manual for more information 1 SELECT A TRAINING SONG Press the SONG button to en gage the music training function The first song number will ap pear on the display Use the buttons or the number pads to select a song using three digits The song number will appear on the display Please note if you press the SONG button and then press the START STOP b...

Page 41: ...e display so you can check your progress The lesson will repeat until you stop it You must first stop the lesson before changing levels 5 STOP YOUR TRAINING Press the START STOP button again to stop the training exercise The lesson will stop but the piano will remain in the music training mode You may now select a new lesson or level or exit the training program 6 EXIT THE TRAINING PROGRAM Cycle t...

Page 42: ...wo octaves Level Lesson 3 Listen and play a single note within four octaves Level Lesson 4 Listen and play a single note within five octaves Level Lesson 5 Listen and play an interval 1 consonant interval Level Lesson 6 Listen and play an interval 2 consonant interval Level Lesson 7 Level Lesson 8 Listen and play a chord 1 types of third chord Level Lesson 9 Listen and play a chord 2 types of thir...

Page 43: ...d Dictionary The chord dictionary can be used to learn fingering of chords There is only one lesson in this unit Press a root key in the octave then select one of the 16 types of chords by pressing a key on the keyboard referring to the diagram below Press the START STOP button to start the lesson the keys that should be pressed to form the chord you selected will appear on the display Press the k...

Page 44: ...evel Lesson 17 Two chord types Level Lesson 18 Four chord types Level Lesson 19 Eight chord types Level Lesson 20 Sixteen chord types Lesson Unit 6 Song Performance Training There are 100 training songs built in to the piano Select the desired song using the SONG button and the buttons or the numeric pad to enter a song number directly Please see the Train ing Songs Book for reference There are fo...

Page 45: ...d on the display screen Play the left hand accompaniment follow ing the melody After your performance the evaluation program will give you a vocal grade if it is engaged The lesson level will repeat until you stop it by pressing the START STOP button again Then you may then select a new lesson level if desired Level Lesson 4 Both hands training Press the START STOP button after the leading metrono...

Page 46: ...uzuki music store MIDI CONNECTION The MIDI terminals are located on the left side panel of the piano 1 MIDI In This terminal receives MIDI data from an external MIDI device Output from an external MIDI devise Connect the MIDI In terminal of the piano and the MIDI Out terminal of an external device Data generated on another devise can sound on your piano MIDI CHANNELS The MIDI system in this unit h...

Page 47: ...ound generator Connect the MIDI Out terminal of the piano and the MIDI in terminal of an external device keyboard synthesizer or sound module and the external devise will respond to your playing In this way you can play two instruments at the same time or play on your piano to the sound of another MIDI devise Connect with a computer You can transmit your performance to a computer to utilize advanc...

Page 48: ...rtamento value 7 10 Volume Pan 11 X Expression 64 66 67 Sustain Sostenuto Soft Pedal 65 X X Portamento yes no 80 81 Reverb Chorus program 91 Reverb Chorus send level 98 99 X X NRPNL NRPHH 100 101 X X RPNL RPNH 121 Reset all controllers 123 All notes off Program Change 0 127 0 127 System Exclusive X X Sys Common Song Select X X Sys Common Song Position X X System Clock X X Real Time Commands X X Mo...

Page 49: ...ench Horn 062 Brass Section 063 Synth Brass 1 064 Synth Brass 2 REED 065 Soprano Sax 066 Alto Sax 067 Tenor Sax 068 Baritone Sax 069 Oboe 070 English Horn 071 Bassoon 072 Clarinet PIPE 073 Piccolo 074 Flute 075 Recorder 076 Pan Flute 077 Bottle Blow 078 Shakuhachi 079 Whistle 080 Ocarina SYNTH LEAD 081 Square 082 Sawtooth 083 Caliope 084 Chiffer 085 Charang 086 Solo Vox 087 Fifths 088 Bass lead SY...

Page 50: ...2 41 Swing 3 42 Jive 43 Dixieland BALLAD 44 Ballad 1 45 Ballad 2 46 Ballad 3 47 Ballad 4 48 Ballad 5 COUNTRY 49 Country 1 50 Country 2 51 BlueGrass 52 Charlstn CARIBBEAN 53 Reggae 54 Beguine 55 BossaNova 56 Latin 57 Samba 58 ChaChaCha 59 Rhumba 60 Mambo 61 Tango BALLROOM 62 Slow Fox 63 Fox Trot 64 5 4Beat 65 Waltz 1 66 Waltz 2 67 March 68 Polka 69 Bolero CHINESE 70 China 1 71 China 2 72 China 3 73...

Page 51: ...ck Metronome Click Metronome Bell Kick Drum 2 Power Kick Drum Side Stick Power Snare Drum 2 Hand Clap Power Snare Drum 1 Low Floor Tom 2 Close Hi hat Low Floor Tom 1 Pedal Hi hat Low Tom Open Hi hat Low mid Tom Hi mid Tom Crash Cymbal 1 High Tom Ride Cymbal 1 Chinese Cymbal Ride Bell Tambourine Splash Cymbal Cowbell Crash Cymbal 2 Vibra Slap Ride Cymbal 2 Hi Bongo Low Bongo Mute Conga Hi Conga Low...

Page 52: ...ngle Cabasa Shaker Belltree Castanets Mute Surdo Open Surdo 153 Orchestra High Q Slap Scratch Push Scratch Pull Stick Square Click Metronome Click Metronome Bell Orche Bass Drum 2 Orche Bass Drum 1 Side Stick Orche Snare Drum 2 Hand Clap Orche Snare Drum 1 Timpani F Timpani F Timpani G Timpani G Timpani A Timpani A Timpani B Timpani C Timpani C Timpani D Timpani D Timpani E Timpani F Tambourine Sp...

Page 53: ...timpani except for in the effects kit Keys from E6 to C8 sound the same as the D 1 to B6 keys except for the Chinese kit A list of the sounds of E6 to C8 for Kit 9 Chinese kit are listed below No Key Sound 88 E6 Drum Hey 89 F6 Low Pai Gu 90 F 6 Small Cymbal 91 G6 Mid Pai Gu 92 G 6 Mute Small Cymbal 93 A6 High Pai Gu 94 A36 Mute Jing Gong 95 B6 Jing Gong 96 C7 Small Gong CHINESEKITCOMPLEMENT ...

Page 54: ... is en gaged the overall keyboard volume is reduced This pedal responds as the Master Volume Control 2 SUSTAIN PEDAL When the sustain pedal is engaged the engaged piano keys will decay gradually as if you were con tinuing to hold down the piano keys 1 2 FOOT VOLUME MIDI OUT IN SUSTAIN PEDAL HEADPHONES AUX DC 12V IN ...

Page 55: ...ee the pedal section for more information 4 HEADPHONES AUX You can play in total silence without disturbing others in the room by plugging a set of headphones into one of the appropriate sockets located on the left side of the keyboard When headphones are plugged into either of these jacks the main speaker system is turned off Two sets of head phones may be used 5 DC 12V IN This is the jack that t...

Page 56: ...f Tempo Pitch Bend Wheel AUTO BASS CHORD MODE Single Fingered Off AUTO ACCOMPANIMENT STYLE 100 Auto accompaniment styles ten quick select style buttons ACCOMPANIMENT CONTROL 100 One Touch Settings Tempo Tap Synchro start Start Stop Introduction Ending Fill In Variation Metronome MUSIC TRAINING COURSE 1 Listen and Play 2 Rhythm Training 3 Melody Training 4 Chord Dictionary 5 Chord Training 6 Song P...

Page 57: ...repair the product or return it to the Suzuki distribution center in San Diego California for repairs Upon completion of the repair the unit will be returned to the dealer freight prepaid This warranty will not apply to this product if it has been misused abused or altered This warranty is void if the product has been opened Without limiting the forego ing bending dropping of unit or visible crack...

Page 58: ...58 NOTES ...

Page 59: ...59 NOTES ...

Page 60: ... SUZUKI PORTABLE KEYBOARD SUZUKI OWNER S MANUAL SP 47 P O BOX 261030 SAN DIEGO CALIFORNIA 92196 858 566 9710 Visit us on the web at www suzukimusic com Copyright 2003 Suzuki Musical Instrument Corporation ...

Reviews: