Surveillix EVR16-X User Manual Download Page 47


29 


Importing DVR Settings 


1.


Exit to Windows by clicking the Exit Button on the Main Display Screen and selecting Restart in Windows Mode. (See the Display 
Screen section later in this chapter) 


2.


Click Start > Programs > Surveillix > VFormat 


3.


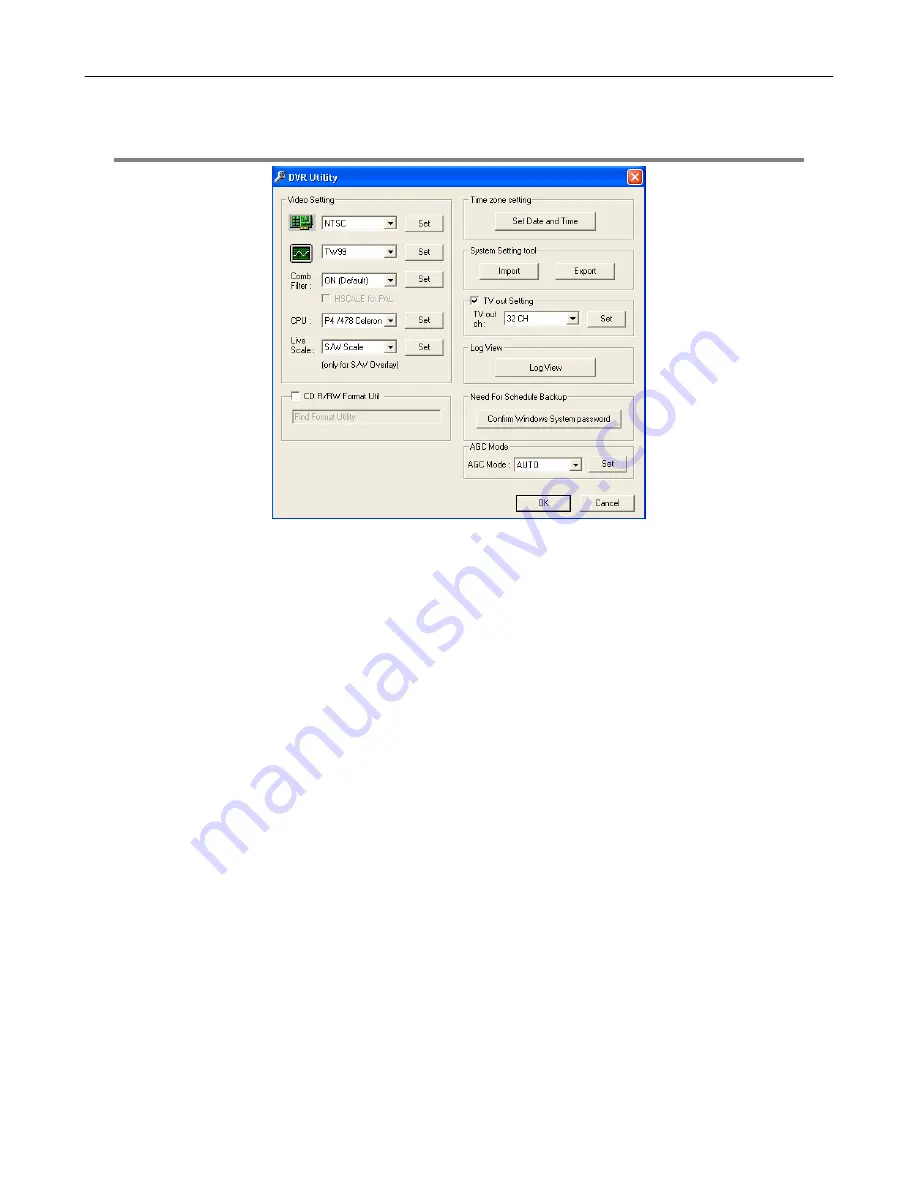
Click the Import Button in the System Settings Tool section. 


4.


Select the location of the settings file to import and click Open. 


5.


Click Yes to import the data file. 


6.


Click the OK Button to close the VFormat Utility. 

USING THE DVR UTILITY 


Exporting DVR Settings 


Exporting DVR settings can help configure multiple DVRs quickly or reconfigure a unit that has failed. Some things must be kept in 
mind when using this feature. 


You cannot use this function on: 


DVRs that are different models.  


When upgrading from certain software versions. You cannot use this feature when upgrading from 
 v1.x to v2.x 


1.


Exit to Windows by clicking the Exit Button on the Main Display Screen and selecting Restart in Windows Mode. (See the Display 
Screen section later in this chapter) 


2.


Click Start > Programs > Surveillix > VFormat 


3.


Click the Export Button in the System Settings tool section. 


4.


Select a location to save the settings file and click Save. The DVR Utility will export the DVR settings and automatically close. 


5.


Click the OK Button to close the VFormat Utility. 

Summary of Contents for EVR16-X

Page 1: ...Video Recorder EVR DVR HVR User Manual DVR8 X EVR8 X HVR8 X DVR16 X EVR16 X HVR16 X EVR32 X HVR32 X model no Please carefully read these instructions before using this product Save this manual for fu...

Page 2: ...ii...

Page 3: ...ROFITS BUSINESS INTERRUPTION OR LOSS OF BUSINESS INFORMATION EVEN IF TOSHIBA HAS BEEN ADVISED OF THE POSSIBILITY OF SUCH DAMAGES AND WHETHER IN AN ACTION OR CONTRACT OR TORT INCLUDING NEGLIGENCE This...

Page 4: ...iv...

Page 5: ...Responsibilities The above warranty is subject to the following conditions 1 You must retain the bill of sale or provide other proof of purchase 2 You must schedule service within thirty days after y...

Page 6: ...ted so that they are not likely to be walked on or pinched by items placed against them paying particular attention to cords at plugs convenience receptacles and the point where they exit from the pro...

Page 7: ...s specified by the manufacturer or have the same characteristics as the original part Unauthorized substitutions may result in fire electric shock or other hazards 18 Safety Check Upon completion of a...

Page 8: ...carefully Moisture condensation occurs during the following cases When this product is brought directly from a cool location to a warm location When this product is moved to a hot and humid location...

Page 9: ...VICE PERSONNEL C A U T I O N RISK OF ELECTRIC SHOCK DO NOT OPEN EXPLANATION OF GRAPHICAL SYMBOLS The lightning flash with arrowhead symbol within an equilateral triangle is intended to alert the user...

Page 10: ...supply connections other than direct connections to the branch circuit e g use of power strips FCC STATEMENT This equipment has been tested and found to comply with the limits for a Class A digital de...

Page 11: ...d by Article 5 of 93 68 EEC per the provisions of EN 55022 1994 EN 55024 1998 EN 61000 4 4 1995 EN 61000 3 2 1995 CISPR 24 1997 EN 61000 4 5 1995 EN 61000 3 3 1995 EN 61000 4 2 1995 EN 61000 4 6 1995...

Page 12: ...xii...

Page 13: ...n 13 GETTING STARTED 15 IDENTIFYING INCLUDED COMPONENTS 16 OPTIONAL COMPONENTS 17 KEYBOARD SETUP 18 MOUSE SETUP 18 MONITOR SETUP 19 POWER SETUP 19 CONNECTING A VIDEO SOURCE TO THE DVR 20 CONNECTING SE...

Page 14: ...0 x120 models 44 Enable Video Out to Spot Monitor 44 Maximum PPS Table 45 SCHEDULE SETUP 46 Recording Schedule 46 Sensor Schedule 47 Create a Recording Schedule 48 Create a Sensor Schedule 48 Scheduli...

Page 15: ...VINGS TIME 68 SAVE TO JPG OR AVI 68 SINGLE CLIP BACKUP 69 PRINTING AN IMAGE 69 PERFORMING A BASIC SEARCH 70 INDEX SEARCH 70 Performing an Index Search 70 Index Search Results Display 70 PREVIEW SEARCH...

Page 16: ...RVIEW 96 SETUP EVENT SENTRY 96 Add Email Notification Filters 96 WEB VIEWER 99 WEB VIEWER OVERVIEW 100 Configuring the Server for Remote Connection 101 Connecting to a DVR Using Web Viewer 101 Closing...

Page 17: ...fier 111 BACKUP VIEWER OVERVIEW 112 Installing Backup Viewer 112 Loading Video from DVD or Hard Drive 113 SCS OVERVIEW 114 Configuring the Server for Remote Connection 114 Connecting to an DVR 114 APP...

Page 18: ...xviii...

Page 19: ...s DVR unit All troubleshooting and repair procedures that may be shown are for reference and minor repair only Because of the complexity of the individual components and subassemblies no one should at...

Page 20: ...2...

Page 21: ...r security investment has never been easier to maintain Multiple users may simultaneously connect through any network connection for instantaneous live viewing digital search and off site video storag...

Page 22: ...tiple Levels of Security Access Up to 32 Looping Outputs 1 Composite Output S Video Output Up to 32 Camera Inputs Up to 16 Network Recording Channels HVR standard upgrade option for EVR or DVR Up to 8...

Page 23: ...5 NOTES...

Page 24: ...6 NOTES...

Page 25: ...7 CONTROLS AND CONNECTIONS This chapter includes the following information Input Output Connector Locations Front Panel Controls and LEDs Rear Panel Connectors...

Page 26: ...Ethernet 512 MB of System Memory 1GB of System Memory 128 MB VGA Card 128 MB VGA Card DVD RW Recorder DVD RW Recorder Full Duplex High Fi Sound Functionality Full Duplex High Fi Sound Functionality 2...

Page 27: ...9 EVR HVR Hard Drive Activity Power LEDs On Off Power Switch DVD RW Drive Cooling Fan Air Intake Hard Drive Array USB Ports Hard Drive Array...

Page 28: ...scription of each connector DVR HVR ON OFF AC Power Connector Secondary Power Switch PS 2 Mouse Input PS 2 Keyboard Input DB 9 Serial Input 1 LPT Parallel Printer Port SVGA Output Fire Wire w RAID onl...

Page 29: ...t CH 13 Out CH 14 Out CH 15 Out CH 16 Out CH 17 Out CH 18 Out CH 19 Out CH 20 Out CH 21 Out CH 22 Out CH 23 Out CH 24 Out CH 25 Out CH 26 Out CH 27 Out CH 28 Out CH 29 Out CH 30 Out CH 31 Out CH 32 Ou...

Page 30: ...PCI Configuration x120R PCI Configuration x240 8 and 16 Channel PCI Configuration RCA Video Out RS 422 Interface RCA Video Out Audio Inputs S Video Output RS 485 Interface SVGA Monitor Output RCA Vide...

Page 31: ...0 32 Channel PCI Configuration x480 PCI Configuration RCA Video Out S Video Out SVGA Monitor Output Audio Inputs RS 485 Interface RCA Video Out S Video Out Audio Inputs SVGA Monitor Output RS 485 Inte...

Page 32: ...14 NOTES...

Page 33: ...15 GETTING STARTED This chapter includes the following information Included Components Setting up the DVR Hardware Optional Components...

Page 34: ...ny of the following items are missing contact the dealer to arrange a replacement DVR Unit Mouse Keyboard Repair Disc Software Disc Power Adapter PTZ Adapter DVR Key Rack Mount Attachments with Screws...

Page 35: ...in fully functional even in the event of a power failure UPS Power Backups also even the fluctuating power current out to provide a consistent reliable power flow This creates a stable environment for...

Page 36: ...ne of these buttons is called clicking Sometimes you will need to double click or click the same button twice quickly In this manual Click means to position the mouse cursor over an item and to single...

Page 37: ...a screen resolution of 1024 x 768 and display colors of at least 32 Bit POWER SETUP WARNING To reduce the risk of electrical shock or damage to the equipment Do not disable the power grounding plug T...

Page 38: ...11 in CH 12 in CH13 in CH14 in CH 15 in CH16 in CH 17 in CH18 in CH19 in CH20 in CH 21 in CH22 in CH23 in CH 24 in CH25 in CH26 in CH 27 in CH 28 in CH29 in CH30 in CH 31 in CH32 in CH 1 Out CH2 Out...

Page 39: ...so an external power supply must be used if power is necessary CONNECTING CONTROL OUTPUTS TO THE DVR Each DVR unit may have up to 16 Control Outputs These outputs can be used to trigger devices such...

Page 40: ...be connected to video monitors or combined with adapters to connect to VCR s LOOPING OUTPUT TERMINATION When terminating the outputs becomes necessary the DVR unit has built in termination that allows...

Page 41: ...on the yellow and orange wires are not used currently 3 Connect the other end of the adapter to the XVR unit as shown 4 Assign the PTZ camera an ID number that coincides with the number assigned to it...

Page 42: ...being removed 2 Turn the Button Lock to the open position and push the Handle Release Button 3 Pull the Release Handle outward while removing the hard drive Reverse steps to install LOCK OPEN LOCK OPE...

Page 43: ...25 NOTES...

Page 44: ...26 NOTES...

Page 45: ...27 DVR BASICS This chapter includes the following information Turning the DVR on and off Becoming familiar with the Display screen Defining Screen Divisions...

Page 46: ...ond to these messages If you are asked to respond to the messages adding a Printer Monitor etc for the first time follow the instructions carefully After this finishes the Surveillix DVR software shou...

Page 47: ...multiple DVRs quickly or reconfigure a unit that has failed Some things must be kept in mind when using this feature You cannot use this function on DVRs that are different models When upgrading from...

Page 48: ...ction NTSC or PAL 4 Click Set 5 Click the OK Button to close the VFormat Utility DISPLAY SCREEN Each time the DVR is started the program defaults to the Display screen The following diagram outlines t...

Page 49: ...recorded to the DVR unit Special Recording There are two types of DVR Special Recording Text is displayed on the camera indicating what type of Special Recording is activated SENSOR Sensor is displaye...

Page 50: ...Area To return to a different Multi Camera View select a different Screen Division option from the Screen Division Menu 2nd Nine Camera View Displays cameras 8 16 in the Video Display Area To return t...

Page 51: ...33...

Page 52: ...34...

Page 53: ...35 SETUP OPTIONS This chapter includes the following information Setup Overview Channels Color Schedule Speed Motion Detect Password Pan Tilt Audio...

Page 54: ...type of recording done by adding motion detection to this as well again increasing the amount of useful video DVR Access By setting up the access passwords you can tightly control the types of access...

Page 55: ...w camera from the Select Camera Drop Down Menu 5 Enter a name for the camera in the Camera Name Field 6 Adjust the Brightness Hue and Contrast if necessary 7 Select the appropriate sensors to associat...

Page 56: ...ted by the Surveillix unit This is a unique code generated using the MAC address of the computer running the software The following steps illustrate how to locate the System ID 1 Enter Setup 2 Click C...

Page 57: ...39 7 Once validated the user will be provided with the Unlock Code 8 Print the page and save for later reference...

Page 58: ...ct the camera channel to add a Network Device to 3 Check the Use Network Device Box 4 If the Network Device supports PTZ check the Enable Network Device PTZ Box 5 Click Setup Network Device and the Ne...

Page 59: ...egions per camera Resize and move them by dragging the sides and corners of the box 4 Adjust the sensitivity of the motion area using the sensitivity slider 5 Define the recording time for a motion ev...

Page 60: ...tion Setup window select a camera to edit from the drop down menu 2 Create a motion area 3 Select the Alarm Output box 4 Select a Control Output to activate for the selected camera 5 Select the durati...

Page 61: ...t a higher PPS to remote connections Ex If a camera channel is set to 25 PPS blue and 7 PPS red the DVR will record at 7 PPS and users viewing live video remotely can receive up to 25 PPS Frame Setup...

Page 62: ...usting this setting can have negative effects on video quality NOTE Do not change from default setting unless instructed by a system administrator Enable Video Out to Spot Monitor 6 Click the Setup Bu...

Page 63: ...annel will use 4 of the total frames available Resolution CCTV x120 model x60 model 320x240 1CIF 120 PPS 60 PPS 640x240 2CIF 120 PPS 60 PPS 640x480 4CIF 60 PPS 30 PPS 32 Channel Frame Allocation 32 Ch...

Page 64: ...ding desired In addition this window contains the System Restart options that allow the user to perform basic system maintenance by automatically scheduling the DVR to restart periodically Single Day...

Page 65: ...sensor event occurs the associated cameras will begin recording as a Sensor Event Sensor Recordings will be flagged and searchable using the Index Search Mode Cameras are associated to sensors in the...

Page 66: ...local server CENTRAL STATION This option sends the Alarm Events to Central Station software EMERGENCY AGENT This option sends the Alarm Event to the Emergency Agent software Motion can be designated a...

Page 67: ...the right of the Date Bar 3 Highlight the time blocks within the Recording Schedule Window for the camera s selected to schedule Once the desired Time Blocks are highlighted click a Recording Mode But...

Page 68: ...lay 2 Click the System Restart Button 3 Select the day s of the week to schedule an automatic system restart and select the box to enable shut down NOTE This step alone does not trigger the DVR to res...

Page 69: ...for the desired sensor 4 Enter the Delay Time to define the number of seconds after the sensor is tripped until the relay is activated 5 Enter the relay s to associate with the sensor Two or more rel...

Page 70: ...nd Output Display 4 Click the Sensor Preset Button 5 Select the desired camera from the Channel Drop Down Menu 6 Select the appropriate sensor from the drop down menu 7 Select the preconfigured PTZ Pr...

Page 71: ...sers to play a sound file when either a Motion event or Sensor event occur This file can be a custom created sound file that is unique to the application The selected WAV file is played through speake...

Page 72: ...ctivate the Intensive Recording To activate the Intensive Recording option follow these steps 1 Inside Camera Setup select the camera to use and enable the sensor to associate with it 2 Click on Gener...

Page 73: ...he TV Out port 4 Select and Event Popup Box if desired 5 Define the Event Holding Time the number of seconds the camera displays after an event for selected event types 6 Define the Auto Switching Tim...

Page 74: ...ustom Mode Enable to create non standard screen divisions Skip 0 FPS Channel Sequence skips cameras with no video signal Create Custom Auto Sequence 1 Open General Setup and click the Sequence Setting...

Page 75: ...Agent and enable Remote Access Transport Rate A bandwidth throttle based on percentage of free network Web Viewer iDVR Enables Disables access to the DVR using the Web Viewer interface Use with Emerg...

Page 76: ...cameras and setting PTZ options INFORMATION The Information Display allows users to define the site code necessary for connecting to remote software save comments relative to the DVR and store tech su...

Page 77: ...59 ADMINISTRATIVE SETUP Safely Remove Connected Device Change Data Storage Location Select Date Export Log Data 1 to 7 days Log Data Display...

Page 78: ...ill be performed and their frequency Recording Data Check Configures when recording checks will be performed and their frequency Alarm Event Configures when general alarms will be sent Disk Management...

Page 79: ...to the User Management Console NOTE The Delete User Button immediately deletes the user use cautiously Add a New User 1 Open the Administrative Setup Display 2 Click the User Management Button 3 Click...

Page 80: ...on 6 Set the user s rank using the User Rank drop down menu and press the OK Button to save changes Changing the Administrator Password 1 Inside Administrative Setup click the User Management Button W...

Page 81: ...63 NOTES...

Page 82: ...64...

Page 83: ...65 SEARCH This chapter includes the following information Setup Overview Channels Color Schedule Speed Motion Detect Password Pan Tilt Quit to Explorer...

Page 84: ...ollowing chapter describes in detail how to use the DVR search features NOTE Audio Channel Buttons are only viewable when one camera is selected Play Controls Back Frame Moves video back one frame Rew...

Page 85: ...en Video from Saved Location 1 Previously saved video clips or backup files can be searched for content Find file by date and time or by name 2 Click the Open Button to search for the saved file 3 Sel...

Page 86: ...fers some type of support for these file formats which make them the most ideal formats to use JPG Optimized for compressing full color or grayscale photographic images JPG images are 24 bit 16 7 mill...

Page 87: ...he Include Viewer to include a copy of the proprietary Backup Viewer Software to view the clip on virtually any windows machine 6 Click the Add Memo Button to include additional information 7 Click th...

Page 88: ...endar Button on the Search Screen to select the date to search 2 Click the Index Search Button The Index Search Option Box will open 3 Select a single camera or select the All Cameras Box 4 Select the...

Page 89: ...t appears has 24 images displayed Each image represents the first second of each hour If there is no image recorded during that period then nothing will be displayed When an hour is selected by double...

Page 90: ...an image to select the 1 minute segment of video to play A single image displays If needed return to the previous 10 image view by right clicking on an image 6 Use the Play controls to play the video...

Page 91: ...ion region box Resize by pulling on the small square boxes located on the outer perimeter of the box 5 Click the Start Search Button the Object Search Filter Window will open 6 Select an end date time...

Page 92: ...ton on the mouse 3 The Search in Live Controls will display at the bottom of the image 4 Use the controls to pause rewind move frame by frame or resume playing as desired AUDIO PLAYBACK Audio is playe...

Page 93: ...75 NOTES...

Page 94: ...76 NOTES...

Page 95: ...77 PAN TILT ZOOM This chapter includes the following information Overview Setting up the PTZ Creating and Viewing a Preset Position Creating and Viewing a Preset Pattern...

Page 96: ...the Connections section of this manual for information on connecting the PTZ camera to the DVR Enable the PTZ Settings 1 Inside the DVR PTZ Setup select the PTZ camera using the Camera Channel drop d...

Page 97: ...k the Open PTZ Controller Button 3 Move the selected camera to the desired position using the Pan Tilt Zoom Focus controls 4 In the Preset Tour Detail section choose a Preset 1 10 using the drop down...

Page 98: ...ge number of PTZ cameras are connected to the DVR ACCESSING PTZ MENUS Some protocols support the ability to access the Internal PTZ Onscreen Menu Since every PTZ camera is different the functions of t...

Page 99: ...ght directions are available only for select protocols Only four of the PTZ Control buttons work for all protocols UP DOWN LEFT RIGHT Using the On Screen Compass 1 Click the Setup Button on the main s...

Page 100: ...seconds that a PTZ Tour displays a Preset Position Setting Start Pos End Pos Define a Mimic Tour The Start Position Button begins the recording process The Stop Position Button ends it Pan Swing Tilt...

Page 101: ...indow 4 In Single Select Mode select one day of the week to create a schedule for or toggle to Multi Select Mode to select multiple days with the same schedule 5 Click and drag the mouse cursor to sel...

Page 102: ...84 NOTES...

Page 103: ...85 BACKING UP VIDEO DATA This chapter includes the following information Overview Saving Video to a DVD R Saving Video from a Single Camera Scheduling Regular Video Backup...

Page 104: ...ue recording without interruption This is the result of the tremendous multiplexing power of the DVR unit which allows it to perform virtually all functions without disrupting the recording process NE...

Page 105: ...r dates to back up video from using the calendar Dates highlighted in blue contain recorded data 3 Select the blocks of time to back up using the Hour Minute Menu Blocks of time with recorded video ar...

Page 106: ...n 3 Set the Backup Time and End Time of the video to backup in the Time Setup Box 4 Select the Cameras to back up in the Channel Selection Box 5 Select the Backup Drive to save the backup video to 6 C...

Page 107: ...heckbox to overwrite previous scheduled backups when the disk becomes full 7 Click the Save Backup Setting Button to save the current backup setting and return to the Main Display Screen Specifying Sc...

Page 108: ...90 NOTES...

Page 109: ...91 LAN ISDN PSTN CONNECTIONS This chapter includes the following information Overview Configuring TCP IP Settings Connecting to a LAN...

Page 110: ...g options of the DVR unit can create and edit all Network settings available on Windows XP Embedded The DVR unit comes equipped with a 10 100 Network Interface Card NIC This card uses a standard RJ 45...

Page 111: ...93 NOTES...

Page 112: ...94 NOTES...

Page 113: ...95 EVENT SENTRY This chapter includes the following information Overview Setup Event Sentry...

Page 114: ...last window click Finish 4 Select No More Tips Please In the Tips and Tricks Window 5 Click Close 6 The main page of the Event Sentry Management consol will display Add Email Notification Filters 1 Fi...

Page 115: ...cept the Event ID field which corresponds to the filter name 10 After all three filters are added save the settings File Save 11 Exit the Event Sentry Management Software File Exit 12 Double Click the...

Page 116: ...98 NOTES...

Page 117: ...99 WEB VIEWER This chapter includes the following information Overview Configuring the Web Viewer...

Page 118: ...view live video from virtually any computer with an internet connection using Microsoft Internet Explorer In order to log in to the DVR server a user account must be made for the user This ensures tha...

Page 119: ...R into the Address Bar 3 When attempting this for the first time on a Computer a window will open and you will be asked to accept an Active X installation Select Yes to this NOTE If you receive a mess...

Page 120: ...102 NOTES...

Page 121: ...103 INCLUDED SOFTWARE SETUP This chapter includes the following information Emergency Agent Overview Remote Software Overview Digital Verifier Backup Viewer SCS Multi Site Software Overview...

Page 122: ...ing Menu if necessary It is recommended that the default setting should be used unless the port must be changed 4 Click the Schedule Setup Button Enter the IP Address of the computer running the Emerg...

Page 123: ...ation settings for activating an audible indicator or popup window when the Emergency Agent receives an event Emergency Agent Window Filter Event List 1 Select a DVR from the DVR Drop Down Menu in the...

Page 124: ...red video 3 Select the Continue Playing Box to watch all recorded events When not selected playback stops at the end of the alarm event 4 Select the Same Camera Box to watch all events recorded by a s...

Page 125: ...setup or control a PTZ camera at any given time The pictures per second passed to the Remote Client vary greatly depending on the connection type and speed In order to log in to the DVR server a user...

Page 126: ...12MB System Memory DirectX 9 or higher Compatible video card ATI Preferable Internet or LAN Connection DSL Cable Modem T1 ISDN etc TCP IP installed Microsoft Windows 2000 or XP Operating System 1024 x...

Page 127: ...e Name The Site Name will be the name displayed inside the connection box to help identify the unit 4 Enter the IP Address of the DVR server By default the DVR unit is set to connect using DHCP 5 Ente...

Page 128: ...eck the Disable Remote Control option You should now be allowed to adjust port settings if necessary NOTE If you are using a Firewall it may be necessary to adjust the port settings on both the DVR an...

Page 129: ...ier option to begin installation When the Welcome screen appears click Next 3 When the Setup Complete window appears click Finish Installation is complete Using the Digital Verifier 1 Open the Digital...

Page 130: ...on DVD into the DVD ROM Do not install on the DVR unit 2 Select the Backup Viewer option to begin installation When the Welcome screen opens click Next 3 Read the License Agreement and select the appr...

Page 131: ...M data select the appropriate DVD ROM drive letter from the Backup Media Box For hard drive data select either an attached hard drive from the Backup Media Box or select the Open Folder Icon to browse...

Page 132: ...og in In addition each user can be assigned different privileges that allow them or deny them access to different functions Configuring the Server for Remote Connection 1 Enter Setup on the DVR unit 2...

Page 133: ...115 NOTES...

Page 134: ...116...

Page 135: ...117 APPENDIX SPECIFICATIONS...

Page 136: ...118...

Page 137: ...n 240 PPS 480 PPS PAL 720x576 720x288 360x288 Image Compression MJPEG 360x240 3 5k 720x240 4 8k Average File Size 720x480 7 12k Video Inputs 8CH BNC 16CH BNC Looping Outputs 8CH BNC Each can be termin...

Page 138: ...120 NOTES...

Page 139: ...mpression MJPEG 360x240 3 5k 720x240 4 8k Average File Size 720x480 7 12k Video Inputs 8 CH BNC 16 CH BNC 32 CH BNC Looping Outputs 8 CH BNC 16 CH BNC 32 CH BNC Composite Outputs RCA Video Outputs S V...

Page 140: ...122 NOTES...

Page 141: ...n the resolutions the Network Camera supports Image Compression MJPEG 360x240 3 5k 720x240 4 8k Average File Size 720x480 7 12k Video Inputs 8 CH BNC 16 CH BNC 32 CH BNC Looping Outputs 8 CH BNC 16 CH...

Reviews: