background image

10

19“ Basic Unit Manual | Surface Concept GmbH

4.2  General Device Operation

After switching on the device (1), the display (4) shows the “Surface Concept” animated logo, while the 

device is scanning for available modules and their specific settings. This can take up to several seconds. 

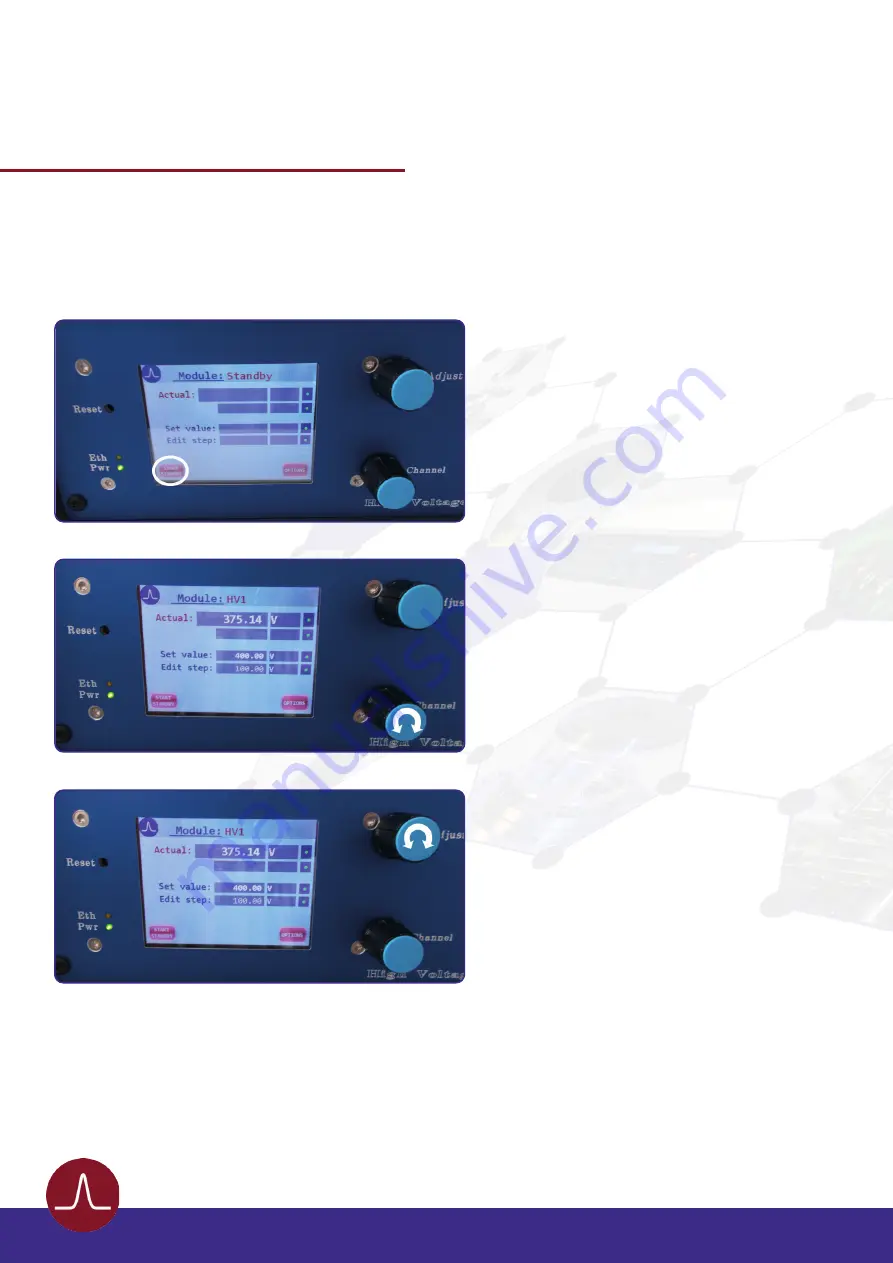
If the device is ready for operation, it switches into the standby mode and shows an empty mask for the 

voltage adjustment (see

 Figure 2

).

Push the “Start/Standby” button in the lower left

corner of the display to switch on the high 

voltage.

Alternatively one can press the “Channel” control

knob.

After switching on the high voltage the device 

is in the so called operation mode. In operation 

mode the display shows the name of the selected 

channel in the top line (in this case “HV 1”) as well 

as the output voltage of that channel.  

The different HV channels can be selected by 

turning the “Channel” control knob.

Figure 2: Standby mode.

Figure 3: Operation mode.

Figure 4: Operation mode – voltage adjustment.

The “Adjust” control knob is used to adjust the 

output voltage. Turn the “Adjust” control knob 

clockwise/counterclockwise to increase/decrease 

the value of the output voltage in a step width as 

defined in the line “edit step”.

The line “set value” displays the nominal value 

for the output voltage as adjusted by the user. 

Voltage adjustment can only be made in this line.

The line “actual” displays the actual value for the 

output voltage on the output connector as measured by the device. The device always regulates the actual 

value of the output voltage to fit to the nominal value as set by the user. Hereby the voltage measurement 

is always a relative measurement between the two HV outputs of one channel. Additional reference 

voltages (e.g. in floating operation) are not measured and therefore are also not displayed (see the manual 

of the specific module for further details). Turn the “Adjust” control knob clockwise/counterclockwise while 

pushing it to increase/decrease the step width in the line “edit step”.

Push the „Start/Standby“-button in the lower left corner of the display again to switch back to 

the “Standby” mode. 

Summary of Contents for HVPS

Page 1: ...19 Basic Unit for HVPS Modules Release R015 Manual...

Page 2: ...Basic Unit Manual Surface Concept GmbH Surface Concept GmbH Am S gewerk 23a 55124 Mainz Germany phone 49 6131 62716 0 fax 49 6131 62716 29 email info surface concept de web www surface concept de All...

Page 3: ...on 5 2 2 Safety Instructions 5 2 3 General Overview 6 3 Introduction 7 3 1 Initial Inspection 7 3 2 Installation 7 4 Device Layout Operation 9 4 1 Device Layout 9 4 2 General Device Operation 10 5 Add...

Page 4: ...4 19 Basic Unit Manual Surface Concept GmbH T h i s s i d e h a s b e e n l e f t b l a n k o n p u r p o s e...

Page 5: ...nsymbol markswarnings whicharegiventopreventanaccidentaldamaging of the device Do NOT ignore these warnings and follow them strictly Otherwise no guarantee is given for arose damages Note The note sym...

Page 6: ...as remotely The manual control is realized via an integrated touch display while the remote control is realized via an Ethernet interface and a binary encoded TCP IP protocol There is also a java bas...

Page 7: ...ic Unit R015 3 2 Installation The general connection scheme of the 19 Basic Unit is as follows First use the Ground connector M4 screw to ground the device Connect the power cable to the main connecto...

Page 8: ...8 19 Basic Unit Manual Surface Concept GmbH T h i s s i d e h a s b e e n l e f t b l a n k o n p u r p o s e...

Page 9: ...wer lightens up when device is switched on and Ethernet connection lightens up only when a software is connected to the HV supply 4 Touch Display 5 Control knob for high voltage adjustment 6 Control k...

Page 10: ...mode voltage adjustment The Adjust control knob is used to adjust the output voltage Turn the Adjust control knob clockwise counterclockwise to increase decrease the value of the output voltage in a s...

Page 11: ...ch display Figure 5 Device Options sub menu 5 1 Special Function Check The sub menu Special Function Check in the device options display the different special functions currently available for the dif...

Page 12: ...ncept GmbH 5 2 Contact Surface Concept The sub menu Contact Surface Concept in the device options displays the Surface Concept contact information Press the Exit button to leave this sub menu Figure 7...

Page 13: ...by error messages in the display Err Interlock The device interlock is active and is blocking the HV output Please terminate the interlock to ground using either the BNC termination plug part of the d...

Page 14: ...14 19 Basic Unit Manual Surface Concept GmbH T h i s s i d e h a s b e e n l e f t b l a n k o n p u r p o s e...

Page 15: ...Basic Unit Manual Surface Concept GmbH 7 Technical Data 19 Basic Unit R015 Housing Dimensions h w d No of Slots for Modules Electrical Input LINE Power max Fuse R033 177mm x 462mm x 496mm 9 85V 260V A...

Page 16: ...16 19 Basic Unit Manual Surface Concept GmbH...

Page 17: ...Basic Unit R015 9 Figure 2 Standby mode 10 Figure 3 Operation mode 10 Figure 4 Operation mode voltage adjustment 10 Figure 5 Device Options sub menu 11 Figure 6 Special Functions Check sub menu 11 Fig...

Page 18: ...g standards or other normative documents where relevant EN 61000 6 2 2005 AC 2005 Electromagnetic compatibility EMC Generic standards Immunity for industrial environments EN 61000 6 4 2007 A1 2011 Ele...

Reviews: