Surecom EP-804CG-S User Manual Download Page 11

4-6

4-7

Hot Keys

 There are numerous hotkey sequences listed near the bottom of each menu.
 These hotkeys can help you quickly access the various configuration functions
of your switch.
Functions:
Ctrl-S Start to run this configuration program
Ctrl-D Set to default configurations
Ctrl-Q Exit the configuration program
TAB Move cursor to the next item
BACKSPACE Move cursor to the prior item
ENTER Toggle selected item to next configuration
EP-804CG-S/805CG-S:                                                EP-808CG-S:
1: Port Status                                                               1: Port Status
2: Port Configuration                                                  2: Port Configuration
3: Mirror Configuration                                              3: Mirror Configuration
4: VLAN Configuration                                              4: VLAN Configuration
5: Misc Configuration                                                5. Trunk Configuration
                                                                                       6. Misc Configuration
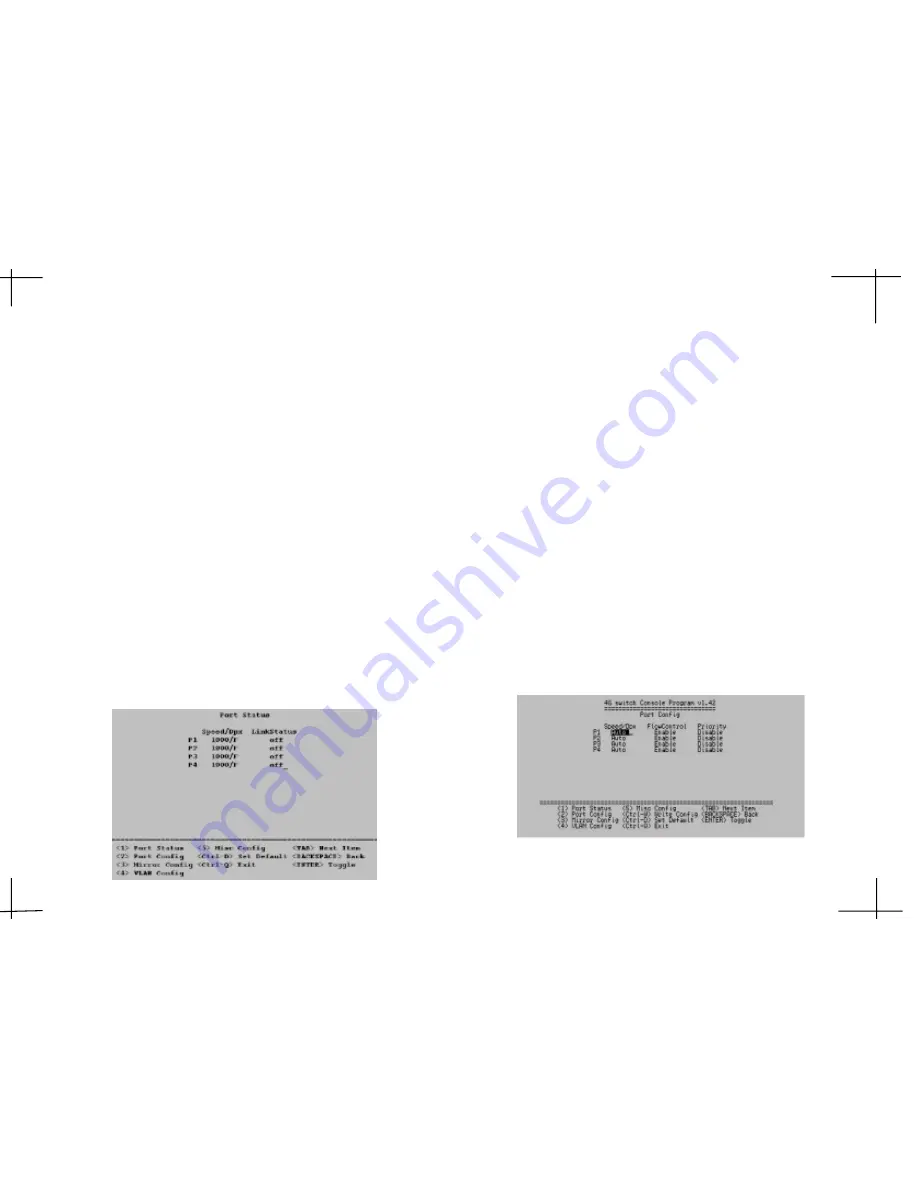
Port Status

 Users can view the status of the ports through the “port status” menu. It can show the
linking status and the speed/duplex mode that the port is currently running.

Step 1:

 Press “1” to view the port status. The following screen will appear

Speed/Dpx: 

This indicate the speed and duplex mode the port is currently running:

10F… 10M, full duplex mode
10H… 10M, half duplex mode
100F… 100M, full duplex mode
100H… 100M, half duplex mode
1000F… 1000M, full duplex mode

Link/Status:

This indicate the link status of the port:
OFF … The port is not connect
On … The port is connected

Port Configurations

 Note: Unless you have specific need to set your port setting at a fixed transmission
speed and mode, we suggest you to set all ports to Auto, which is also the default mode
 for per-port setting.
Step 1:

 Press “2” to select “

Port Config

” on the 

Main Menu 

and the following submenu appears:

Summary of Contents for EP-804CG-S

Page 1: ...4 5 8 Port 10 100 1000M Gigabit Ethernet Desktop Smart Switch User s Manual EP 804 805 808 CG S www surecom net com 5 ...

Page 2: ...nt product may cause radio interference in which case the user may be required to take adequate measures Trademarks All other brands and product names may be registered trademarks or trademarks of their respective holders Table of Contents E Chapter1 Chapter2 Chapter3 Chapter4 Introduction Key Features Package Contents Performance Highlights Hardware Front Panel LED Indicators Network Connection T...

Page 3: ...000M Gigabit Ethernet Desktop Smart Switch is designed for easy installation and high performance in an environment where traffic on the network and the number of users increase continuously Small businesses and corporate branch offices can now take full advantage of 1000Mbps Gigabit Ethernet performance and pre serve existing desktop investment with no changes required to PCs NICs cabling drivers...

Page 4: ...e e r G n O f o s p b M 0 0 0 1 t r o p d e t c e n n o c t r o p 4 4 Note 1 In the case of Link the lights of 100 and 1000 don t light up it belongs to 10Mbps 2 On 805CG S 808CG S LED when Tx lights on not flash it means that the switch is transmitting data to linked computer When Rx lights on it means the switch is receiving data from linked computer Power 100 Link Act 1 2 3 4 1000 EP 804CG S FD...

Page 5: ...four ports Note The LED indicators for PC connection are dependant on the LAN card capabilities If LED indicators are not illuminated after making a proper connection check the PC LAN card the cable the 4 5 8 port 10 100 1000M Gigabit Ethernet Desktop Smart Switch conditions and the connections SwitchtoHub A hub 10BASE T or 100BASE TX can be connected to the N Way Switch via a 2 pair Category 3 4 ...

Page 6: ...u D l l u F s p b M 0 0 2 x e l p u D f l a H s p b M 0 0 1 x e l p u D l l u F s p b M 0 0 0 2 a i d e M T E S A B 0 1 X T E S A B 0 0 1 T E S A B 0 0 0 1 M 0 0 1 o t p u 5 4 3 t a C P T U r i a p 2 t e n r e h t E M 0 0 1 o t p u 5 t a C P T U r i a p 2 t e n r e h t E t s a F M 0 0 1 o t p u s u l p 5 t a C P T U r i a p 4 t e n r e h t E t i b a g i G s t r o P f o o N r u o F J R s p b M 0 0 ...

Page 7: ...TUBFORYOURRECORDS Date Purchased Where Purchased From Whom Model Serial MANUFACTURER DISTRIBUTOR TO ATTN Place Stamp Here WARRANTY REGISTRATION CARD WARRANTY REGISTRATION CARD WARRANTY REGISTRATION CARD WARRANTY REGISTRATION CARD WARRANTY REGISTRATION CARD Please complete this form and return it within 10 days of purchase to validate the warranty Name Title Company Address Tel No Signature Purchas...

Page 8: ...ent you can easily configure the Switch for VLAN Priority and Port Mirroring function But before you can actually configure the smart management functions by your host PC you should establish a proper RS 232 cable connection between the console port of your switch and the COM port of your host PC Making RS 232 Cable Connection to the Host PC The way to make a RS 232 cable connection is simple Just...

Page 9: ...ration In the following section we will offer you a configuration example using Windows HyperTerminal on Win dows 95 98 2000 platform Run Windows HyperTerminal utility Step 1 After the RS 232 connection is properly made you should then run Windows HyperTerminal by accessing Start menu Accessory Communication HyperTerminal Step 2 The HyperTerminal window appears with a dialog box to prompt you to e...

Page 10: ...cond 9600 Data bits 8 Parity None Stop bits 1 Flow Control None ClickOK Step 6 Power on 4 5 8 Port 10 100 1000M Gigabit Ethernet Desktop Smart Switch Step 7 Press Control S when the blank screen appears Step 8 After the host PC has successfully connected to the 4 5 8 Port 10 100 1000M Gigabit Ethernet Desktop Smart Switch you will see the Switch Setup Main Menu appears EP 805CG S EP 808CG S EP 804...

Page 11: ... Configuration Port Status Users can view the status of the ports through the port status menu It can show the linking status and the speed duplex mode that the port is currently running Step 1 Press 1 to view the port status The following screen will appear Speed Dpx This indicate the speed and duplex mode the port is currently running 10F 10M full duplex mode 10H 10M half duplex mode 100F 100M f...

Page 12: ... Forced to 100M half duplex mode 1000F Forced to 1000M full duplex mode Flow Control Used to disable or enable the flow control operation for full duplex mode on the transmit side of the corresponding port Priority Used to set the priority classes on the corresponding port The Priority can be set as following Disable use the pin configuration as the priority Class 0 priority is class 0 lowest Clas...

Page 13: ...c Incoming Outgoing mirror all the monitored port s incoming and outgoing traffic Step 3 Press Tab and Backspace keys to navigate then press Enter key to change settings Step 4 To save changes press Control Q When asked whether to Save Changes press Y to save After exiting the program press Control S to enter the smart consol again VLAN Configurations VLAN divide the switch into different VLAN gro...

Page 14: ... VLANs it is very easy to set up overlappingVLANswithmaximumflexibility Create a VLAN Group Step 1 Press ENTER key to change enable a specific VLAN Group In this case we enable the VLAN Group 0 Step 2 Add a member port to the VLAN group by press ENTER below the port number you want to add A v sign will occur to indicate the added port Press ENTER again to remove a member port In the screen below p...

Page 15: ...te VLANs as well as overlapping VLANs Separate VLAN groups To set up Separate VLAN Groups with no overlapping between any two VLAN groups you should have your VLAN configurations looking similar to this Overlapping VLANs To set up overlapping VLAN Groups with overlapping between VLAN groups you should have your VLAN configurations looking similar to the following In this case Port 1 is the overlap...

Page 16: ...onds 1200sec set aging time to 1200 seconds IPPriorityMapping The IP Priority Mapping Ratio can be set in this menu For Type of Service TOS 1 to 7 each value can be changed to the desired value Trunk Configuration 808CG S Press 5 to enter the Trunk config Trunk A Used to disable or enable the trunk channel port 1 and port 2 BalancingMethod Source port based suggest use the model Soure add based So...

Reviews: