


6-4
S
UPER
S
ERVER 1026T-M3 Manual
6-4 Drive Bay Installation/Removal
Accessing the Drive Bays
Hard Drives: Because of their hotswap capability, you do not need to access the
inside of the chassis or power down the system to install or replace hard drives.
Proceed to the next section for instructions.
DVD-ROM Drive: For installing/removing a DVD-ROM drive, you will need to gain
access to the inside of the system by removing the top cover of the chassis. Proceed
to the "DVD-ROM Drive Installation" section later in this chapter for instructions.
Note:
Only a "slim" DVD-ROM drive will fi t into the server chassis.
Hard Drive Installation
The hard drives are mounted in drive carriers to simplify their installation and
removal from the chassis. These carriers also help promote proper airfl ow for
the drive bays. For this reason, even empty carriers without drives installed must
remain in the chassis.
Installing a Hard Drive into a Drive Carrier (Figure 6-3)
Insert a drive into the carrier with the PCB side facing down and the connec-
1.
tor end toward the rear of the carrier.
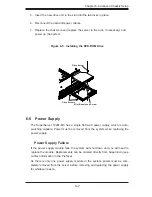
Figure 6-2: Replacing a System Fan
(shown with optional fan installed)
Summary of Contents for SuperServer 1026T-M3
Page 1: ...SUPER SUPERSERVER 1026T M3 USER S MANUAL Revision 1 0 ...
Page 5: ...v Preface Notes ...
Page 10: ...Notes x SUPERSERVER 1026T M3 User s Manual ...
Page 16: ...1 6 SUPERSERVER 1026T M3 User s Manual Notes ...
Page 28: ...2 12 SUPERSERVER 1026T M3 Manual Notes ...
Page 98: ...A 2 SUPERSERVER 1026T M3 User s Manual Notes ...


