background image

Chapter 2: Installation

2-3

Installing the Heatsinks

We recommend the use of active type heatsinks (except for 1U systems). Use any 

onboard fan header for the CPU's heatsink fan. To install the heatsink, please follow 

the installation instructions included with your heatsink package (not included).

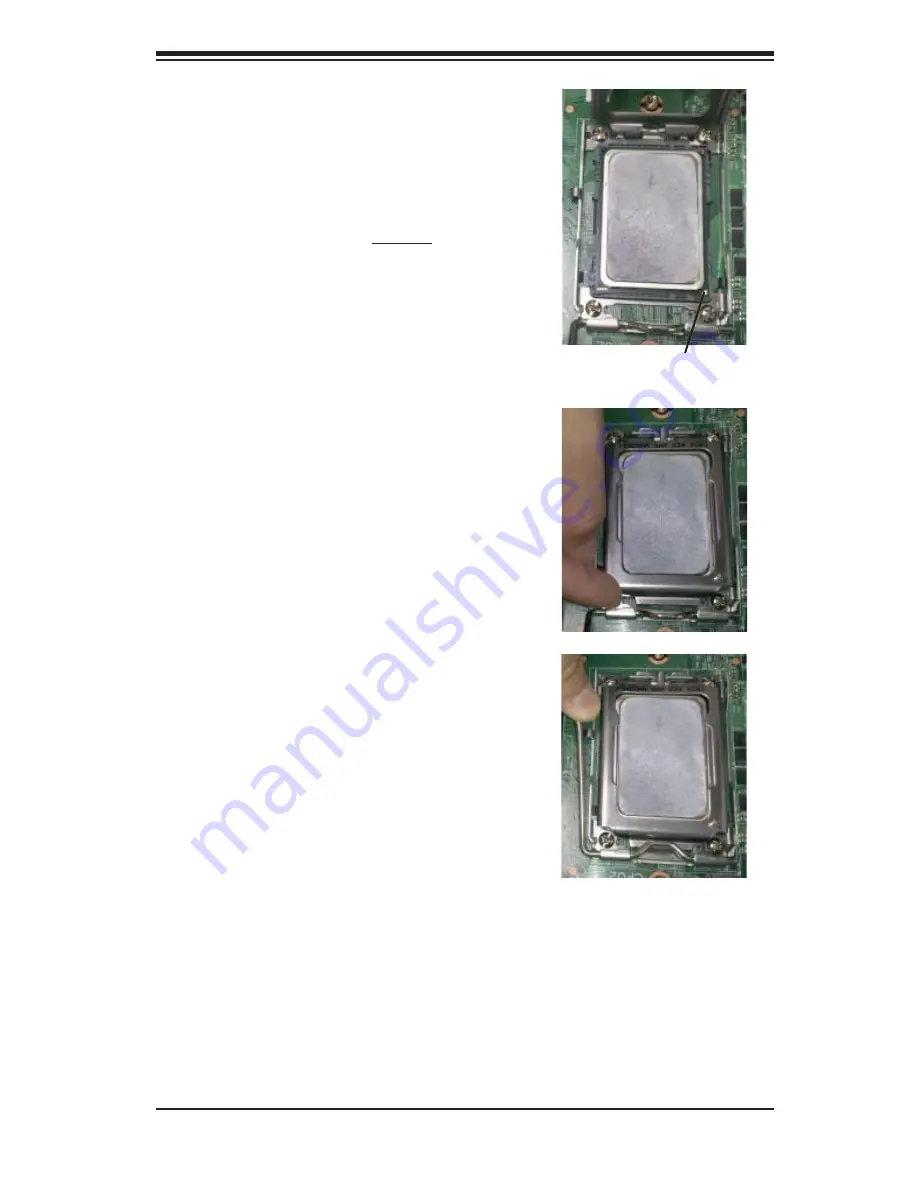
Triangle

Use your thumb and your index fi nger 

3. 

to hold the CPU. Locate and align pin 

1 of the CPU socket with pin 1 of the 

CPU. Both are marked with a triangle.

Align pin 1 of the CPU with pin 1 of the 

4. 

socket. Once aligned, carefully place 

the CPU into the socket. 

Do not drop 

the CPU on the socket, move the CPU 

horizontally or vertically or rub the CPU 

against the socket or against any pins 

of the socket, which may damage the 

CPU and/or the socket

.

With the CPU inserted into the socket, 

5. 

inspect the four corners of the CPU to 

make sure that it is properly installed 

and fl ush with the socket. Then, gently 

lower the silver CPU retention plate into 

place.

Carefully press the CPU socket lever 

6. 

down until it locks into its retention 

tab. For a dual-CPU system, repeat 

these steps to install another CPU into 

the CPU#2 socket (and into CPU#2, 

#3 and #4 sockets for a quad-CPU 

confi guration).

Note:

 in single and dual-CPU confi gurations, memory must be installed in the DIMM 

slots associated with the installed CPU(s). Memory is limited to a maximum of 128 

for single CPU and 256 GB for dual CPU confi gurations.

Summary of Contents for H8SGL

Page 1: ...H8SGL H8SGL F USER S MANUAL Revision 1 1 SUPER...

Page 2: ...of any such disputes Super Micro s total liability for all claims will not exceed the price paid for the hardware product FCC Statement This equipment has been tested and found to comply with the lim...

Page 3: ...hecklist of what should be included in your motherboard box describes the features specifications and performance of the motherboard and provides detailed information about the chipset Chapter 2 begin...

Page 4: ...iv H8SGL F Serverboard User s Manual Notes...

Page 5: ...Devices 1 Precautions 1 Unpacking 1 2 2 Processor and Heatsink Installation 2 2 3 Mounting the Motherboard into a Chassis 4 2 4 Installing Memory 4 DIMM Module Population Configuration 6 2 5 PCI Expan...

Page 6: ...aker Enable Disable 15 Compact Flash Master Slave Select 16 Watch Dog Enable Disable 16 USB Wake Up 16 BMC Jumper 16 2 9 Onboard Indicators 17 LAN1 LAN2 LEDs 17 Dedicated IPMI LAN LEDs 17 Power LED 17...

Page 7: ...Procedures 3 3 3 Frequently Asked Questions 3 3 4 Returning Merchandise for Service 4 Chapter 4 BIOS 4 1 Introduction 1 4 2 Main Menu 2 4 3 Advanced Settings Menu 2 4 3 Security Menu 14 4 4 Boot Menu...

Page 8: ...Notes viii H8SGL F Serverboard User s Manual...

Page 9: ...the highest standards in quality and performance Please check that the following items have all been included with your motherboard If anything listed here is damaged or missing contact your retailer...

Page 10: ...ess Super Micro Computer B V Het Sterrenbeeld 28 5215 ML s Hertogenbosch The Netherlands Tel 31 0 73 6400390 Fax 31 0 73 6416525 Email sales supermicro nl General Information support supermicro nl Tec...

Page 11: ...Chapter 1 Introduction 1 3 Figure 1 1 H8SGL F Image...

Page 12: ...SATA3 SATA2 SATA1 SATA0 JWOL JD1 JCF1 JOH1 JI2C1 JI2C2 JL1 DP3 BATTERY JBT1 JPL1 JPL2 JPUSB1 JPG1 JWD FAN2 FAN1 FAN6 FAN5 FAN3 FAN4 DIMM4B DIMM4A DIMM3B DIMM3A DIMM2B DIMM2A DIMM1B DIMM1A T SGPIO1 T...

Page 13: ...isable Both Closed Enabled JPB BMC Enable Disable Pins 1 2 Enabled JPG1 VGA Enable Disable Pins 1 2 Enabled JPL1 LAN 1 Enable Disable Pins 1 2 Enabled JPL2 LAN 2 Enable Disable Pins 1 2 Enabled JPUSB1...

Page 14: ...JL1 Chassis Intrusion Header JOH1 Overheat Warning Header JPI2C1 Power I2 C Header JPW1 24 pin Main ATX Power Connector JPW2 12V 8 pin CPU Power Connectors JWF1 Compact Flash Card Power Connector JWOL...

Page 15: ...One 1 PCI Express x8 in x16 slot Gen 2 One 1 PCI Express x8 Gen 2 One 1 PCI Express x4 in x8 slot Gen 2 Three 3 PCI slots BIOS 16 Mb AMIBIOS SPI Flash ROM APM 1 2 DMI 2 3 PCI 2 2 ACPI 1 0 ACPI 2 0 is...

Page 16: ...2x type A Two 2 LAN ports supported by two onboard Intel 82574 dual port Ethernet controller for 10 100 1000Base T One 1 dedicated IPMI LAN port H8SGL F only One 1 VGA port supported by an onboard Ma...

Page 17: ...R PCI LPC SMBus SIO W83527HG HWM W83795G SPI Flash KB MS COM2 RMII DDR2 SDRAM 64MB X16 PSU I2C IPMB FE PHY RTL8201N VGA RJ45 Clock Gen TPM SR5650 COM1 RJ45 INTEL 82574L PCI SLOT2 PCI SLOT3 PCI E GEN2...

Page 18: ...to 48x between integrated circuits This is done partly by reducing the number of buses in the chipset to reduce bottlenecks and by enabling a more efficient use of memory in multi processor systems T...

Page 19: ...ways on but appears to be off and responds immediately to user or other requests Slow Blinking LED for Suspend State Indicator When the CPU goes into a suspend state the chassis power LED will start b...

Page 20: ...d by power surges Warning To prevent the possibility of explosion do not use the wrong type of onboard CMOS battery or install it upside down 1 7 Super I O The disk drive adapter functions of the Supe...

Page 21: ...Chapter 1 Introduction 1 13 The IRQs DMAs and I O space resources of the Super I O can be flexibly adjusted to meet ISA PnP requirements which support ACPI and APM Advanced Power Management...

Page 22: ...1 14 H8SGL F Serverboard User s Manual Notes...

Page 23: ...its components peripheral chips memory modules or gold contacts When handling chips or modules avoid touching their pins Put the motherboard and peripherals back into their antistatic bags when not i...

Page 24: ...rocedure Follow the procedures as listed below to install the motherboard into a chassis Install the processor s and the heatsink s 1 Install the motherboard in the chassis 2 Install the memory and ad...

Page 25: ...the CPU horizontally or vertically or rub the CPU against the socket or against any pins of the socket which may damage the CPU and or the socket With the CPU inserted into the socket 5 inspect the fo...

Page 26: ...o the Tray in the Chassis Carefully mount the motherboard onto the motherboard tray by aligning the 1 motherboard mounting holes with the raised metal standoffs in the tray Insert screws into all the...

Page 27: ...C Unbuffered ECC non ECC SDRAM Populating four adjacent slots at a time with memory modules of the same size and type will result in interleaved 128 bit memory which is faster than non interleaved 64...

Page 28: ...w for memory installation Per Channel DIMM Populations Options DIMM Type DIMM A DIMM B Max MHz 1 5V DIMMs Max MHz 1 35V DIMMs Max GB Channel Unbuffered DIMM SR or DR Empty 1333 MHz 1333 MHz 8 GB SR SR...

Page 29: ...chassis remove the PCI slot shield 6 Slide the add on card into the riser card and attach the add on card bracket 7 in place of the PCI slot shield Secure the add on card by closing the PCI slot shiel...

Page 30: ...Port Locations and Definitions Front Control Panel JF1 contains header pins for various front control panel connectors See Figure 2 3 for the pin definitions of the various connectors Refer to Sectio...

Page 31: ...er chassis See the table on the right for pin definitions PW_ON Connector The PW_ON connector is on pins 1 and 2 of JF1 This header should be connected to the chassis power button See the table on the...

Page 32: ...ay network activity See the table on the right for pin definitions Power On LED The Power On LED connector is located on pins 15 and 16 of JF1 This connection is used to provide LED indication of powe...

Page 33: ...ons Pin Definition 1 Ground 2 12V 3 Tachometer 4 PWR Modulation Fan Headers This motherboard has six fan headers Fan1 to Fan6 These 4 pin fans headers are backward compatible with 3 pin fans However f...

Page 34: ...in Definitions T SGPIO1 TSGPIO2 Pin Definition Pin Definition 1 NC 2 NC 3 Ground 4 Data 5 Load 6 Ground 7 NC 8 NC Note NC indicates no connection Power I2C The JPI2C1 header is for power I2 C which ma...

Page 35: ...s 4 7 are for the speaker See the tables on the right for pin definitions If you wish to use the onboard speaker you should close pins 6 7 with a jumper Connect a cable to pins 4 7 of JD1 to use an ex...

Page 36: ...diagram at right for an example of jumping pins 1 and 2 Refer to the motherboard layout page for jumper locations Note On two pin jumpers Closed means the jumper is on and Open means the jumper is off...

Page 37: ...2 Enable Disable Change the setting of jumper JPL1 or JPL2 to enable or disable the LAN1 or LAN2 Ethernets port See the table on the right for jumper settings The default setting is enabled LAN1 2 En...

Page 38: ...operly you will need to connect the Compact Flash Card power cable to JWF1 first Refer to the board layout below for the location Compact Flash Card Master Slave Select JCF1 Jumper Setting Definition...

Page 39: ...EDs A dedicated IPMI LAN is also included on the H8SGL F serverboard The amber LED on the right indicates activity while the green LED on the left indicates the speed of the connection See the table a...

Page 40: ...ns IDE 1 Pin Definition Pin Definition 1 Reset IDE 2 Ground 3 Host Data 7 4 Host Data 8 5 Host Data 6 6 Host Data 9 7 Host Data 5 8 Host Data 10 9 Host Data 4 10 Host Data 11 11 Host Data 3 12 Host Da...

Page 41: ...alling the OS operating system and SATA RAID driver you must decide if you wish to have the operating system installed as part of a bootable RAID array or installed to a separate non RAID hard drive I...

Page 42: ...hit the Del key to enter the BIOS Setup Utlility After the Setup Utility loads Use the arrow keys to move to the Exit menu Scroll down with the arrow 1 keys to the Load Optimal Defaults setting and p...

Page 43: ...ing the RAID Driver During OS Installation You may also use the procedure below to install the RAID driver during the Window s OS installation With the Windows OS installation CD in the CD ROM drive r...

Page 44: ...icon representing your CD ROM drive Finally double click on the S Setup icon Click the icons showing a hand writing on paper to view the readme files for each item Click the computer icons to the rig...

Page 45: ...nformation such as CPU temperature system voltages and fan status See the Figure below for a display of the Supero Doctor III interface Note The default User Name and Password for SuperDoctor III is A...

Page 46: ...at ftp ftp supermicro com utility Supero_Doctor_III You can also download the Super Doctor III User s Guide at http www supermicro com PRODUCT Manuals SDIII UserGuide pdf For Linux we recommend that...

Page 47: ...power supply 2 Make sure that no short circuits exist between the motherboard and chassis 3 Disconnect all cables from the motherboard including those for the keyboard 4 and mouse Remove all add on c...

Page 48: ...d 1 You should be using registered ECC DDR 3 memory see next page Also 2 it is recommended that you use the same memory type and speed for all DIMMs in the system See Section 2 4 for memory details Ch...

Page 49: ...oard model and PCB revision number BIOS release date version this can be seen on the initial display when your system first boots up System configuration An example of a Technical Support form is post...

Page 50: ...e instant off capabilities as long as the BIOS has control of the system When the Standby or Suspend feature is enabled or when the BIOS is not in control such as during memory count the first screen...

Page 51: ...ch as F1 F2 etc Each main BIOS menu option is described in this manual The Main BIOS screen has two main frames The left frame displays all the options that can be configured Grayed out options cannot...

Page 52: ...ys to move between fields The date must be entered in DAY MM DD YYYY format The time is entered in HH MM SS format Please note that time is in a 24 hour format For example 5 30 A M appears as 05 30 00...

Page 53: ...system to restart when system is inactive more than 5 minutes The options are Enabled and Disabled Power Button Function This sets the function of the power button when you turn off the system Options...

Page 54: ...his setting Enables or Disables microcode updating Secure Virtual Machine Mode This setting is used to Enable or Disable SVM Power Now This setting is used to Enable or Disable the AMD Power Now featu...

Page 55: ...clude Auto or Disabled CS Sparing This setting will reserve a spare memory rank in each node when enabled Options are Enabled and Disabled Bank Swizzle Mode This setting Enables or Disables the bank s...

Page 56: ...used to enable or disable or set the GART size in systems without AGP Options include Enabled and Disabled OHCI EHCI HC Device Functions These settings allow you to either Enable or Disable functions...

Page 57: ...clude SATA as Primary or SATA as secondary Primary Secondary Third Fourth IDE Master Slave LBA Large Mode LBA Logical Block Addressing is a method of addressing data on a disk drive The options are Di...

Page 58: ...generally works with all hard disk drives manufactured after 1999 For other disk drives such as IDE CD ROM drives check the specifications of the drive DMA Mode Selects the DMA Mode Options are Auto...

Page 59: ...PCI Busmastering for reading or writing to IDE drives ROM Scan Ordering This setting determines which kind of option ROM activates prior to another Options include Onboard First and Addon First PCI S...

Page 60: ...port from accessing any system resources When this option is set to Disabled the serial port physically becomes unavailable Select 2F8 IRQ3 to allow the serial port to use 2F8 as its I O port address...

Page 61: ...et the delay in seconds to display memory information Options are No Delay 1 sec 2 secs and 4 secs Hardware Health Configuration CPU Overheat Alarm This setting allows you to specify the type of alarm...

Page 62: ...ACPI v2 0 and ACPI v3 0 IPMI Configuration This menu shows static information about the IPMI firmware revision and status of the BMC as well as options for IPMI configuration View BMC System Event Log...

Page 63: ...ith xxx having a value of less than 256 and in decimal form only The IP address and current IP address in the BMC are shown Subnet Mask In the field provided here enter the Subnet address in the decim...

Page 64: ...s a Supervisor and a User password If you use both passwords the Supervisor password must be set first Change Supervisor Password Select this option and press Enter to access the sub menu and then typ...

Page 65: ...d in the corresponding type menu Hard Disk Drives This feature allows you to specify the boot sequence from the list of available hard disk drives A device that is in parenthesis has been disabled in...

Page 66: ...tion and reboot the computer Select Discard Changes and Exit from the Exit menu and press Enter Discard Changes Select this option and press Enter to discard all the changes and return to AMI BIOS Uti...

Page 67: ...should consult with your system manufacturer for possible repairs These fatal errors are usually communicated through a series of audible beeps The numbers on the fatal error list on the following pa...

Page 68: ...A 2 H8SGL F Serverboard User s Manual Notes...

Page 69: ...itialization code checksum will be verified D1h Initializing the DMA controller performing the keyboard controller BAT test starting memory refresh and entering 4 GB flat mode next D3h Starting memory...

Page 70: ...ooking for a floppy diskette in drive A Reading the first sector of the diskette Efh A read error occurred while reading the floppy drive in drive A F0h Next searching for the AMIBOOT ROM file in the...

Page 71: ...Initialize CMOS RAM in every boot AMIBIOS POST option was set in AMIBCP or the End key was pressed 12h Next disabling DMA controllers 1 and 2 and interrupt controllers 1 and 2 13h The video display h...

Page 72: ...ch is on Initializing data to check memory wraparound at 0 0 next 45h Data initialized Checking for memory wraparound at 0 0 and finding the total system memory size next 46h The memory wraparound tes...

Page 73: ...ular buffer next 83h The command byte was written and global data initialization has completed Checking for a locked key next 84h Locked key checking is over Checking for a memory size mismatch with C...

Page 74: ...s next A3h The soft error display has completed Setting the keyboard typematic rate next A4h The keyboard typematic rate is set Programming the memory wait states next A5h Memory wait state programmin...

Reviews: