background image

Appendix C: Software Installation Instructions

C-11

Initializing Disk Drives

If an installed disk does not appear in the disk selection list for creating a new 

array, or if it appears grayed out, you may have to initialize it before you can use 

it as part of an array. Drives attached to the controller must be initialized before 

they can be used in an array.

Caution: Initializing a disk overwrites the partition table on the disk and makes 

any data on the disk inaccessible. If the drive is used in an array, you may not be 

able to use the array again.

Do not initialize a disk that is part of a boot array.  To determine which disks are 

associated with a particular array, please refer to 

Viewing Array Properties.

To initialize drives:

1. Turn on your computer and press Ctrl+A when prompted to access the ARC 

utility.

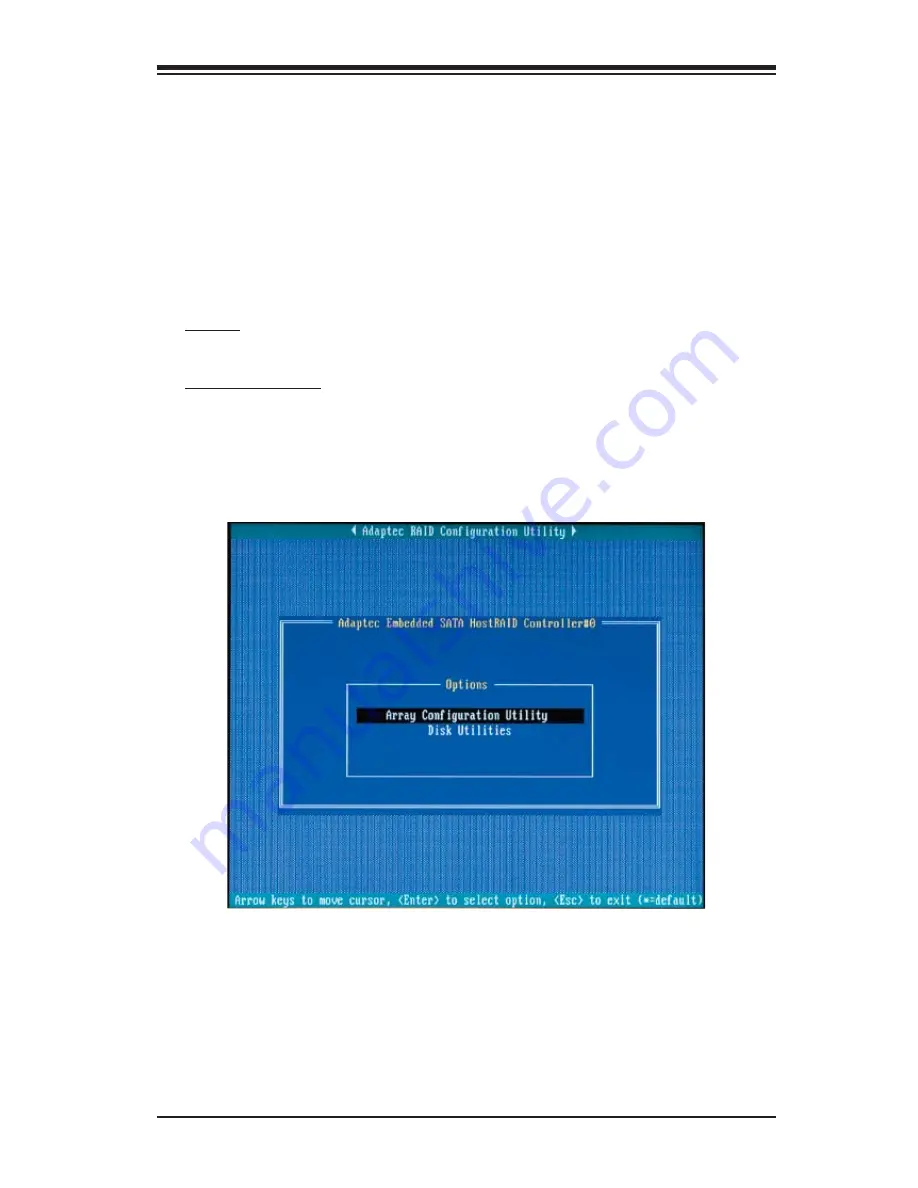
2. From the ARC menu, select Array Confi guration Utility (ACU) (as shown in the 

screen below).

3. Select Initialize Drives (as shown in the screen below).

Summary of Contents for X6DVA-4G2

Page 1: ...SUPER X6DVA 4G2 X6DVA EG2 USER S MANUAL Revision 1 0b ...

Page 2: ...sputes Supermicro s total liability for all claims will not exceed the price paid for the hardware product FCC Statement This equipment has been tested and found to comply with the limits for a Class A digital device pursuant to Part 15 of the FCC Rules These limits are designed to provide reasonable protection against harmful interference when the equipment is operated in a commercial environment...

Page 3: ...formation about the chipset Chapter 2 provides hardware installation instructions Read this chapter when installing the processor memory modules and other hardware components into the system If you encounter any problems see Chapter 3 which describes troubleshoot ing procedures for the video the memory and the system setup stored in the CMOS Chapter 4 includes an introduction to BIOS and provides ...

Page 4: ...3 Special Features 1 10 Recovery from AC Power Loss 1 10 1 4 PC Health Monitoring 1 10 1 5 ACPI Features 1 11 1 6 Power Supply 1 12 1 7 Super I O 1 13 Chapter 2 Installation 2 1 Static Sensitive Devices 2 1 Precautions 2 1 Unpacking 2 1 2 2 PGA Processor and Heatsink Installation 2 2 2 3 Installing DIMMs 2 5 2 4 I O Ports Control Panel Connectors 2 6 2 5 Connecting Cables 2 8 ATX Power Connector 2...

Page 5: ...19 Explanation of Jumpers 2 19 GLAN Enable Disable 2 19 Clear CMOS 2 20 Watch Dog 2 20 VGA Enable Disable 2 21 SMB Data SMB Clock to PCI 2 21 SCSI Controller Enable Disable 2 22 SCSI Termination Enable Disable 2 22 Power Force On 2 23 Alarm Reset 2 23 2 7 Onboard Indicators 2 24 GLAN LEDs 2 24 System LED 2 24 Onboard LEDs 2 25 2 8 Parallel Port Floppy IPMI Hard Disk Drive and SCSI Connections 2 26...

Page 6: ...ns 3 3 3 4 Returning Merchandise for Service 3 3 Chapter 4 BIOS 4 1 Introduction 4 1 4 2 Main Setup 4 2 4 3 Advanced Setup 4 3 4 4 Boot Setup 4 16 4 5 Security Setup 4 19 4 6 Exit 4 20 Appendices Appendix A BIOS Error Beep Codes A 1 Appendix B BIOS POST Checkpoint Codes B 1 Appendix C Installing Software Drivers and the Operating System C 1 X6DVA 4G2 X6DVA EG2 User s Manual ...

Page 7: ...en included with your motherboard If anything listed here is damaged or missing contact your retailer All included in the Retail Box One 1 Supermicro Mainboard One 1 ribbon cable for IDE devices CBL 036 One 1 floppy ribbon cable CBL 022 One 1 9 pin serial port DTK cable CBL 010 One 1 SATA cable CBL 044 One 1 SCSI Cable CBL 034 U320 X6DVA 4G2 only One 1 CPU mounting plate SKT 0159 Two 2 CPU retentio...

Page 8: ...dress Super Micro Computer B V Het Sterrenbeeld 28 5215 ML s Hertogenbosch The Netherlands Tel 31 0 73 6400390 Fax 31 0 73 6416525 Email sales supermicro nl General Information support supermicro nl Technical Support rma supermicro nl Customer Support Asia Pacific Address Super Micro Taiwan 4F No 232 1 Liancheng Road Chung Ho 235 Taipei Hsien Taiwan R O C Tel 886 2 8226 3990 Fax 886 2 8226 3991 Web...

Page 9: ... EG2 Image Note The drawings and pictures shown in this manual were based on the latest PCB Revision available at the time of publishing of the manual The motherboard you ve received may or may not look exactly the same as the graphics shown in the manual ...

Page 10: ... IDE 1 J44 JF1 Fan3 E7320 MCH PXH SI O VGA CTLR SCSI LSI 53C20 USB2 3 JPA2 DS9 Fan2 PW2 JWOL DS7 DS8 JPF BIOS DS1 DS4 DS2 DS3 DS5 J2 KB Mouse USB0 1 J3 COM1 J4 VGA J1 GLAN1 GLAN2 J8B1 J9B1 South Bridge Important Notes to the User All images and graphics shown in this manual were based upon the latest PCB Revision available at the time of publishing of this manual The motherboard you ve received ma...

Page 11: ...rs See Chapter 2 DS7 DS8 POST Code LED See Chpt 2 App A DS9 System LED See Chapter 2 FAN 1 6 CPU Chassis Fan Headers GLAN 1 2 G bit Ethernet Ports IDE1 J44 IDE2 J38 IDE1 2 Hard Disk Drive Connectors J1 VGA Connector J2 Keyboard Mouse J10 Parallel Printer Header J24 Floppy Disk Drive Connector J28 SCSI Connector Note J41 IPMI 2 0 Socket JF1 Front Control Panel Connector JF2 PWR LED Pins1 3 Speaker ...

Page 12: ...g a supported OS Note visit www Intel com for CPU support and driver updates OS Licensing Support Intel 64 bit CPU supports Windows 2000 Professional Windows Advanced Server Windows XP Home Windows XP Professional Windows Server 2003 Standard Enterprise Intel 64 bit CPU and Hyper Threading Technology supports Windows 2000 Advanced Server Windows XP Home Windows XP Professional Windows Server 2003 ...

Page 13: ...he BIOS for more information VRM Protection Feature 880 C 980 C 1080 C Default ACPI Features Slow blinking LED for suspend state indicator Main switch override mechanism Onboard I O LSI Logic Single Channel 53C1020 Ultra 320 SCSI X6DVA 4G2 only One IPMI 2 0 Socket Two Intel 82541 PI Gigabit Ethernet controllers 2 EIDE Ultra DMA 100 bus master interfaces 1 floppy port interface up to 2 88 MB 1 EPP E...

Page 14: ... Note This is a general block diagram Please see the previous Motherboard Features pages for details on the features of each motherboard Mouse Keyboard Flpy Prntr COM1 FPUSB FPUSB USB USB SATA SATA IDE IDE Video SRAM PCI 33MHz Slot 1 82541 82541 6300ESB 4 5 6 2 2 2 E7320 MCH CPU1 CPU0 ...

Page 15: ...s configurable x8 PCI Express interfaces which may alternatively be configured as two independent x4 PCI Express interfaces These interfaces support connection of the MCH to a variety of other bridges that are compliant with the PCI Express Interface Specification Rev 1 0a The MCH interfaces with the 6300ESB I O Controller Hub 6300ESB ICH via Hub Interface The PCI Bus provides con nection between a P...

Page 16: ...an error message is sent to the screen Users can adjust the voltage thresholds in Supero Doctor III to define the sen sitivity of the voltage monitor Fan Status Monitor with Fan Speed Control The PC health monitor can check the RPM status of the cooling fans The onboard CPU and chassis fans are controlled by Thermal Management via the BIOS Environmental Temperature Control The thermal control senso...

Page 17: ...ed Configuration and Power Interface The ACPI specifica tion defines a flexible and abstract hardware interface that provides a standard way to integrate power management features throughout a PC system including its hardware operating system and application software This enables the system to automatically turn on and off peripherals such as CD ROMs network cards hard disk drives and printers This al...

Page 18: ...AN traffic is kept to a minimum and users are not interrupted The motherboard has a 3 pin header WOL to connect to the 3 pin header on a Network Interface Card NIC that has WOL capability In addition an onboard LAN controller can also support WOL without any connection to the WOL header The 3 pin WOL header is to be used with a LAN add on card only Note Wake On LAN requires an ATX 2 01 or above com...

Page 19: ...r I O greatly reduces the number of components required for interfacing with floppy disk drives The Super I O supports 360 K 720 K 1 2 M 1 44 M or 2 88 M disk drives and data transfer rates of 250 Kb s 500 Kb s or 1 Mb s It also provides two high speed 16550 compatible serial com munication ports UARTs Each UART includes a 16 byte send receive FIFO a programmable baud rate generator complete modem ...

Page 20: ...1 14 X6DVA 4G2 X6DVA EG2 User s Manual Notes ...

Page 21: ...o not touch its components peripheral chips memory modules or gold contacts When handling chips or modules avoid touching their pins Put the motherboard and peripherals back into their antistatic bags when not in use For grounding purposes make sure your computer chassis provides excellent conductivity between the power supply the case the mounting fasteners and the motherboard Use only the correc...

Page 22: ...if your chassis has matching CPU mounting holes 3 Make sure that you install the motherboard into the chassis first then install the processor into the CPU socket and install the CPU heatsink last 4 Make sure that only Intel certified multi directional heatsinks and fans are used CPU Installation 1 Lift the lever on the CPU socket lift the lever completely as shown on the picture on the right otherw...

Page 23: ...ion We do not recommend that the CPU or the heatsink be removed However if you do need to un install the heatsink please follow the instructions below to uninstall the heatsink to prevent damage done to the CPU or the CPU socket 1 Do not apply any thermal grease to the heatsink or the CPU die the required amount of thermal grease has already been ap plied Heatsink Installation Note Heatsinks are h...

Page 24: ...motherboard in the se quence as show in the second picture on the right 2 Hold the heatsink as shown in the pic ture on the right and gently wriggle the heatsink to loosen it from the CPU Do not use excessive force when wriggling the heatsink 3 Once the CPU is loosened from the heatsink remove the heatsink from the CPU socket 4 Clean the surface of the CPU and the heatsink to get rid of the old th...

Page 25: ...all two modules at a time beginning with DIMM 1A then DIMM 1B and so on 2 Insert each DIMM module vertically into its slot Pay attention to the notch along the bottom of the module to prevent inserting the DIMM module incorrectly 3 Gently press down on the DIMM module until it snaps into place in the slot Repeat for all modules see step 1 above Memory Support The X6DVA 4G2 X6DVA EG2 supports up to...

Page 26: ...e edge of both ends of the module This should release it from the slot 2 4 I OPorts Control Panel Connectors The I O ports are color coded in conformance with the PC 99 specification See Figure 2 3 below for the locations of the various I O ports Figure 2 3 I O Port Locations and Definitions ...

Page 27: ...gned specifically for use with Supermicro server chassis See Figure 2 4 for the descriptions of the various control panel buttons and LED indicators Refer to the following section for descriptions and pin definitions Figure 2 4 JF1 Header Pins Power Button OH Fan Fail LED 1 NIC1 LED Reset Button 2 Power Fail LED HDD LED Power LED Reset Pwr Vcc Vcc Vcc Vcc Ground Ground 19 20 Vcc X Ground NMI X NIC2 ...

Page 28: ...th Bridge 2 5 Connecting Cables ATX Power Connector There is a 24 pin main power supply connector PW1 and an optional 8 pin CPU PWR connector PW2 on the board This power connector meets the SSI EPS 12V specification See the table on the right for pin defi nitions For CPU PWR PW2 please refer to the item listed below Processor Power Connector In addition to the Primary ATX power connector above the 1...

Page 29: ...R SCSI LSI 53C20 USB2 3 JPA2 DS9 Fan2 PW2 JWOL DS7 DS8 JPF BIOS DS1 DS4 DS2 DS3 DS5 J2 KB Mouse USB0 1 J3 COM1 J4 VGA J1 GLAN1 GLAN2 J8B1 J9B1 South Bridge Power Button OH Fan Fail LED 1 NIC1 LED Reset Button 2 Power Fail LED HDD LED Power LED Reset Pwr Vcc Vcc Vcc Vcc Ground Ground 19 20 Vcc X Ground NMI X NIC2 LED Vcc Power LED The Power LED connection is located on pins 15 and 16 of JF1 Refer t...

Page 30: ...cluding SCSI Serial ATA and IDE See the table on the right for pin definitions HDD LED NIC1 NIC2 LED HDD LED Pin Definitions JF1 Pin Definition 13 5V 14 HD Active GLAN1 2 LED Pin Definitions JF1 Pin Definition 9 10 Vcc 11 12 Ground SUPER X6DVA 4G2 DIMM 2B DIMM 2A DIMM 3B DIMM 3A DIMM 1A DIMM 1B 8 pin PWR FP CTRL Speaker JWOR GLAN CTLR X4 PCI Exp PCIX 6 PCIX 133MHz North Bridge PW4 ATX PWR 24 Pin Fan1 P...

Page 31: ...tion 7 Vcc 8 Ground OH Fan Fail Indicator Status State Definition Off Normal On Overheat Flash ing Fan Fail PWR Fail LED Pin Definitions JF1 Pin Definition 5 Vcc 6 Ground SUPER X6DVA 4G2 DIMM 2B DIMM 2A DIMM 3B DIMM 3A DIMM 1A DIMM 1B 8 pin PWR FP CTRL Speaker JWOR GLAN CTLR X4 PCI Exp PCIX 6 PCIX 133MHz North Bridge PW4 ATX PWR 24 Pin Fan1 PW1 CPU 1 CPU 2 COM2 6300ESB ICH GLAN CTLR PW3 J18 J19 J20 J...

Page 32: ...B0 1 J3 COM1 J4 VGA J1 GLAN1 GLAN2 J8B1 J9B1 South Bridge Power Button OH Fan Fail LED 1 NIC1 LED Reset Button 2 Power Fail LED HDD LED Power LED Reset Pwr Vcc Vcc Vcc Vcc Ground Ground 19 20 Vcc X Ground NMI X NIC2 LED Vcc Power Button The Power Button connection is located at pins 1 and 2 of JF1 Mo mentarily contacting both pins will power on off the system To turn off the power when set to susp...

Page 33: ...IOS DS1 DS4 DS2 DS3 DS5 J2 KB Mouse USB0 1 J3 COM1 J4 VGA J1 GLAN1 GLAN2 J8B1 J9B1 South Bridge Chassis Intrusion A Chassis Intrusion header is located at JL1 Attach the appropriate cable to inform you of a chassis intrusion Universal Serial Bus USB There are two Universal Serial Bus ports USB 0 1 located on the I O panel and additional two USB ports USB 2 3 on the motherboard These two USB USB 2 ...

Page 34: ...S3 DS5 J2 KB Mouse USB0 1 J3 COM1 J4 VGA J1 GLAN1 GLAN2 J8B1 J9B1 South Bridge Wake On Ring The Wake On Ring header is des ignated JWOR This function allows your computer to receive and to be awakened by an incoming call to the modem when in suspend state See the table on the right for pin definitions You must have a Wake On Ring card and cable to use this feature Wake On LAN The Wake On LAN header...

Page 35: ...XH SI O VGA CTLR SCSI LSI 53C20 USB2 3 JPA2 DS9 Fan2 PW2 JWOL DS7 DS8 JPF BIOS DS1 DS4 DS2 DS3 DS5 J2 KB Mouse USB0 1 J3 COM1 J4 VGA J1 GLAN1 GLAN2 J8B1 J9B1 South Bridge Serial Ports There are a Serial Port COM1 J4 and one Serial Header COM2 J5 on the X6DVA 4G2 EG2 See the table on the right for pin definitions GLAN Giga bit Ethernet Ports A G bit Ethernet port designated JLAN1 JLAN2 is located be...

Page 36: ...e USB0 1 J3 COM1 J4 VGA J1 GLAN1 GLAN2 J8B1 J9B1 South Bridge ATX PS 2 Keyboard and PS 2 Mouse Ports The ATX PS 2 keyboard and PS 2 mouse are located at J2 See the table at right for pin definitions See Figure 2 3 for the locations of these ports Fan Headers There are six fan headers Fan 1 to Fan 6 on the X6DVA 4G2 X6DVA EG2 See the table on the right for pin definitions Note These fan headers are ...

Page 37: ...2 3 JPA2 DS9 Fan2 PW2 JWOL DS7 DS8 JPF BIOS DS1 DS4 DS2 DS3 DS5 J2 KB Mouse USB0 1 J3 COM1 J4 VGA J1 GLAN1 GLAN2 J8B1 J9B1 South Bridge Power Fault Connect a cable from your power supply to the PW4 header to provide warning of power supply failure This warning signal is passed through the PWR_LED pin to indicate of a power failure on the chassis See the table on the right for pin definitions Note T...

Page 38: ...LAN1 GLAN2 J8B1 J9B1 South Bridge SMB Power I2 C Connector I2 C Connector PW3 located next to the ATX 24 pin PWR Connector monitors the PWR Supply onboard fans and system temperatures Speaker Power LED Keylock On the JF2 header pins 1 3 5 7 are for the Speaker and Pins 2 4 6 are for the Power LED and pins 8 10 are for the Keylock See the table on the right for speaker pin defini tions Note The spea...

Page 39: ... GLAN1 GLAN2 J8B1 J9B1 South Bridge 2 6 Jumper Settings Explanation of Jumpers To modify the operation of the motherboard jumpers can be used to choose between optional settings Jumpers create shorts between two pins to change the function of the connector Pin 1 is identified with a squaresolderpadontheprintedcircuit board See the motherboard layout pages for jumper locations Note On two pin jumper...

Page 40: ...atch Dog JWD controls Watch Dog a system monitor that takes action when a soft ware application hangs Close Pins 1 2 to reset the system if a program hangs Close Pins 2 3 to generate a non maskable interrupt for the program that hangs Watch Dog must also be enabled in the BIOS CMOS Clear JBT1 is used to clear CMOS Instead of pins this jumper consists of contact pads to prevent the accidental clear...

Page 41: ... JPA2 DS9 Fan2 PW2 JWOL DS7 DS8 JPF BIOS DS1 DS4 DS2 DS3 DS5 J2 KB Mouse USB0 1 J3 COM1 J4 VGA J1 GLAN1 GLAN2 J8B1 J9B1 South Bridge VGA Enable Disable JPG1 enables or disables the VGA Connector on the motherboard See the table on the right for jumper set tings The default setting is enabled SMB Data SMB CLK to PCI Jumpers J13 J15 allow you to connect PCI Slot1 PCI X Slot5 PCI X Slot6 to the Syste...

Page 42: ... J8B1 J9B1 South Bridge SCSI Controller Enable Disable For the X6DVA 4G2 only Jumper JPA1 allows you to enable or disable the SCSI Controller The default setting is pins 1 2 to enable all four headers See the table on the right for jumper settings SCSI Termination Enable Disable For the X6DVA 4G2 only Jumper JPA2 allows you to enable or disable termination for the SCSI con nector The default setti...

Page 43: ... J3 COM1 J4 VGA J1 GLAN1 GLAN2 J8B1 J9B1 South Bridge Power Force On Jumper JPF allows you to enable or dis able the function of Power Force On If enabled the power will always stay on automatically If this function disabled the user needs to press the power but ton to power on the system PWR Force On Power Force On Jumper Settings Jumper Setting Definition Off Normal On Force On Alarm Reset The sy...

Page 44: ...N LEDs The Gigabit Ethernet LAN ports located beside the Video port has two LEDs The yellow LED indicates activity while the other LED may be green orange or off to indicate the speed of the connec tion See the table at right for the func tions associated with the second LED 2 7 Onboard Indicators Right Left GLAN Left LED Connection Speed Indicator LED Color Definition Off 10Mbps or No Connection G...

Page 45: ...320 MCH PXH SI O VGA CTLR SCSI LSI 53C20 USB2 3 JPA2 DS9 Fan2 PW2 JWOL DS7 DS8 JPF BIOS DS1 DS4 DS2 DS3 DS5 J2 KB Mouse USB0 1 J3 COM1 J4 VGA J1 GLAN1 GLAN2 J8B1 J9B1 South Bridge DS7 DS8 Onboard LED Indicators DS1 DS5 DS7 DS8 In addition to the LAN LEDs and SATA LED there are other LED indi cators DS1 DS5 DS7 DS8 on the X6DVA 4G2 EG2 DS7 and DS8 are POST Codes LEDs See the table on the right for ...

Page 46: ...Definition Pin Definition 1 Strobe 2 Auto Feed 3 Data Bit 0 4 Error 5 Data Bit 1 6 Init 7 Data Bit 2 8 SLCT IN 9 Data Bit 3 10 GND 11 Data Bit 4 12 GND 13 Data Bit 5 14 GND 15 Data Bit 6 16 GND 17 Data Bit 7 18 GND 19 ACK 20 GND 21 BUSY 22 Write Data 23 PE 24 Write Gate 25 SLCT 26 NC SUPER X6DVA 4G2 DIMM 2B DIMM 2A DIMM 3B DIMM 3A DIMM 1A DIMM 1B 8 pin PWR FP CTRL Speaker JWOR GLAN CTLR X4 PCI Exp P...

Page 47: ...Data 9 7 Host Data 5 8 Host Data 10 9 Host Data 4 10 Host Data 11 11 Host Data 3 12 Host Data 12 13 Host Data 2 14 Host Data 13 15 Host Data 1 16 Host Data 14 17 Host Data 0 18 Host Data 15 19 Ground 20 Key 21 DRQ3 22 Ground 23 I O Write 24 Ground 25 I O Read 26 Ground 27 IOCHRDY 28 BALE 29 DACK3 30 Ground 31 IRQ14 32 IOCS16 33 Addr1 34 Ground 35 Addr0 36 Addr2 37 Chip Select 0 38 Chip Select 1 39...

Page 48: ... 27 SEL 61 SEL 28 C D 62 C D 29 REQ 63 REQ 30 I O 64 I O 31 DB 8 65 DB 8 32 DB 9 66 DB 9 33 DB 10 67 DB 10 34 DB 11 68 DB 11 SUPER X6DVA 4G2 DIMM 2B DIMM 2A DIMM 3B DIMM 3A DIMM 1A DIMM 1B 8 pin PWR FP CTRL Speaker JWOR GLAN CTLR X4 PCI Exp PCIX 6 PCIX 133MHz North Bridge PW4 ATX PWR 24 Pin Fan1 PW1 CPU 1 CPU 2 COM2 6300ESB ICH GLAN CTLR PW3 J18 J19 J20 J21 J22 J23 JPL1 JPL2 PCIX 5 PCIX 100 MHz JP...

Page 49: ...s as well No Power 1 Make sure that there are no short circuits between the motherboard and the chassis 2 Make sure that all jumpers are set to their default positions 3 Make sure that the 115V 230V switch on the power supply is properly set 4 Turn the power switch on and off to test the system 5 The battery on your motherboard may be old Check to verify that it still supplies 3VDC If it does not ...

Page 50: ...MM 1A then DIMM 1B and so on see Section 2 3 6 Check the position of the 115V 230V switch on the power supply 3 2 Technical Support Procedures Before contacting Technical Support please take the following steps Also Note that as a motherboard manufacturer Supermicro does not sell directly to end us ers so it is best to first check with your distributor or reseller for troubleshooting services They ...

Page 51: ...ing message and the information on how to update your BIOS on our web site Also check the cur rent BIOS revision and make sure it is newer than your BIOS before downloading Note There is no BIOS Recovery function available for the motherboard Should a problem occur after you flash the BIOS you will need to change all six BIOS chips Question What s on the CD that came with my motherboard Answer The ...

Page 52: ... only covers normal consumer use and does not cover damages in curred in shipping or from failure due to the alternation misuse abuse or improper maintenance of products During the warranty period contact your distributor first for any product prob lems ...

Page 53: ... highlighted in white Often a text message will accompany it Note The AMIBIOS has default text messages built in Supermicro retains the option to include omit or change any of these text messages The AMIBIOS Setup Utility uses a key based navigation system called hot keys Most of the AMIBIOS setup utility hot keys can be used at any time during the setup navigation process These keys include F1 F1...

Page 54: ...in BIOS Setup screen is shown below When you select the Main Setup the following items will be automatically displayed System Overview The following BIOS information will be displayed AMIBIOS Version Build Date ID Processors When you select this option AMIBIOS will automatically display the status of processors as shown below Type Speed Counts System Memory This option allows AMIBIOS to display th...

Page 55: ...vanced Settings The Advanced Settings screen and sub menus are listed below Warning When you first enter the Advanced Setup screen the Setup Warning will be displayed Please follow the instruction and set the correct value for each item to prevent the system from malfunctioning CPU Configuration Sub Menu Configure Advanced CPU Settings This option allows the user to configure the Advanced CPU settings...

Page 56: ...or to classify areas in the system memory where an application code can execute and where it cannot thus preventing a worm or a virus from creating a flood of codes to overwhelm the processor or damage the system during an attack Note For more information regarding hardware software support for this function please refer to Intel s and Microsoft s web sites C1E Support Available if supported by the...

Page 57: ...led P ATA Parallel ATA only S ATA Serial ATA only and P ATA S ATA Combined Mode Operation This feature allows the user to select the IDE Combined Mode The options are P ATA 1st Channel and S ATA 1st Channel S ATA Ports Definition This feature allows the user to configure the Serial ATA Ports The options are P0 Master P1 Slave and P0 Slave P1 Master Primary IDE Master Slave Secondary IDE Master Slave...

Page 58: ...k drive support cannot be determined Select 0 to allow AMIBIOS to use PIO mode 0 It has a data transfer rate of 3 3 MBs Select 1 to allow AMIBIOS to use PIO mode 1 It has a data transfer rate of 5 2 MBs Select 2 to allow AMIBIOS to use PIO mode 2 It has a data transfer rate of 8 3 MBs Select 3 to allow AMIBIOS to use PIO mode 3 It has a data transfer rate of 11 1 MBs Select 4 to allow AMIBIOS to u...

Page 59: ...Disabled Enabled and Auto 32Bit Data Transfer Select Enabled to activate the function of 32 Bit data transfer Select Dis abled to disable this function The options are Enabled and Disabled Hard Disk Write Protect Select Enabled to enable the function of Hard Disk Write Protect to prevent data from being written to HDD The options are Enabled or Disabled IDE Detect Time Out This feature allows the ...

Page 60: ...et this value to allow or restrict the system from giving the VGA adapter card an interrupt address The options are Yes and No Palette Snooping Select Enabled to inform the PCI devices that an ISA graphics device is installed in the system in order for the graphics card to function properly The options are Enabled and Disabled PCI IDE BusMaster Set this value to allow or prevent the use of PCI IDE...

Page 61: ...rial port physically becomes unavailable Select 2F8 IRQ3 to allow the serial port to use 2F8 as its I O port address and IRQ 3 for the interrupt address The options are Disabled 2F8 IRQ3 3E8 IRQ4 and 2E8 IRQ3 Parallel Port Address This option specifies the I O address used by the parallel port Select Disabled to prevent the parallel port from accessing any system resources When the value of this op...

Page 62: ...t In Self Test The options are Enabled and Disabled ICH Delayed Transaction Select Disabled to set the South Bridge P2P Bridge Secondary Discard Timer to 32 micro seconds for the PCI 32 bit bus Select Enabled to set the South Bridge P2P Bridge Secondary Discard Timer to 4 micro seconds for the PCI 32 bit bus ICH DCB Select Enabled to activate the ICH DMA Collection Buffer to provide Type F DMA per...

Page 63: ...rating system ACPI Configuration Use this feature to configure additional ACPI options Select Yes if the operating system supports ACPI Select No if the operating system does not support ACPI The options are No and Yes ACPI 2 0 Features Select Yes to allow RSDP pointers to point to the 64 bit Fixed System Descrip tion Tables Select No to deactivate this function The options are Yes and No ACPI APIC ...

Page 64: ...Enabled Event Log Configuration Highlight this item and press Enter to view the contents of the event log View Event Log This feature allows the user to view all unread events Mark All Events as Read Highlight this item and press Enter to mark the DMI events as read Clear Event Log This setting will clear all event logs when set to OK The options are OK and Cancel ECC Event Logging This setting all...

Page 65: ...d and Disabled I O Expander Mode This feature allows the user to set the IO Expand Mode for Hot Plug support The options are PCA9555 Two PCA9554 One PCA9554 Low One PCA9554 High Two PCA9554A One PCA9554A Low and Two PCA9554 PCI Express Port2 PXH This feature allows the user to configure the PCI Express slot The options are Auto Enabled and Disabled PCI Express Port3 Slot 4 This feature allows the u...

Page 66: ... for Console Redirection The options are COM1 and COM2 Serial Port Mode This feature allows the user to set the serial port mode for Console Redirection The options are 115200 8 N 1 57600 8 N 1 38400 8 N 1 19200 8 N 1 and 9600 8 N 1 Flow Control This feature allows the user to set the flow control for Console Redirection The options are None Hardware and Software Redirection After BIOS POST Select ...

Page 67: ...system should wait in an attempt to detect the presence of a USB Mass Storage Device before it issues a start command the system to proceed with the next operation during POST The options are 10 Seconds 20 Seconds 30 Seconds and 40 Seconds Emulation Type If set to Auto USB devices that are smaller than 530MB will be emulated as floppy and the remaining will be emulated as an HDD The Forced FDD opti...

Page 68: ...our chassis came with 4 pin fan headers Select Workstation if your system is used as a Workstation Select Server if your system is used as a Server Select Disable to disable the fan speed control function to allow the onboard fans to run at full speed 12V at all the time The options are 1 Disable 2 3 pin Server 3 3 pin Workstation 4 4 pin Server and 5 4 pin Workstation Fan1 Speed to Fan6 Speed Not...

Page 69: ...Current to allow the computer system to display the BIOS information during system boot The options are Force BIOS and Keep Current Boot up Num Lock Set this value to allow the Number Lock setting to be modified during boot up The default setting is On The options are On and Off PS 2 Mouse Support Set this value to allow the PS 2 mouse support to be modified The options are Auto Enabled and Disabled...

Page 70: ... 2nd Drive 3rd Drive 1ST boot device 328 ID01 LUN0 LSI Removable Drives This feature allows the user to specify the boot sequence from available Remov able Drives 1st Drive This option allow the user to specify the boot sequence for 1st Removable Drive The options are 1st Floppy Drive and Disabled CD DVD Drives This feature allows the user to specify the boot sequence from available CD DVD Drives ...

Page 71: ...lear the user password Boot Sector Virus Protection This option is near the bottom of the Security Setup screen Select Disabled to deactivate the Boot Sector Virus Protection Select Enabled to enable boot sector protection When Enabled AMIBOIS displays a warning when any program or virus issues a Disk Format command or attempts to write to the boot sector of the hard disk drive The options are Ena...

Page 72: ...guration and reboot the computer Select Discard Changes and Exit from the Exit menu and press Enter Discarding Changes Select this option and press Enter to discard all the changes and return to the AMIBIOS Utility Program Load Optimal Defaults To set this feature select Load Optimal Defaults from the Exit menu and press En ter Then Select OK to allow AMIBIOS to automatically load Optimal Defaults...

Page 73: ...le repairs These fatal errors are usually communicated through a series of audible beeps The numbers on the fatal error list on the following page correspond to the number of beeps for the corresponding error All errors listed with the exception of Beep Code 8 are fatal errors POST codes may be read on the debug LEDs located beside the LAN port on the motherboard backplane See the description of t...

Page 74: ...A 2 X6DVA 4G2 User s Manual A 2 DS7 DS8 LED Post Codes LED Indicators Description Message DS7 DS8 On On PWR On On Off SPD Read OK Off On Memory Size OK Off Off Starting Bus Initialization ...

Page 75: ...s are listed in order of execution Checkpoint Code Description D0h The NMI is disabled Power on delay is starting Next the initialization code check sum will be verified D1h Initializing the DMA controller performing the keyboard controller BAT test starting memory refresh and entering 4 GB flat mode next D3h Starting memory sizing next D4h Returning to real mode Executing any OEM patches and settin...

Page 76: ...red while reading the floppy drive in drive A F0h Next searching for the AMIBOOT ROM file in the root directory F1h The AMIBOOT ROM file is not in the root directory F2h Next reading and analyzing the floppy diskette FAT to find the clusters occupied by the AMIBOOT ROM file F3h Next reading the AMIBOOT ROM file cluster by cluster F4h The AMIBOOT ROM file is not the correct size F5h Next disabling internal...

Page 77: ...d during power on Initializing CMOS RAM if the Initialize CMOS RAM in every boot AMIBIOS POST option was set in AMIBCP or the End key was pressed 12h Next disabling DMA controllers 1 and 2 and interrupt controllers 1 and 2 13h The video display has been disabled Port B has been initialized Next initializing the chipset 14h The 8254 timer test will begin next 19h Next programming the flash ROM 1Ah T...

Page 78: ... general devices next if present See the last page of this chapter for additional information 39h Displaying bus initialization error messages See the last page of this chapter for additional information 3Ah The new cursor position has been read and saved Displaying the Hit DEL mes sage next 3Bh The Hit DEL message is displayed The protected mode memory test is about to start 40h Preparing the des...

Page 79: ... was adjusted for relocation and shadowing Clearing the Hit DEL message next 59h The Hit DEL message is cleared The WAIT message is displayed Starting the DMA and interrupt controller test next 60h The DMA page register test passed Performing the DMA Controller 1 base register test next 62h The DMA controller 1 base register test passed Performing the DMA controller 2 base register test next 65h T...

Page 80: ...ntrol and has now returned control to BIOS POST Perform ing any required processing after the option ROM returned control 99h Any initialization required after the option ROM test has completed Configuring the timer data area and printer base address next 9Ah Set the timer and printer base addresses Setting the RS 232 base address next 9Bh Returned after setting the RS 232 base address Performing a...

Page 81: ...0 option ROM had control next Aah Initialization after E000 option ROM control has completed Displaying the system configuration next Abh Uncompressing the DMI data and executing DMI POST initialization next B0h The system configuration is displayed B1h Copying any code to specific areas 00h Code copying to specific areas is done Passing control to INT 19h boot loader next ...

Page 82: ...B 8 X6DVA 4G2 User s Manual Notes ...

Page 83: ...te a point to point connection between devices It is a serial link which supports SATA Transfer rates from 150MBps Because the serial cables used in SATA are thinner than the traditional cables used in Paral lel ATA PATA SATA systems have better airflow and can be installed in smaller chassis than Parallel ATA In addition the cables used in PATA can only extend to 40cm long while Serial ATA cables ...

Page 84: ...ping or RAID 1 Mirroring to enhance the industry s pioneer PCI to express host control ler products RAID striping RAID 0 can greatly improve hard disk I O performance because of its capability in striping data across multiple drives RAID mirroring RAID 1 allows the data to be simultaneously written to two drives so critical data is always available even if a single hard disk fails Due to the built...

Page 85: ...Chapter 4 for System BIOS Configurations and then press the Ctrl and A keys simultaneously when prompted to do so during the system startup Refer to the previous page for detailed instructions A Using the Array Configuration Utility ACU The Array Configuration Utility ACU enables you to create manage and delete arrays from the controller s BIOS add and delete spare drives and initialize drives During...

Page 86: ...box select the array you want to view and press Enter The Array Properties dialog box appears showing detailed information on the array The physical disks associated with the array are displayed here 5 Press Esc to return to the previous menu Managing Arrays Select this option to view array properties and delete arrays The following sec tions describe the operations Of Managing Arrays To select th...

Page 87: ... From the ACU menu select Manage Arrays 4 Select the array you wish to delete and press Delete 5 In the Array Properties dialog box select Delete and press Enter The following prompt is displayed Warning Deleting the array will render array unusable Do you want to delete the array Yes No RAID 1 only the following prompt is also displayed Deleting the partition will result in data loss Do you also ...

Page 88: ...ay 1 Turn on your computer and press Ctrl A when prompted to access the ARC utility 2 From the ARC menu select Array Configuration Utility Main Menu ACU as shown on the first screen on page C 5 3 From the ACU menu select Create Array 4 Select the disks for the new array and press Insert as the screen shown below Note To deselect any disk highlight the disk and press Delete 5 Press Enter when both di...

Page 89: ...u cannot change the array properties using the ACU You will need to use the Adaptec Storage Manager Browser Edition Refer to the Adaptec User s Guide in the enclosed CD To assign properties to the new array 1 In the Array Properties menu as shown in the following screen select an array type and press Enter Note that only the available array types RAID 0 and RAID1 are displayed on the screen RAID 0...

Page 90: ...elect Migrate for RAID 0 or Build for RAID 1 you will be asked to select the source drive The contents of the source drive will be preserved How ever the data on the new drive will be lost Raid Level Create Via When Appropriate RAID 0 No Init Creating a RAID 0 on new drives RAID 0 Migrate Note Creating a RAID 0 from one new drive and one drive with data you wish to preserve RAID 1 Build1 Any time ...

Page 91: ...ACU allows you to use drives of different sizes in a RAID However during a build operation only the smaller drive can be selected as the source or first drive 5 When migrating from single volume to RAID 0 migrating from a larger drive to a smaller drive is allowed However the destination drive must be at least half the capacity of the source drive 6 Adaptec does not recommend that you migrate or bu...

Page 92: ... asterisk will appear next to the bootable array as shown in the picture below Deleting a Bootable Array To delete a bootable array 1 From the Main menu select Manage Arrays 2 From the List of Arrays select the bootable array you want to delete and press Ctrl B a bootable array is the array marked with an asterisk as shown in the picture above 3 Enter Y to delete a bootable array when the followin...

Page 93: ...g a disk overwrites the partition table on the disk and makes any data on the disk inaccessible If the drive is used in an array you may not be able to use the array again Do not initialize a disk that is part of a boot array To determine which disks are associated with a particular array please refer to Viewing Array Properties To initialize drives 1 Turn on your computer and press Ctrl A when pr...

Page 94: ...C 12 X6DVA 4G2 X6DVA EG2 User s Manual 4 Use the up and down arrow keys to highlight the disk you wish to initialize and press Insert as shown in the screen below ...

Page 95: ...eat Step 4 so that both drives to be initialized are selected as shown in the screen below 6 Press Enter 7 Read the warning message as shown in the screen 8 Make sure that you have selected the correct disk drives to initialize If correct press Y to continue ...

Page 96: ... perform a Rebuild to optimized its functionality For a critical array Rebuild operation the optimal drive is the source drive Note 2 If no spare array exists and a hard disk drive fails you need to create a spare before you can rebuild an array To Rebuild an array 1 From the Main Menu select Manage Arrays as shown in the screen below From the List of Arrays select the array you want to Rebuild 2 ...

Page 97: ...Using the Disk Utilities The Disk Utilities enable you to format or verify the media of your Serial ATA hard disks To access the disk utilities 1 Turn on your computer and press Ctrl A when prompted to access the ARC utility as shown in the screen below ...

Page 98: ...C 16 X6DVA 4G2 X6DVA EG2 User s Manual 3 Select the desired disk and press Enter as shown in the screen below 2 From the ARC menu select Disk Utilities as shown in the screen below ...

Page 99: ...formatted at the factory and do not need to be low level formatted again Caution Formatting destroys all data on the drive Be sure to back up your data before performing this operation 2 Verify Disk Media Scans the media of a disk drive for defects To Exit Adaptec RAID Configuration Utility 1 Once you have completed RAID array configurations press ESC to exit The following screen will appear 2 Press...

Page 100: ... CD g Press the F6 key when the message Press F6 if you need to install a third party SCSI or RAID driver displays h When the Windows OS Setup screen appears press S to specify additional device s i Insert the driver diskette Adaptec Embedded Serial ATA Raid Controller Driver into Drive A and press the Enter key j Choose the Adaptec Embedded Host Serial ATA Raid Controller from the list indicated ...

Page 101: ...u to view the entire contents of the CD Please refer to the LSI User s Guide for the installation of the SCSI RAID Control ler Driver The LSI User s Guide is included in the CD You can also download a copy of the user s guide from our web site C 3 Installing Other Software Programs and Drivers A Installing Drivers other than Adaptec Embedded Serial ATA RAID Controller Driver After you ve installed...

Page 102: ...ltages and fan status See the Figure below for a display of the Supero Doctor III interface Note 1 The default user name and password are ADMIN Note 2 In the Windows OS environment the Supero Doctor III settings take precedence over the BIOS settings When first installed Supero Doctor III adopts the temperature threshold settings previously set in the BIOS Any subsequent changes to these thresholds...

Page 103: ...II Remote Control Note SD III Software Revision 1 0 can be downloaded from our Web site at ftp ftp supermicro com utility Supero_Doctor_III You can also download SDIII User s Guide at http www supermicro com PRODUCT Manuals SDIII User Guide pdf For Linux we will still recommend Supero Doctor II ...

Page 104: ...C 22 X6DVA 4G2 X6DVA EG2 User s Manual Notes ...

Reviews: