background image

H11DST-B User's Manual

50

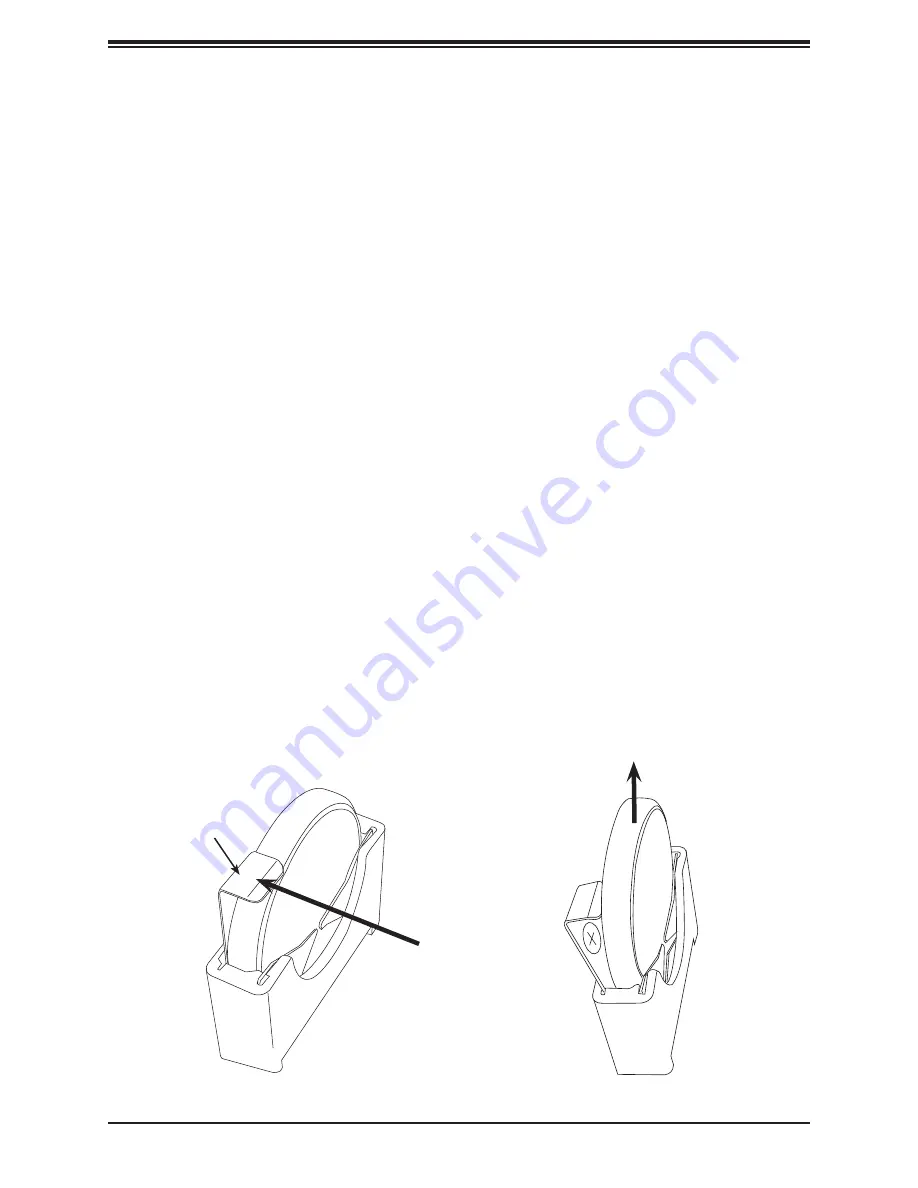
3.5 Battery Removal and Installation

Battery Removal

To remove the onboard battery, follow the steps below:

1. Power off your system and unplug your power cable.

2. Locate the onboard battery as shown in Chapter 1.

3. Using a tool such as a pen or a small screwdriver, push the battery lock outwards to 

unlock it. Once unlocked, pull out the battery from the holder.

4. Remove the battery.

3.4 Returning Merchandise for Service

A receipt or copy of your invoice marked with the date of purchase is required before any 
warranty service will be rendered. You can obtain service by calling your vendor for a Returned 
Merchandise Authorization (RMA) number. When returning to the manufacturer, the RMA 
number should be prominently displayed on the outside of the shipping carton and mailed 
prepaid or hand-carried. Shipping and handling charges will be applied for all orders that 
must be mailed when service is complete.
For faster service, RMA authorizations may be requested online (

http://www.supermicro.com/

support/rma/

).

This warranty only covers normal consumer use and does not cover damages incurred in 
shipping or from failure due to the alteration, misuse, abuse or improper maintenance of 
products.

During the warranty period, contact your distributor first for any product problems.

Battery lock

Step 3, Push 

Battery lock 

outwards 

Step 4, Remove 

battery by 

pulling it 

upwards. 

Summary of Contents for H11DST-B

Page 1: ...USER S MANUAL Revision 1 0 H11DST B...

Page 2: ...operated in a commercial environment This equipment generates uses and can radiate radio frequency energy and if not installed and used in accordance with the manufacturer s instruction manual may ca...

Page 3: ...while consuming little power Please note that this motherboard is intended to be installed and serviced by professional technicians only For processor memory updates please refer to our website at ht...

Page 4: ...uter B V Het Sterrenbeeld 28 5215 ML s Hertogenbosch The Netherlands Tel 31 0 73 6400390 Fax 31 0 73 6416525 Email sales supermicro nl General Information support supermicro nl Technical Support rma s...

Page 5: ...nvironmental Temperature Control 18 System Resource Alert 18 1 5 ACPI Features 19 1 6 Power Supply 19 1 7 Super I O 19 Chapter 2 Installation 2 1 Static Sensitive Devices 20 Precautions 20 Unpacking 2...

Page 6: ...Setup Configuration 46 When the System Becomes Unstable 47 3 2 Technical Support Procedures 48 3 3 Frequently Asked Questions 48 3 4 Returning Merchandise for Service 50 3 5 Battery Removal and Insta...

Page 7: ...nstalling Software Programs 83 B 2 SuperDoctor 5 84 Appendix C Standardized Warning Statements C 1 Battery Handling 85 C 2 Product Disposal 87 Appendix D UEFI BIOS Recovery D 1 Overview 88 D 2 Recover...

Page 8: ...etailer Important Links For your system to work properly please follow the links below to download all necessary drivers utilities and the user s manual for your server Supermicro product manuals http...

Page 9: ...herboard Image Note All graphics shown in this manual were based upon the latest PCB revision available at the time of publication of the manual The motherboard you received may or may not look exactl...

Page 10: ...10 H11DST B User s Manual Figure 1 2 H11DST B Motherboard Layout BMC FLASH...

Page 11: ...JPG1 COM1 JWD1 JDBG1 FAN3 FAN4 JTPM1 JF2 SXB1 SXB2 JF1 BT1 SXB3 JSD1 SATA6 JSDCARD1 J2 PCI E SATA M 2 USB3 JBT1 P2 DIMME1 P2 DIMMF1 P2 DIMMG1 P2 DIMMH1 P1 DIMMB1 P1 DIMMC1 P1 DIMMD1 P1 DIMME1 P1 DIMM...

Page 12: ...n jumpers I O ports and JF1 front panel connections Jumpers LED indicators not indicated are used for testing only Use only the correct type of onboard CMOS battery as specified by the manufacturer Do...

Page 13: ...MI_LAN Dedicated IPMI LAN port JF1 Front control panel JF2 PCI E 3 0 x4 slot supported by CPU2 JSD1 SATA DOM power connector JSDCARD1 Micro SD Card slot JTPM1 Trusted Platform Module TPM Port 80 conne...

Page 14: ...CI E 3 0 x4 via CPU2 JF2 1 x PCI E 3 0 x4 M 2 Port 1 x PCI E 3 0 x24 via CPU2 SXB2 Network ATEN IPMI from ASPEED AST 2500 BMC for gigabit RJ45 port Graphics ASPEED AST2500 BMC chip with one 1 VGA port...

Page 15: ...mperature CPU switching phase voltage regulator CPU Thermal Trip support Fan Control Dual cooling zones Low noise fan speed control Pulse Width Modulation PWM fan control System Management Trusted Pla...

Page 16: ...C BMC ROM 32MB TPM BIOS ROM 16MB MUX SPI SPI CPU0 P3 15 0 RMII JSIOM1 SXB4 CPU1 P0 15 8 CPU0 P2 15 0 Micro SD CPU0 USB2 0_1 0 xGMI SXB3 SXB2 DDR4 DIMM 0 DDR4 DIMM 0 DDR4 DIMM 0 DDR4 DIMM 0 DDR4 DIMM 0...

Page 17: ...Adaptive Thermal Management Monitoring PCI E 3 0 SATA 3 0 w transfer rates of up to 6 Gb s System Management Bus SMBus Specification Version 2 0 1 3 Special Features This section describes the health...

Page 18: ...oling fans through the IPMI Web interface The chassis fans are controlled by Thermal Management Environmental Temperature Control The thermal control sensor monitors the CPU temperature in real time a...

Page 19: ...ecessary for proper and reliable operation It is even more important for processors that have high CPU clock rates In areas where noisy power transmission is present you may choose to install a line f...

Page 20: ...its components peripheral chips memory modules or gold contacts When handling chips or modules avoid touching their pins Put the motherboard and peripherals back into their antistatic bags when not i...

Page 21: ...ground the motherboard to the chassis Make sure that the metal standoffs click in or are screwed in tightly Phillips Screwdriver 1 Standoffs 11 Only if Needed Phillips Screws Tools Needed Location of...

Page 22: ...22 H11DST B User s Manual Figure 2 1 Motherboard Mounting Holes...

Page 23: ...standoffs in the chassis as needed 5 Install the motherboard into the chassis carefully to avoid damaging other motherboard components 6 Using the Phillips screwdriver insert a Phillips head 6 screw i...

Page 24: ...you install the CPU heatsink If you buy a CPU separately make sure that you use an AMD certified heatsink only Make sure to install the motherboard into the chassis before you install the CPU heatsin...

Page 25: ...pping position 3 Lift the rail frame up by gripping the lift tabs near the front end of the rail frame While keeping a secure grip of the rail frame lift it to a position so you can do the next step o...

Page 26: ...p the handle of the carrier frame CPU package assembly from its shipping tray and while gripping the handle align the flanges of the carrier frame onto the rails of the rail frame so its pins will be...

Page 27: ...ll it securely rests in upright position Then remove the PnP cover cap from the CPU socket below Grip the two lift tabs marked Remove at the middle of the cap and pull vertically upwards to remove the...

Page 28: ...is seated in the Socket housing Note that the force frame is spring loaded and has to be held in place before it is secured 10 Place and re screw the screws in the reverse order to the way you removed...

Page 29: ...er the four screw holes on CPU package on the socket frame 12 Using a diagonal pattern tighten the four screws down on the heatsink in a clockwise fashion till it is secure The heatsink will now be se...

Page 30: ...frame is spring loaded so be careful lifting it up into a vertical position 5 Grip the handle of the carrier frame and pull upwards to extract it from the rail frame Return the carrier frame CPU packa...

Page 31: ...onal memory information Processors and their Corresponding Memory Modules CPU Channel Channel Channel Channel 1 2 3 4 5 6 7 8 4 DIMMS CPU1 B1 D1 F1 H1 8 DIMMS CPU1 A1 B1 C1 D1 E1 F1 G1 H1 8 DIMMS CPU1...

Page 32: ...DIMM speeds can be installed However all DIMMs will run at the speed of the slowest DIMM The motherboard will support odd numbered modules 1 or 3 modules installed However to achieve the best memory...

Page 33: ...4 Align the notches on both ends of the module against the receptive points on the ends of the slot 5 Press the notches on both ends of the module straight down into the slot until the module snaps i...

Page 34: ...oard Figure 2 1 I O Port Locations and Definitions Rear I O Ports Description Description Description 1 VGA Port 3 USB 1 3 0 5 UID LED 2 USB 0 3 0 4 IPMI LAN Port 6 UID Switch 1 5 4 3 2 VGA Port There...

Page 35: ...ID switch again to turn off the LED indicators The UID Indicator provides easy identification of a system that may be in need of service Note UID can also be triggered via IPMI on the serverboard For...

Page 36: ...a solid state DOM storage device connected to one of the SATA ports See the table below for pin definitions DOM Power Pin Definitions Pin Definition 1 5V 2 Ground 3 Ground SATA Ports The H11DST B has...

Page 37: ...system Please go to the following link for more information on TPM http www supermicro com manuals other TPM pdf Trusted Platform Module Header Pin Definitions Pin Definition Pin Definition 1 LCLK 2 G...

Page 38: ...s are supported by riser cards that are available separately The table below describes their functions Expansion Slots Name Description SXB1 PCI E 3 0 x4 Slot Supported by CPU2 and SATA Connections SA...

Page 39: ...onnector Pins Jumper Setting 3 2 1 3 2 1 Clear CMOS JBT1 is used to clear CMOS which will also clear any passwords Instead of pins this jumper consists of contact pads to prevent accidentally clearing...

Page 40: ...isable it Watch Dog Jumper Settings Jumper Setting Definition Pins 1 2 Reset Default Pins 2 3 NMI Open Disabled VGA Enable Disable Optional JPG1 allows you to enable or disable the VGA port The defaul...

Page 41: ...JDBG1 will enable or disable Debug Mode on the motherboard See the table below for jumper settings The default setting is Normal Mode Debug Mode Enable Disable Jumper Settings JDBG1 Jumper Setting De...

Page 42: ...rmal Green Fast Blinking BMC Initializing UID Switch and LED Indicator The rear UID LED1 is located next to the UID switch The front UID LED is located on the front panel When you press the UID switch...

Page 43: ...d all the system power rails are ready When the system is turned off or any one of the system power rails fails this LED will turn off Turn off the system and unplug the power cord before removing or...

Page 44: ...ion PCI Express 3 0 x24 A PCI E 3 0 x24 slot supported by CPU2 is located at SXB2 Refer to the layout on Section 1 1 for the location Powered SATA DOM SuperDOM A SATA DOM Device on Disk is located at...

Page 45: ...circuits exist between the motherboard and chassis 5 Disconnect all cables from the motherboard including those for the keyboard and mouse 6 Remove all add on cards 7 Install a CPU a heatsink and at...

Page 46: ...check for bad DIMM modules or slots by following the Memory Errors Troubleshooting procedure in this Chapter Memory Errors 1 Make sure that the DIMM modules are properly and fully installed 2 Confirm...

Page 47: ...ite for more information on the minimum power requirements 6 Proper software support Make sure that the correct drivers are used B If the system becomes unstable before or during OS installation check...

Page 48: ...clude the following information when contacting us for technical support Motherboard model and PCB revision number BIOS release date version this can be seen on the initial display when your system fi...

Page 49: ...when the BIOS is not in control such as during memory count the first screen that appears when the system is turned on the momentary on off switch must be held for more than four seconds to shutdown t...

Page 50: ...by calling your vendor for a Returned Merchandise Authorization RMA number When returning to the manufacturer the RMA number should be prominently displayed on the outside of the shipping carton and m...

Page 51: ...onboard battery follow the steps 1 2 from the preceding page and continue below 2 Identify the battery s polarity The positive side should be facing toward the battery lock 3 Push the spring loaded b...

Page 52: ...etc Each main BIOS menu option is described in this manual The Main BIOS screen has two main frames The left frame displays all the options that can be configured Grayed out options cannot be configu...

Page 53: ...ighlight System Date or System Time using the arrow keys Enter new values using the keyboard Press the Tab key or the arrow keys to move between fields The date must be entered in MM DD YYYY format Th...

Page 54: ...T B User s Manual 54 CPLD Version This item displays the version of the CPLD firmware used in the system Memory Information Total Memory This item displays the total size of memory available in the sy...

Page 55: ...enu items Boot Feature Quiet Boot Use this feature to select the screen display between the POST messages and the OEM logo upon bootup Select Disabled to display the POST messages Select Enabled to di...

Page 56: ...lly reboot the system from a specified boot device after its initial boot failure The options are Disabled Legacy Boot and EFI Boot Power Configuration Watch Dog Function If enabled the Watch Dog Time...

Page 57: ...2 devices TPM 2 0 to TPM 2 0 devices and Auto will auto select according to the version of the device installed with the default set to TPM 2 0 The options are TPM 1 2 TPM 2 0 and Auto CPU Configurat...

Page 58: ...Family Processor Model Microcode Patch Level L1 Instruction Cache Size Method L1 Data Cache Size Method L2 Data Cache Size Method L3 Cache per Scoket Size Method NB Configuration Determinism Slider Us...

Page 59: ...is setting controls the memory interleaving size This determines the starting address of the interleave bit 8 9 10 or 11 Options include 256 Bytes 512 Bytes 1 KB 2 KB or Auto CPU1 CPU2 Memory Informat...

Page 60: ...7 9 10 11 12 IO 2F8h IRQ 3 4 5 6 7 9 10 11 12 IO 3E8h IRQ 3 4 5 6 7 9 10 11 12 and IO 2E8h IRQ 3 4 5 6 7 9 10 11 12 SOL Configuration SOL Select Enabled to enable the selected onboard serial port The...

Page 61: ...bit can be sent along with regular data bits to detect data transmission errors Select Even if the parity bit is set to 0 and the number of 1 s in data bits is even Select Odd if the parity bit is set...

Page 62: ...tems will become available for user s configuration Console Redirection Settings Terminal Type This feature allows the user to select the target terminal emulation type for Console Redirection Select...

Page 63: ...loss caused by buffer overflow Send a Stop signal to stop sending data when the receiving buffer is full Send a Start signal to start sending data when the receiving buffer is empty The options are N...

Page 64: ...ects a serial port in a client server to be used by the Microsoft Windows Emergency Management Services EMS to communicate with a remote host server The options are COM1 COM2 Disabled and AMT SOL Term...

Page 65: ...r the system PCI E Spread Spectrum Use this setting to Enable or Disable PCI E Spread Spectrum for your system Target Link Speed If supported by hardware and set to Force to x S GT S x being a value o...

Page 66: ...ing to select which firmware function is to be loaded for onboard LAN1 on the system Options include Disabled PXE iSCSI and FCoE Onboard LAN1 Option ROM Use this setting to select which firmware funct...

Page 67: ...ort the PXE boot Default is 0 Media Detect Count This setting allows you set in a number field the number of times presence of media will be checked Default is 1 Error Management RCD Parity This setti...

Page 68: ...me of the iSCSI Initiator in IQN format Once the name of the iSCSI Initiator is entered into the system configure the proper settings for the following items Add an Attempt Delete Attempts Change Atte...

Page 69: ...IPMI settings BMC Firmware Revision This item indicates the IPMI firmware revision used in your system IPMI Status Baseboard Management Controller This item indicates the status of the IPMI firmware...

Page 70: ...ures for IPV4 support IPMI LAN Selection This item displays the IPMI LAN setting The default setting is Failover IPMI Network Link Status This item displays the IPMI Network Link status The default se...

Page 71: ...ure IPV6 Support This section displays configuration features for IPV6 support IPV6 Support Use this feature to enable IPV6 support The options are Enabled and Disabled Configuration Address Source Th...

Page 72: ...1DST B User s Manual 72 IPMI Function Support This option Enables or Disables the built in IPMI Intelligent Platform Management Interface feature on the server board The options are Enabled and Disabl...

Page 73: ...S Event settings Enabling Disabling Options SMBIOS Event Log Select Enabled to enable SMBIOS System Management BIOS Event Logging during system boot The options are Enabled and Disabled Erasing Settin...

Page 74: ...ECI Multiple Event Count Increment Enter the increment value for the multiple event counter Enter a number between 1 to 255 The default setting is 1 METW Multiple Event Count Time Window This item is...

Page 75: ...is erased the User Password will be cleared as well User Password Press Enter to create a new or change an existing User password Password Check Select Setup for the system to check for a password at...

Page 76: ...t secure keys set by the manufacturer The options are Yes and No Enroll EFI Image This allows the image to run in Secure Boot Mode and enroll SHA256 hash of the binary into an Authorized Signature Dat...

Page 77: ...the DBX from the manufacturer s defaults to the existing DBX Select No to load the DBX from a file The options are Yes and No Authorized TimeStamps Set New Key Select Yes to load the DBT from the manu...

Page 78: ...ot to an EFI OS after the boot failed from the legacy boot order FIXED BOOT ORDER Priorities Section This option prioritizes the order of bootable devices that the system to boot from Press Enter on e...

Page 79: ...ion Boot Priorities This feature allows the user to specify which UEFI devices are boot devices UEFI Boot Order 1 Hard Disk Drive BBS Priorities This feature allows the user to specify which hard disk...

Page 80: ...oot the computer Select Discard Changes and Exit from the Exit menu and press Enter Save Changes and Reset Select this option to reset the system after saving the changes Save Changes After completing...

Page 81: ...Defaults from the Exit menu and press Enter This enables the user to save any changes to the BIOS setup for future use Restore User Defaults To set this feature select Restore User Defaults from the...

Page 82: ...m support manuals AMI BIOS POST Codes User s Guide When BIOS performs the Power On Self Test it writes checkpoint codes to I O port 0080h If the computer cannot complete the boot process a diagnostic...

Page 83: ...You may also use a utility to extract the ISO file if preferred After creating a CD DVD with the ISO files insert the disk into the CD DVD drive on your system and the display shown in Figure B 1 sho...

Page 84: ...s in a command line or web based interface in Windows and Linux operating systems The program monitors system health information such as CPU temperature system voltages system power consumption fan sp...

Page 85: ...nstalling or configuring components These warnings may also be found on our website at http www supermicro com about policies safety_information cfm C 1 Battery Handling Warnung Bei Einsetzen einer fa...

Page 86: ...r indien de batterij verkeerd vervangen wordt Vervang de batterij slechts met hetzelfde of een equivalent type die door de fabrikant aanbevolen wordt Gebruikte batterijen dienen overeenkomstig fabriek...

Page 87: ...entos nacionales Attention La mise au rebut ou le recyclage de ce produit sont g n ralement soumis des lois et ou directives de respect de l environnement Renseignez vous aupr s de l organisme comp te...

Page 88: ...ain BIOS block a main BIOS image The boot block contains critical BIOS codes including memory detection and recovery codes for the user to flash a new BIOS image if the original main BIOS image is cor...

Page 89: ...1 Using a different system copy the Super ROM binary image file into the disc Root Directory of a USB device or a writeable CD DVD Note If you cannot locate the Super ROM file in your driver disk visi...

Page 90: ...d until the following screen or a screen similar to the one below displays 4 After locating the new BIOS binary image the system will enter the BIOS Recovery menu as shown below Note At this point you...

Page 91: ...omplete 9 After seeing the message that BIOS update has completed unplug the AC power cable from the power supply clear CMOS then plug the AC power cable in the power supply again to power on the syst...

Reviews: