Supermicro CSE-LB16-AW Chassis Series User's Manual
24
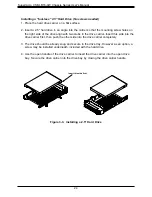
Figure 3-3. Installing a 2.5" Hard Drive
Installing a "tool-less" 2.5" Hard Drive (No screws needed)
1.
Place the hard drive carrier on a flat surface.
2. Insert a 2.5" hard drive in an angle into the carrier so that the mounting screw holes on
the right side of the drive align with two stubs in the drive carrier. Insert this side into the
drive carrier first, then push the other side into the drive carrier completely.
3.
The drive should be already snug and secure in the drive tray. However as an option, a
screw may be installed underneath, included with the hard drive.
4. Use the open handle of the drive carrier to insert the drive carrier into the open drive
bay. Secure the drive carrier into the drive bay by closing the drive carrier handle.
Insert this side first

