background image

3-9

Chapter 3: Installation

Note:

 If the 

FOUND NEW HARDWARE WIZARD

 screen displays on your 

system, click CANCEL.

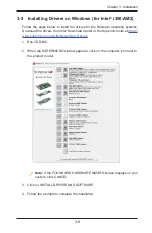
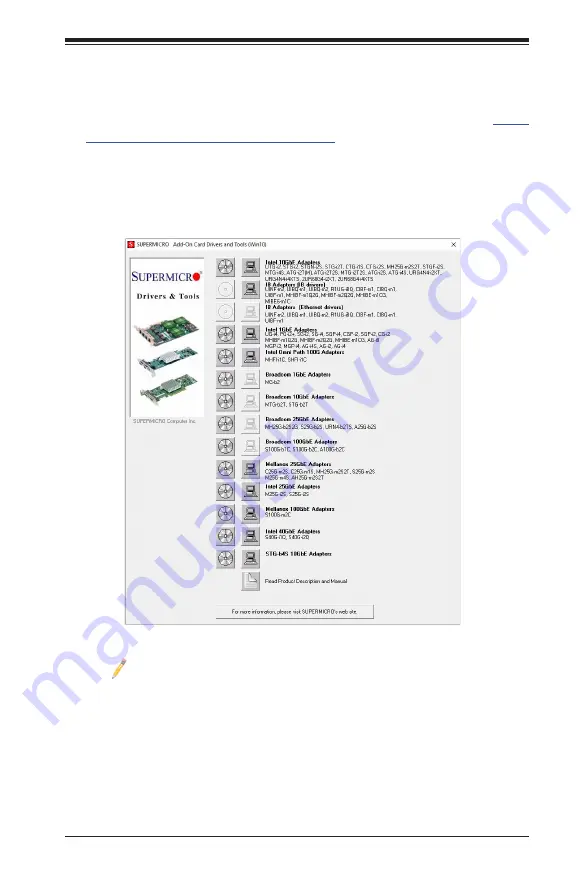
3.  Click on INSTALL DRIVERS AND SOFTWARE.

4.  Follow the prompts to complete the installation.

3-5   Installing Drivers on Windows (for Intel

®

 i350-AM2)

Follow the steps below to install the drivers for the Windows operating systems. 
Download the drivers from Intel

®

 Download Center or the Supermicro site at 

https://

www.supermicro.com/wftp/Networking_Drivers

.

1.  Run CDR-NIC. 

2.  When the SUPERMICRO window appears, click on the computer icon next to 

the product model.

Summary of Contents for AOC-AG-i2

Page 1: ...User s Guide Revision 1 0 AOC AG i2 AOC AG i2M...

Page 2: ...a USA The State of California County of Santa Clara shall be the exclusive venue for the resolution of any such disputes Supermicro s total liability for all claims will not exceed the price paid for...

Page 3: ...r s guide are based upon the latest PCB revision available at the time of publishing The card you have received may or may not look exactly the same as the graphics shown in this user s guide Returnin...

Page 4: ...following symbols for proper system installation and for safety instructions to prevent damage to the system or injury to yourself Note Additional information given for proper system setup Networking...

Page 5: ...v Preface...
Page 6: ...Het Sterrenbeeld 28 5215 ML s Hertogenbosch The Netherlands Tel 31 0 73 6400390 Fax 31 0 73 6416525 Email sales supermicro nl General Information support supermicro nl Technical Support rma supermicro...

Page 7: ...cators and Connectors 2 4 2 4 PCI E 2 1 x4 AIOM Form Factor Connector 2 6 Chapter 3 Installation 3 1 Static Sensitive Devices 3 1 3 2 Before Installation 3 2 3 3 Installing the Add on Card AOC AG i2 w...

Page 8: ...ndards in quality and performance For product support and updates please refer to our website at http www supermicro com products nfo networking cfm adapter 1 2 Product Highlights Advanced I O Module...

Page 9: ...low control support Automatic cross over detection function MDI MDI X 1Gb s Ethernet IEEE 802 3 802 3u 802 3ab PHY specifications compliant Virtualization Features PC SIG SR IOV support VM to VM packe...

Page 10: ...d IPv4 IPv6 increases throughput and lowers processor usage Receive Side Scaling RSS for Windows environment Scalable I O for Linux environments Intelligent interrupt generation Management Features Pr...

Page 11: ...lative humidity at 35 C Physical Dimensions Card PCB dimensions 76mm x 115mm W x D Note This product is only sold as part of an integrated solution with Supermicro server systems 1 4 Available SKUs SK...

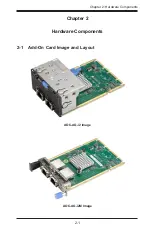
Page 12: ...Chapter 2 Hardware Components 2 1 Chapter 2 Hardware Components 2 1 Add On Card Image and Layout AOC AG i2 Image AOC AG i2M Image...

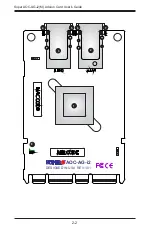
Page 13: ...2 2 Super AOC AG i2 M Add on Card User s Guide LED1 LED2 LED3 LED4 JLAN1 JLAN2 LED9 BAR CODE MAC CODE REV 1 01 AOC AG i2 DESIGNED IN USA 1 4 1 3 1 2 1 1 1 6 1 5 1 7 1 8...

Page 14: ...Major Components No Component Name Definition 1 Intel i350 GbE Ethernet controller 2 JLAN1 LAN RJ45 Port 3 JLAN2 LAN RJ45 Port 4 LED1 LAN RJ45 Port 2 Active LED 5 LED2 LAN RJ45 Port 2 Link LED 6 LED3...

Page 15: ...Note 1 To make sure that LAN port functions properly be sure to use the following cable specified by the manufacturer Direct attached twin axial copper cable or Short Range or Long Range fiber optic c...

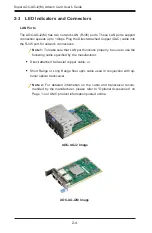
Page 16: ...100 Mbps Link Speed Activity Right Green Flashing Activity LAN LED Each RJ45 connector has two LEDs The LEDs on the left of a port LED 2 and 4 indicates link speeds and the LEDs on the right LED 1 an...

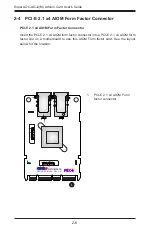
Page 17: ...nector Insert the PCI E 2 1 x4 AIOM form factor connector into a PCI E 2 1 x4 AIOM form factor slot on a motherboard to use this AIOM Form factor card See the layout below for the location 1 PCI E 2 1...

Page 18: ...bag Handle the add on card by its edges only do not touch its components Put the add on card back into the antistatic bags when not in use For grounding purposes make sure that your system chassis pr...

Page 19: ...own the system 2 Unplug the power cord 3 Use industry standard anti static equipment such as gloves or a wrist strap and follow the precautions on page 3 1 to avoid damage caused by ESD 4 Familiarize...

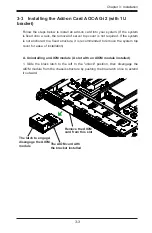
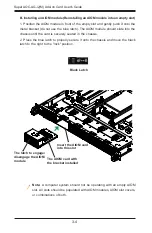
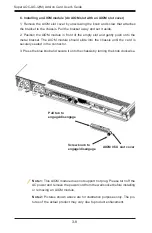
Page 20: ...ored to a fixed structure it is recommended to remove the system top cover for ease of installation A Uninstalling an AIOM module A slot with an AIOM module installed 1 Slide the black latch to the le...

Page 21: ...slot 1 Position the AIOM module in front of the empty slot and gently push it onto the metal bracket do not use the blue latch The AIOM module should slide into the chassis until the card is securely...

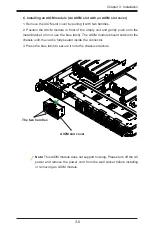
Page 22: ...stalling an AIOM module An AIOM slot with an AIOM slot cover 1 Remove the AIOM slot cover by pulling it with two handles 2 Position the AIOM module in front of the empty slot and gently push onto the...

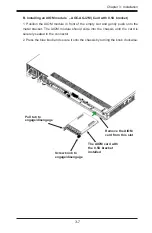
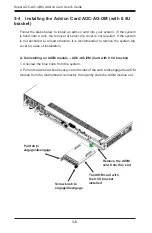
Page 23: ...xed structure it is recommended to remove the system top cover for ease of installation A Uninstalling an AIOM module AOC AG i2M Card with 0 5U bracket 1 Unscrew the blue knob from the system 2 Pull o...

Page 24: ...y push onto the metal bracket The AIOM module should slide into the chassis until the card is securely seated in the connector 2 Press the blue knob and secure it onto the chassis by turning the knob...

Page 25: ...stalling an AIOM module An AIOM slot with an AIOM slot cover 1 Remove the AIOM slot cover by unscrewing the knob and screw that attaches the bracket to the chassis Pull the bracket away and set it asi...

Page 26: ...te the installation 3 5 Installing Drivers on Windows for Intel i350 AM2 Follow the steps below to install the drivers for the Windows operating systems Download the drivers from Intel Download Center...

Page 27: ...the system at this time Follow the instructions below to build the driver manually 1 Move the base driver tar file to the directory of your choice For example home username igb or usr local src igb 2...

Page 28: ...e kernel before loading the new module To do this use rmmod igb modprobe igb 6 Assign an IP address to the interface by entering the following where x is the interface number ifconfig ethx IP_address...

Page 29: ...Enter the following where IP_address is the IP address for another machine on the same subnet as the interface that is being tested ping IP_address 7 If you want the driver to load automatically when...

Page 30: ...igb_hw c optional igb dev igb igb_ee c optional igb dev igb if_igb c optional igb Remove the following lines from the usr src sys conf files i386 file if they exist dev igb if_igb_fx_hw c optional igb...

Page 31: ...expected to result in significant injury or loss of life or catastrophic property damage Accordingly Supermicro disclaims any and all liability and should buyer use or sell such products for use in su...

Reviews: