


2
—
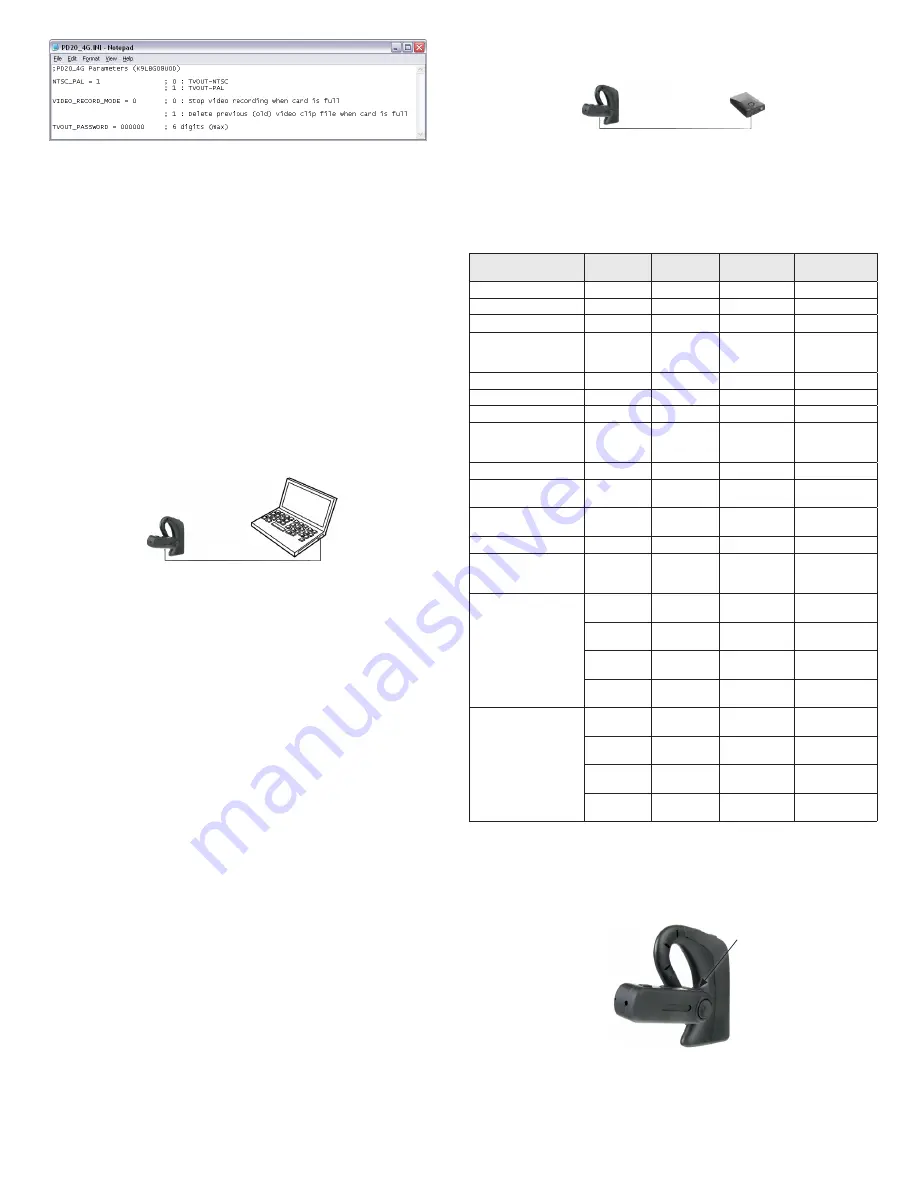
To setup the TV OUT signal format, edit NTSC_PAL = 0 for NTSC video format (used in most of
North and South America, and some other countries), or edit NTSC_PAL = 1 for PAL format.
—
To setup the Loop Overwrite function, edit VIDEO_RECORD_MODE = 0 to stop recording when
memory is full, or edit VIDEO_RECORD_MODE = 1 to overwrite old data in memory when
memory is full.
—
Enter a password to use the TV OUT feature of the XTR-BLUE1. The default password is
“
000000
”. The password can have a maximum of 6 digits.
—
Save the editing changes made to the file and close the file editor.
—
Proceed to
Charging the XTR-BLUE1 ...
, or eject the device from the operating system, then
disconnect it from the USB port.
Charging the XTR-BLUE1 and portable power supply
Charge the XTR-BLUE1 device fully before use. It can be charged different ways:
•
Through a USB connection to a computer:
—
Power off the XTR-BLUE1.
—
Connect the USB cable provided between the USB jack on the XTR-BLUE1 and a USB jack on a
computer that is running. The XTR-BLUE1 will begin charging and the red indicator will flash
slowly.
USB jack
PC USB
jack
USB cable
—
Wait until the red indicator stops flashing and stays on, then disconnect the USB cable between
the XTR-BLUE1 and your computer.
•
Using an automobile cigarette lighter with the adapter:
—
Power off the XTR-BLUE1.
—
Plug the cigarette lighter adapter into the lighter socket.
—
Connect the USB cable provided between the USB jack on the XTR-BLUE1 and a USB jack on
a cigarette lighter adapter.
NOTE
: Some cars may need to be running to provide power to the
lighter socket. The XTR-BLUE1 will begin charging and the red indicator will flash slowly.
—
Wait until the red indicator stops flashing and stays on, then disconnect the USB cable between
the XTR-BLUE1 and cigarette lighter adapter.
•
Using the USB power adapter provided:
—
Power off the XTR-BLUE1.
—
Connect the power adapter to the USB connector on the XTR-BLUE1, then plug it into a standard
120 VAC outlet. The red indicator on the XTR-BLUE1 will flash continuously while charging.
—
Wait until the red indicator stops flashing and stays on, then disconnect the power adapter
from the XTR-BLUE1 and outlet.
•
Charging the Portable Power Supply .
—
Power off the Portable Power Supply.
—
Connect the Mini B 8-Pin Discharge Wire to Portable Power Supply and the USB connector
adapter.
—
Plug the USB connector into a USB port on a running computer. The indicator on the Portable
Power Supply will flash continuously while charging.
—
Wait until the indicator stops flashing and stays on, then disconnect the Portable Power Supply.
Using the Portable Power Supply with the XTR-BLUE1
The Portable Power Supply can provide extended power to the XTR-BLUE1, or function as a flash light if
necessary. To attach the power supply to the XTR-BLUE1:
•
Power off the XTR-BLUE1.
•
Attach the Mini B 8-pin discharge wire (provided) to the USB jack of the XTR-BLUE1 and the front-
panel jack of the Portable Power Supply
USB jack
PPS jack
Mini B 8-pin
Discharge Wire
•
Power on the XTR-BLUE1.
NOTE
: You can test the charge level of the Portable Power Supply by pressing the button on the top of the
unit.
Operation Indicators
Function
Red
Indicator
Green
Indicator
Bluetooth
Headset
Battery or Memory
available
Power on
On
Audible tone
Battery charging
Flash slowly
Battery fully charged
On
Low battery indication
Flash quickly
for 30 sec. then
power off
Audible tone
PC camera mode
Flash quickly
Video recording
Flash slowly
Audible tone
Photo shooting
Flash 2x
Audible tone
Memory full
On for 30 sec.,
then dormant
state
Audible tone
TV OUT mode
On
On
Data transmission
(decryption state)
Flash quickly
Data transmission
(non-decryption state)
Flash alternately
Flash alternately
Turn on voice activated switch
Flash 3x
In voice activated mode, if no
sound detected for 3 min., revert
to standby mode
Flash 3x, then
revert to standby
mode
Battery level detection - press
Stop button for 4 seconds
Flash 1x
75% - 100% battery
available
Flash 2x
50% - 75% battery
available
Flash 3x
25% - 50% battery
available
Flash 4x
Less than 25% battery
available
Memory level detection - press
Video recording button for 4
seconds
Flash 1x
75% - 100% memory
available
Flash 2x
50% - 75% memory
available
Flash 3x
25% - 50% memory
available
Flash 4x
Less than 25%
memory available
Step 2. Operation
Powering on the device
To power on the headset, slide the power switch to on. The red indicator will light and an audible tone can
be heard.
Power
Switch
NOTE
: If the device doesn’t respond when the power button is pressed, the battery power is low.
The device should be recharged.


