


9
116083
A
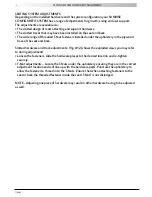
fig. #3
A
B
D
C
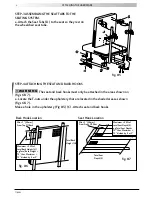
ATTACHING THE HARDWARE
STEP-2 ASSEMBLING THE KNOB CLAMP HARDWARE TO THE WHEELCHAIR
FRAME (fig #2, & 4)
Attaching the Back Knob Clamps
a. Loosen bolts (A)
b. Using the correct size supplied clamp spacers to fit the
wheelchair tube size tighten the clamp onto the back tube
(A1).
2. Attaching the Seat Knob Clamps
a. Loosen bolts (B)
b. Using the correct size supplied clamp spacers to fit the
wheelchair tube size tighten the clamp onto the
tube (fig. #4).
fig. #2
Seat Hook
Knob Clamp
Knob Clamp
Seat Tab
Seat to Back
Bracket
Spacers
fig. #4
NOTE: During the following steps tighten all hardware just
enough to hold positions. This will make it easier to adjust
during assembly. Ensure that when attaching fasteners to the
seat or back the threaded fastener inside the seat (t-nut) is
not dislodged. Ensure that all threads align straight and do
not cross thread. Tighten all fasteners. Sunrise recommends
tightening fasteners to 100 ft/lbs (115.5 kgf/cm) of torque.
STEP-1 ASSEMBLING THE BACK TO SEAT BRACKET TO THE
SEATING SYSTEM. (fig #1)
Locate the T-Nuts under the seat and back upholstery. Before
making the holes for the fasteners make sure the holes you
have chosen will give you the largest range of seat depth and
back height adjustment.
fig. #1
Back Hook


