Sunrise Medical Quickie P-220 User Instruction Manual & Warranty Download Page 26

930475 Rev. A

X I I .   M a i n t e n a n c e

51

X I I .   M a i n t e n a n c e

930475 Rev. A

50

E. PNEUMATIC TIRES

1. Do not use this chair if any of the tires are

under- or over-inflated.

2. Low pressure in a tire may cause the chair to

veer to one side and result in loss of control.

3. An over-inflated tire may burst.
4. Never use a gas station pump to inflate a tire.

Such pumps provide air at high volume, and
may cause tire to burst.

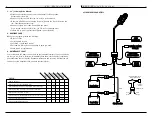
1. Check for signs of wear and correct air pressure

in pneumatic tires weekly. 

2. For best performance, inflate tires to the same

pressure level, as shown on the tire sidewall: 
•8" & 9" (200 & 250mm) pneumatic casters– 

30 to 40 psi (207 to 275 kpa)

•12" (310 mm) pneumatic drive wheels– 

35 to 45 psi (240 to 310 kpa)

3.

CAUTION–

To prevent tire damage: 

•Use a hand pump (or a low volume air pump) 

to inflate tires.

•Use a tire gauge to check pressure.

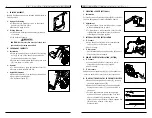
F. TO REPAIR OR REPLACE A TIRE

Residual air pressure in tires can cause severe
injury. Make sure you release all air in tire
before attempting to service or repair tires.

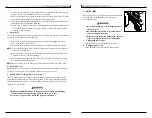
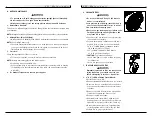
1. 8" & 9" (200 & 250mm) Caster Wheels: 

a. Release all air from tire. 
b. Remove caster wheel from fork using a 1/2" wrench. 
c. Make sure there is no residual air in tire before

you remove bolts that hold the two rim halves
together. 

d. Remove four bolts from rim using a #3 phillips

screwdriver. Separate two halves of rim. 

e. Repair or replace inner tube. 
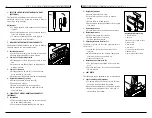
f. Reassemble the caster wheel; make sure the

bearing spacer is in place and all four bolts are
tightened to a torque of 60 in.-lbs. (6.8 N.m). 

g. Mount caster wheel onto fork. Install washers

correctly tighten bolt to 240 in.-lbs. (27 N.m). 

h. Inflate tire to proper pressure level. 

A

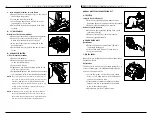
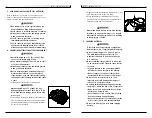
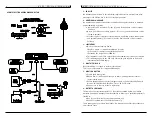
D. BATTERY MAINTENANCE

1. To prevent an acid spill, always keep batteries upright (wet cell batteries).
2. Never smoke or hold an open flame near batteries.
3. Always wear rubber gloves and safety glasses when you handle batteries.

1. Maintenance Schedule: 

This varies for different types of batteries. Always follow the instructions supplied with
your batteries. 

NOTE–

Always wear rubber gloves and safety glasses when you handle or service batteries.

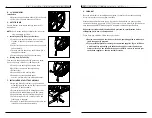
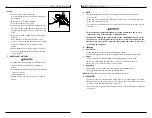
2. Adding Water: (Wet Cells Only)

• Wet-type lead acid batteries need periodic replacement of water due to evaporation. 

NOTE– 

Use distilled water only. 

• Check the battery fluid level about once a week. When you remove the stoppers

(on top of the battery) there should be one-eighth to one-quarter of an inch of
fluid above the internal plates. Do not overfill. 
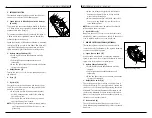
3. Corrosion: 

Check battery terminals often for corrosion. 

a. If corrosion is present, use a wire brush to clean the terminals. 

NOTE–

Always wear safety glasses and rubber gloves. 

b. Use baking soda to neutralize acid. 
c. Use petroleum jelly to re-grease the terminals after connecting cable to battery.

(Completely cover the terminal nut and bolt, cable clip and any exposed cable
with jelly). 

4. For Answers To Questions: Contact your supplier.

Summary of Contents for Quickie P-220

Page 1: ...Quickie P 220 User Instruction Manual Warranty Supplier This manual must be given to the rider of this wheelchair Rider Before using this wheelchair read this entire manual and save for future reference ...

Page 2: ...safety new products and options to increase your use and enjoyment of this wheelchair If you lose your war ranty card call or write and we will gladly send you a new one FOR ANSWERS TO YOUR QUESTIONS Your authorized supplier knows your wheelchair best and can answer most of your questions about chair safety use and maintenance For future reference fill in the following Supplier ___________________...

Page 3: ...re 51 G Ordering Parts 52 H Maintenance Chart 52 XIII WIRING DIAGRAM 53 XIV SUNRISE LIMITED WARRANTY 55 I I T a b l e o f C o n t e n t s 930475 Rev A 4 I INTRODUCTION 3 II TABLE OF CONTENTS 4 III YOUR CHAIR AND ITS PARTS 6 IV NOTICE READ BEFORE USE 8 V EMI ELECTROMAGNETIC INTERFERENCE 9 A What is EMI 9 B What Effect Can EMI Have 9 C Sources of EMI 10 D Distance From the Source 10 E Immunity Level...

Page 4: ...andard 8 200mm pneumatic Option 8 200mm airless insert 8 200mm suspension 9 225mm pneumatic 9 225mm airless insert Armrests Standard dual post with standard or full length pad Option dual post height adjustable height adjustable with standard or full length pad Manual Wheelchair Conversion Kit Conversion Kit Axles Option quad release axle nuts Rear Wheels Standard Mag Tire types pneumatic airless ...

Page 5: ...AIR SAFETY OPTIONS Sunrise provides a choice of many power wheelchair styles sizes and adjustments to meet the needs of the rider However final selection of a wheelchair rests solely with you and your health care professional Choosing the best chair for you depends on such things as 1 Your size disability strength balance and coordination 2 Your intended use and your level of activity 3 The types ...

Page 6: ...e broad types 1 Hand Held Transceivers The antenna is usually mounted directly on the unit These include Citizens band CB radios Walkie talkies Security fire and police radios Cellular phones Lap top computers with phone or fax Other personal communication devices NOTE These devices can transmit signals while they are on even if not in use 2 Medium Range Mobile Transceivers These include two way r...

Page 7: ...over or loss of control may occur and cause severe injury to you or others A NOTICE TO RIDER 1 Before using this chair you should be trained in its safe use by your health care professional 2 Every wheelchair is different Take the time to learn the feel of this chair before you begin riding 3 Be aware that you must develop your own methods for the safe use of this chair that are best suited to you...

Page 8: ...ss authorized by Sunrise Doing so will void the Warranty and may create a safety hazard 1 If you modify or adjust this chair it may increase the risk of a fall or tip over 2 Modifications unauthorized by Sunrise constitutes remanufacturing of the wheel chair This voids the warranty The rider then assumes all future liability for the wheelchair H WHEN SEATED IN A PARKED WHEELCHAIR 1 Always turn off...

Page 9: ... BALANCE The point where this chair will tip forward back or to the side depends on its center of balance and stability The Center Of Balance Is Affected By 1 The seat height and seat angle 2 A change in your body position posture or weight distribution 3 Using this chair on a ramp or slope 4 The use of a back pack or other options and the amount of added weight 5 Drive wheel positioning To Reduce...

Page 10: ...re very dangerous Even a small change in height may stop a caster wheel and cause your chair to tip You may need to Remove or cover threshold strips between rooms Install a ramp at entry or exit doors 2 Keep your eyes moving when you ride scan the area well ahead of your chair 3 Make sure the floor areas where you use this chair are level and free of obstacles 4 To help correct your center of bala...

Page 11: ...er design will vary depending on such things as the length and height of the ramp the need for an intermediate platform landing size doors and the direction of swing and whether the ramp includes a turn or angle At A Minimum 1 Open sides of ramp must have side rails to prevent your chair from going over the edge 2 Slope must not be steeper than one inch in height for every one foot of slope length...

Page 12: ... disengaged H ON OFF SWITCH 1 Never use the ON OFF switch to stop the chair except in an emergency This will result in an abrupt stop and may cause you to fall 2 To slow your chair to a stop return the joystick to neutral V I I W a r n i n g s C o m p o n e n t s O p t i o n s 930475 Rev A 22 Note If you use parts or make changes not authorized by Sunrise it may cre ate a safety hazard and will vo...

Page 13: ...hair easier to use 1 Do not use this chair if any of the tires are under or over inflated Check weekly for proper inflation level as listed on the tire sidewall 2 Low pressure in a tire may cause the chair to veer to one side and result in a loss of control 3 An over inflated tire may burst 4 Never use a gas station air pump to inflate a tire Such pumps provide air at high volume and could cause t...

Page 14: ...warnings in this Manual for that task 2 The Tips that follow are suggestions only Be aware that you will need to learn safe methods best suited to the rider and to your abilities Consult your health care professional for instructions A TO CLIMB A CURB OR SINGLE STEP The following is one way to safely help a rider climb a curb or single step going forward 1 Stay behind the chair 2 Face the curb and...

Page 15: ... weigh up to 55 lbs 25 kg Care must be taken to avoid injury when lifting I X S e t U p A d j u s t m e n t U s e 930475 Rev A 28 TOOLS YOU WILL NEED 1 Basic Tool Kit To set up adjust and maintain your chair you will need the following tools 7 16 box and open end wrench 1 2 box and open end wrench 3 4 box and open end wrench 5 32 Allen wrench 3 16 Allen wrench 1 8 Allen wrench Phillips screwdriver...

Page 16: ...he Joystick from the mount by unfas tening the two screws C on the underside of the mount c Position angle bracket mount such that you achieve the desired joystick height Four posi tions are available by relocating the mount either on the top or bottom of the mounting bar D and or by rotation of the angle bracket mount I X S e t U p A d j u s t m e n t U s e 930475 Rev A 30 C FOLDING BACKREST Quic...

Page 17: ...allows the control to be locked in a forward or retract ed position using magnets Adjustment a To retract joystick push outward on the inside of joystick b Push joystick away from front of armrest until it locks into retracted position c To return to forward position push joystick forward until it locks into place J DUAL POST HEIGHT ADJUSTABLE ARMRESTS The dual post flip back armrest can be used a...

Page 18: ... Remove the front securing bolt C on the side of the backrest hinge plate b Loosen the lower rear bolt D c Set at desired angle There are five holes in 4º increments to choose from d Reinstall the front bolt and tighten both bolts securely M 12 DRIVE WHEEL Drive Wheel Position Adjustment a Remove the seat and main frame and the batteries b Remove the four 4 bolts B using a 1 2 wrench from each qui...

Page 19: ...e it into the axle sleeve until it locks E ANTI TIP TUBES Sunrise Designs recommends anti tip tubes for all wheelchairs NOTE Use a torque setting of 100 in lbs when set ting up anti tip receivers 1 Inserting Anti Tip Tubes Into Receiver a Press the rear anti tip release lever on the anti tip tube so that both release pins are drawn inside b Insert into the anti tip tube receiver on the axle tube a...

Page 20: ... is required before the circuit breaker will reset 2 Repeated Shutdown If the chair continues to shut down after resetting have it serviced by a supplier X O p e r a t i n g G u i d e 930475 Rev A 38 A PERFORMANCE CONTROL SETTINGS 1 It is vital to match control settings to your level of function and ability 2 Consult your health care professional and your supplier to select the best control settin...

Page 21: ...t this switch 4 Mode Switch A The on off mode switch allows you to select from 5 five different programmable drive profiles or actuator mode sets X O p e r a t i n g G u i d e 930475 Rev A 40 E INTEGRAL JOYSTICK The standard integral joystick controls the chair s per formance It consists of the following parts 1 Speed Control or Drive Mode Selection Buttons A and B To decrease the speed level depr...

Page 22: ...stick controls the direction and speed of your chair Turn the chair on and move the joystick in the direction you want to go Moving the joystick from the neutral center position disengages the motor locks allowing the chair to move The chair will move faster the more you move the joystick away from neutral NOTE If your speed becomes hard to manage release the Joystick and the chair will come to a ...

Page 23: ...g Completely read and follow all warnings about the batteries in this user instruction manual and any labels applied to the product Failure to do so could result in fire explosion injury and or death A INTRODUCTION 1 Notes Batteries supply the power for your chair They contain a finite amount of energy and have limits on how long they can store and supply energy You can charge batteries only a cer...

Page 24: ...ow metal tools or chair parts to make direct contact across both battery terminals 5 Never look directly into cells when charging battery C ACID BURNS UNSEALED WET CELL BATTERIES Acid in batteries is corrosive It can cause serious burns to the eyes and skin and can damage floors fur niture clothing and your wheelchair 1 Use extreme care not to spill acid when you handle batteries Keep batteries up...

Page 25: ...amage fabric Drip dry only Heat from a dryer may damage fabric NOTE Washing the fabric may decrease fire retardant properties C STORAGE TIPS 1 Store your chair in a clean dry area If you fail to do so parts may rust or corrode 2 Before using your chair make sure it is in proper working order Inspect and service all items on the Maintenance Chart See p 51 3 If you store this chair for more than thr...

Page 26: ...e Repair or replace inner tube f Reassemble the caster wheel make sure the bearing spacer is in place and all four bolts are tightened to a torque of 60 in lbs 6 8 N m g Mount caster wheel onto fork Install washers correctly tighten bolt to 240 in lbs 27 N m h Inflate tire to proper pressure level A D BATTERY MAINTENANCE 1 To prevent an acid spill always keep batteries upright wet cell batteries 2...

Page 27: ...ems are loose worn bent or distorted immediately have them checked and or repaired by your authorized Sunrise supplier Frequent maintenance and servicing will improve per formance extend wheelchair life and help prevent injuries Charge Batteries Check tires for proper inflation level Check batteries for proper electrolyte level wet only Check plugs and connectors for proper connections Check all m...

Page 28: ...ag is removed or altered c This warranty applies in the USA only Check with your supplier to find out if international warranties apply 4 WHAT WE WILL DO Our sole liability is to repair or replace covered parts This is your only remedy for consequential damages 5 WHAT YOU MUST DO a Return the warranty card b Obtain from us while this warranty is in effect prior approval for return or repair covere...

Page 29: ...Sunrise Medical 7477 East Dry Creek Parkway Longmont Colorado 80503 USA 800 333 4000 In Canada 800 263 3390 2002 Sunrise Medical 5 02 930475 Rev A ...

Reviews: