Sunrise Medical Quickie Nitrum Instructions For Use Manual Download Page 6

Quickie 

®

 NITRUM

249817 Rev. A

6

V. GENERAL WARNINGS

G. SAFETY CHECKLIST

WARNING

Before Each Use Of Your Chair:
1. 

Make sure the chair rolls easily and that all parts work smoothly. Check 
for noise, vibration, or a change in ease of use. (This may indicate low tire 
pressure, loose fasteners, or damage to your chair).

2. 

Immediately repair a

ny problem. Your authorized dealer can help you fi nd 

and correct the problem(s).

3. 

Check to see that both quick-release rear axles are locked. When locked, 
the axle button will “pop out” fully. If not locked, the wheel may come off  
and cause you to fall.

4. 

If your chair has anti-tip tubes, lock them in place.

H. CHANGES & ADJUSTMENTS

WARNING

1. 

See your healthcare advisor and have them adjust seating components 
any time a change or adjustment needs to be made.

2. 

Unauthorized modifi cations or use of parts not supplied or approved by 
Sunrise may change the chair structure. This will void the warranty and 
may cause a safety hazard.

If you fail to heed these warnings, damage to your chair, a fall, tip-over or loss 
of control may occur and cause severe injury to the rider or others.

I. ENVIRONMENTAL CONDITIONS

WARNING

1. 

Use extra care if you must ride your chair on a wet or slick surface. If you 
are in doubt, ask for help.

2. 

Contact with water or excess moisture may cause your chair to rust or 
corrode. Avoid all extreme weather situations if possible.
a.    Do not use your chair in a shower, pool or other body of water.  
 

The chair tubing and parts are not water-tight and may rust or 


corrode from the inside.

b.  

Avoid excess moisture (for example, do not leave your chair in a


damp bathroom while taking a shower).

c.  

Dry your chair as soon as you can if it gets wet, or if you use water


to clean it.

If you fail to heed these warnings, damage to your chair, a fall, tip-over or loss 
of control may occur and cause severe injury to the rider or others.

J. TERRAIN

WARNING

1. 

Based on ANSI/RESNA testing, Sunrise Medical recommends the use of 
a caster wheel with a minimum diameter of 5”, if the wheelchair will be 
overcoming obstacles up to 1/2” on a regular basis.

2. 

Your chair is designed for use on fi rm, even surfaces such as concrete, 

asphalt, indoor fl ooring, and carpets.

3. 

Do not operate your chair in sand, loose soil, or over rocky terrain.

4. 

If you use your chair on terrain that is rougher than described above 
there is a danger that screws and bolts will loosen prematurely, and that 
damage to wheels or axles could put the rider at risk of a fall, tip-over, or 
loss of control.

If you fail to heed these warnings, damage to your chair, a fall, tip-over or loss 
of control may occur and cause severe injury to the rider or others.

K. STREET USE

WARNING

1. 

This product is not intended for street use.

2. 

Avoid streets whenever possible.

3. 

Obey and follow all legal pedestrian pathways, and laws that apply to 
pedestrians.

4. 

Be alert to the danger of motor vehicles in parking lots, or if you must 
cross a road.

If you fail to heed these warnings, damage to your chair, a fall, tip-over or loss 
of control may occur and cause severe injury to the rider or others.

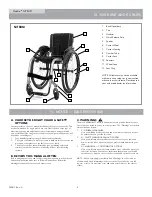
L. MOTOR VEHICLE SAFETY

If possible and feasible, the rider should transfer to the Original Equipment 
Manufacturer vehicle seat and use the OEM vehicle restraint.

Sunrise Medical does provide a WC-19 Wheelchair Tie-Down and Occupant 
Restraint System, otherwise called a Transit Option.  To Identify whether your 
wheelchair has been manufactured with the Transit Option installed, look 
for four points of securement.  Two Front points, (A) and two rear points 
(B).  These points are recognized by the securement point decal which can be 
found on or near the securement points.  If your wheelchair is equipped with 
the Transit Option please review the Transit Securement supplement that was 
provided with the wheelchair for additional information and instructions.  You 
can request a copy from your authorized supplier, or Sunrise Medical if you 
don’t have it.

WARNING

If your chair is NOT equipped with the Transit Option:

1. 

NEVER let anyone sit in this chair while in a moving vehicle.
a.   ALWAYS move the rider to an approved vehicle seat.
b.   ALWAYS secure the rider with proper motor vehicle restraints. 

2. 

In an accident or sudden stop the rider may be thrown from the chair.  
Wheelchair seat belts will not prevent this, and further injury may result 
from the belts or straps.

3. 

NEVER transport this chair in the front seat of a vehicle. It may shift and 
interfere with the driver. 

4. 

ALWAYS secure this chair so that it cannot roll or shift. 

5. 

Do not use any chair that has been involved in a motor vehicle accident.  
The frame and/or components may have been changed due to the 
accident.  Such items could be, but are not limited to: bent, loosened, 
and/or broken components that were subjected to an impact.

If you fail to heed these warnings, damage to your chair, a fall, tip-over or loss 
of control may occur and cause severe injury to the rider or others.

1

2

Look for this symbol on your wheelchair.  It indicates wheelchair 
securement points which conform to ANSI/RESNA (1998) V.1 –
Section 19 & ANSI/RESNA (2012) V.4 WC-19.

A

1

2

B

Summary of Contents for Quickie Nitrum

Page 1: ...n Internet www SunriseMedical com Ingrese a la p gina del producto espec co para descargar el manual comun quese con el proveedor autorizado de Sunrise Medical Au Fournisseur Ce manuel doit tre remis...

Page 2: ...erence please ll in the following Dealer ______________________________________________________ Address _____________________________________________________ Telephone ________________________________...

Page 3: ...g Belts Option 13 I Push Handles Option 13 J Quick Release Axles 13 K Rear Wheels 13 L Rear Wheel Locks 13 M Modi ed Seat Systems 13 N Seat and Back Upholstery 14 O Backrest Tension Adjustable 14 P Fr...

Page 4: ...positioning belts or special seating systems B REVIEW THIS MANUAL OFTEN Before using this chair you and each person who may assist you should read this entire manual and make sure to follow all instr...

Page 5: ...that after consulting a healthcare professional you will need to learn safe and proven body mechanics to use and create assistive methods best suited to your abilities D ACCESSORIES WARNING Unauthoriz...

Page 6: ...ider at risk of a fall tip over or loss of control If you fail to heed these warnings damage to your chair a fall tip over or loss of control may occur and cause severe injury to the rider or others K...

Page 7: ...if a loose part is swallowed by a child O PINCH POINT WARNING NOTE Your wheelchair has many moving parts that can create pinch points and possible nger traps Be aware when making any adjustments when...

Page 8: ...UP over an obstacle b Press your upper body BACKWARD as you go DOWN from a higher to a lower level 6 If your chair has anti tip tubes do not go over an obstacle without help 7 Keep both of your hands...

Page 9: ...a Wet or slippery surfaces b A change in grade on a slope or a lip bump or depression These may cause a fall or tip over 8 To Reduce The Risk Of A Fall Or Tip Over a Lean or press your body UPHILL Thi...

Page 10: ...surface as you can This will reduce the risk that the chair will tip or move away from you If you fail to heed these warnings damage to your chair a fall tip over or loss of control may occur and can...

Page 11: ...a fall tip over or loss of control may occur and cause severe injury to the rider or others M STAIRS WARNING 1 NEVER use this chair on stairs UNLESS you have someone to help you Doing so is likely to...

Page 12: ...ened fasteners may fail or cause damage to chair parts 3 If bolts or screws become loose tighten them as soon as you can If you fail to heed these warnings damage to your chair a fall tip over or loss...

Page 13: ...air a fall tip over or loss of control may occur and cause severe injury to the rider or others J QUICK RELEASE AXLES WARNING 1 Do not use this chair UNLESS you are sure that both quick release rear a...

Page 14: ...and cause severe injury to the rider or others P FREESTYLE BACK Option WARNING The Freestyle Adjustable Backrest is a versatile back intended to replace wheelchair back upholstery It is designed to p...

Page 15: ...d Camber Plugs Inspect the camber tubes and plugs every 6 months ensuring that all fasteners are tight and that no parts have moved from their preset positions C CLEANING 1 Paint Finish a Clean the pa...

Page 16: ...tedly Wheel locks must be adjusted after making sure the tires have the correct air pressure When fully engaged the arm D should be imbedded into the tire at least 1 8 inch to be e ective If you nd th...

Page 17: ...etermined by the adjustment bolt A position b Slide the armrest into the receiver tube B on rear of frame until the adjustment bolt is securely seated locked in the receiver tube slot 2 Swinging Away...

Page 18: ...he backrest Use caution when backing the chair up where the towel bar handle C or release bar B may come into contact or rub up along something to allow the back to unintentionally fold down Fig 20 N...

Page 19: ...Sling may be removed by rst loosening the Velcro straps C that encircle the chair frame All straps must be reinstalled in the same position and quantity as the original set up Q CUSHION INSTALLATION P...

Page 20: ...teries su ciently charged The green lights on the battery indicator must be on Attach to Chair 1 Attach calf strap to chair 2 Clean adhesive surfaces for LED light with LOCTITE SF7063 3 LED Light scre...

Page 21: ...ny u dust or dirt on axles or moving parts c DO NOT USE 3 in ONE oil or WD 40 for lubrication Only use Te on based Lubricant when working on this wheelchair D REAR WHEEL AXLE NUT ADJUSTMENT The rear w...

Page 22: ...s A in the clamp counterclockwise one quarter turn b Repeat the same process with the remaining three screws A c Alternately loosen the screws two turns each until both screws are loose d Slide clamp...

Page 23: ...very at table or a workbench makes this setting more accurate 1 Correcting a Pull to the Right or Left Determine which direction the chair is pulling right or left Make the following adjustments to th...

Page 24: ...included be used to verify correct torque speci cation is achieved Some of the screws that are used during manufacture are tted with threadlock blue or yellow dot on the thread and can be undone and t...

Page 25: ...en adjusted WARNING An incorrectly adjusted caster fork angle may cause the casters to wobble and lead to the user falling or severe injuries NOTE setting the fork to trailing fork is inclined toward...

Page 26: ...ds K on both sides of the chair b Slide footrest to desired height c Tighten socket to 62 in lbs on both sides L ADJUSTING REAR SEAT HEIGHT NOTE Adjustment to rear seat height may also require caster...

Page 27: ...ttern C Fig 60 and tighten again allen screws B on both sides to 5 Nm N FREESTYLE BACK MAINTENANCE AND ADJUSTMENT 1 When performing regular maintenance check the torque on the Freestyle back a Using a...

Page 28: ...able or ground surface Loosen the cap screws C 3 per side unless equipped with anti tips then 4 per side that secure the camber tube clamp Locate the at surfaces on the front and rear of the camber pl...

Page 29: ...f adjustment can be limited by chair con guration and options selected a Adjusting the Center of Gravity Open Frame You can adjust your center of gravity position by moving the two axle plate clamps A...

Page 30: ...hair frame The end of the camber tube should be ush with the outer most portion of the camber tube clamp Torque fasteners A to 62 in lbs 7 Nm 5 Setting the Toe to Zero Alternative Method Place the ent...

Page 31: ...ide the camber insert in or out to establish the required wheel spacing Tighten screw to 62 in lbs 7Nm Repeat on the right side of the chair matching the wheel spacing set on the left side R CHECK OUT...

Page 32: ...t warrant a Tires and tubes upholstery pads and push handle grips b Damage from neglect accident misuse or from improper installation or repair c Products modi ed without Sunrise Medical s express wri...

Page 33: ...249817 Rev A 33 NOTES...

Page 34: ...249817 Rev A 34 NOTES...

Page 35: ...249817 Rev A 35 NOTES...

Page 36: ...Sunrise Medical 2842 N Business Park Ave Fresno CA 93727 USA In Canada 800 263 3390 Customer Service 800 333 4000 www SunriseMedical com 2020 Sunrise Medical US LLC 08 2020 P N 249817 Rev A...

Reviews: