


Choose the objects you would like to control:
•
Short press Group number button 1, all associated devices of Association Group 2 are the objects which the
command will be sent to.
•
Short press Group number button 2, all associated devices of Association Group 3 are the objects which the
command will be sent to.
•
Short press Group number button 3, all associated devices of Association Group 4 are the objects which the
command will be sent to.
•
Short press Group number button 4, all associated devices of Association Group 5 are the objects which the
command will be sent to.
Control the objects you would like to control:
•
Double click Group number button 1-4, activation of scenes in Gateways using Command Class Central
Scene.
•
Short press “ALL ON/OFF” button, direct control of associated devices using Basic Set On/Off commands.
•
Short touch or slide touch the “Color Wheel”, direct control of associated devices using Color Switch Set
commands.
•
Press and hold down brightness button, direct control of associated devices using Multilevel Switch Start
Level Change commands.
•
Short press PWM1-PWM4 buttons, direct control of associated devices using Color Switch Set commands,
press and hold down PWM1-PWM4 buttons, direct control of associated devices using Color Switch Start Level
Change commands.
•
Short press "play/pause" button, direct control of associated devices using Scene Activation Set, Scene ID =
255. Press and hold down "play/pause" button, direct control of associated devices using Scene Conf Set,
Scene ID = 255.
Node Information Frame
The Node Information Frame is the business card of a Z-Wave device. It contains information about the device
type and the technical capabilities. The inclusion and exclusion of the device is confirmed by sending out a
Node Information Frame. Beside this it may be needed for certain network operations to send out a Node
Information Frame.
How to send out Node Information Frame:
Set the wall controller into inclusion/exclusion mode: press and hold down “ALL ON/OFF” button for over 3
seconds, or short press the “inclusion/exclusion” button, LED indicator turns on to indicate the wall controller
has already sent out Node Information Frame, the user can repeat the operation to set the wall controller to quit
“inclusion/exclusion mode”.
Technical Data
IP Rating
Frequency
SDK
Explorer Frame Support
Device Type
Generic Device Class
Specific Device Class
Routing
FLiRS
IP 20
868.42 MHz (EU)
Up to 100 m outside, on average up to
40 m inside buildings
6.71.01
Yes
Wall Controller
Wall Controller
Basic Wall Controller
Yes
No
Wireless Range
6.Short press "play/pause" button,direct control of
associated devices using Scene Activation Set,
Scene ID = 255.
7.Press and hold down "play/pause" button, direct
control of associated devices using Scene Conf Set,
Scene ID = 255.
5
Launch 4
12
Set and unset associations:
(Note: All association information will be cleared automatically once the wall controller is excluded from a
network.)
Associations can be assigned and remove either via Z-Wave commands or using the device itself.
1. Set association by operating primary controller/gateway to send packets to the wall controller:
The primary controller/gateway sends packets to the wall controller using “Command Class ASSOCIATION” or
“Command Class Multi Channel Association”
2. Set association by operating the wall controller and devices to be controlled:
To control a Z-Wave device from the Wall Controller the node ID of this device needs to be assigned to one of
the four association groups. This is a three-step process:
1. Press and hold down “ALL ON/OFF” button on the wall controller for over 3 seconds, LED indicator turns on.
2. Click any Group number button on the wall controller within 25 seconds to add the device to be controlled to
the association group, double click any Group number button on the wall controller within 25 seconds to
remove the device to be controlled to the association group.
3. Operate the device to be controlled to send Node Information Frame (please refer to the device manual)
within 15 seconds, or set the device to exclusion mode within 15 seconds, since it will send Node Information
Frame in exclusion mode, LED indications are as follows:
LED blinks 5 times to indicate that the wall controller failed to add the associated device
(the association group has already added maximum quantity associated devices that it supports ).
LED blinks 10 times to indicate that the wall controller added the associated device successfully.
LED blinks 8 times to indicate that the wall controller removed the associated device successfully.
To remove all associated devices in an association group on the wall controller directly:
1. Press and hold down “ALL ON/OFF” button on the wall controller for over 3 seconds, LED indicator turns on.
2. Click any Group number button on the wall controller 5 times continuously within 25 seconds to remove all
associated devices of this group, LED indicator blinks 8 times to indicate that the associated devices are
removed successfully.
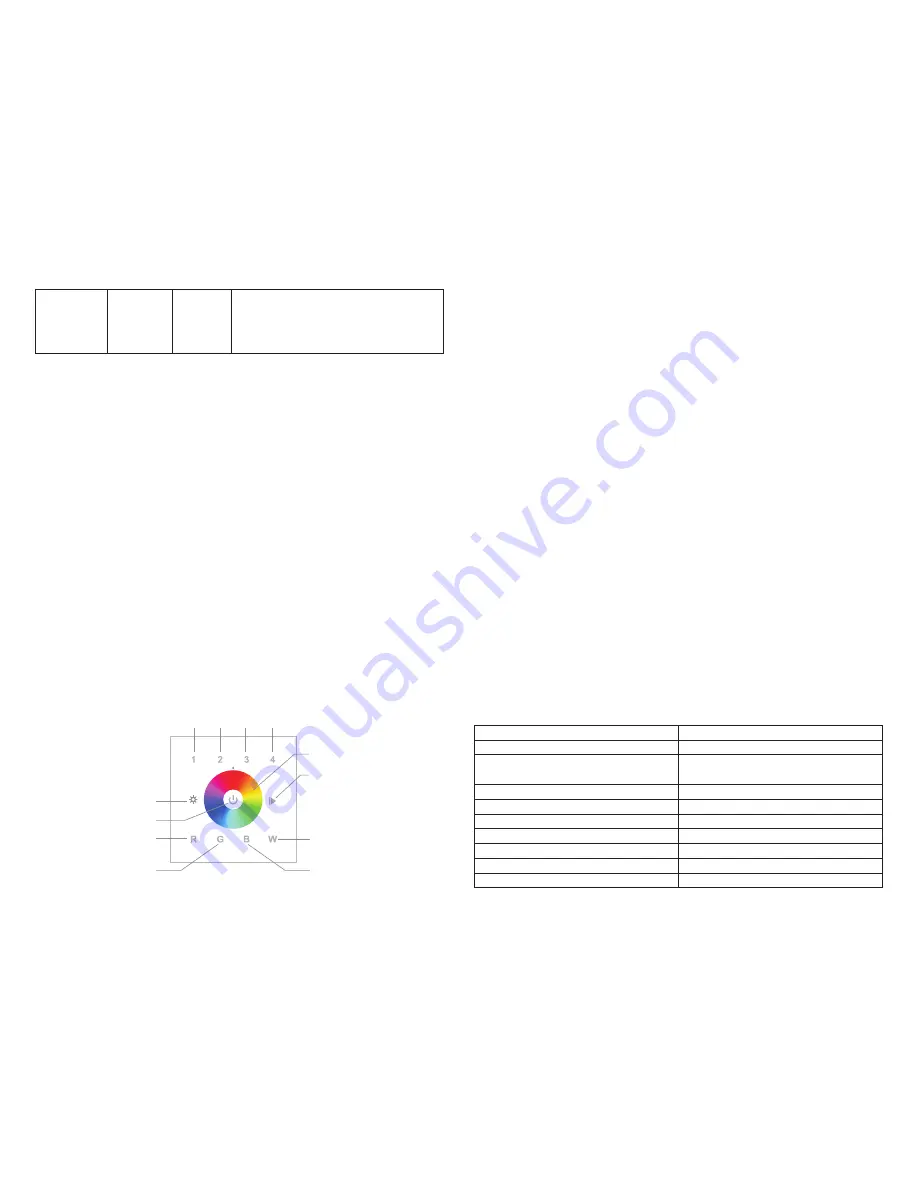
Operating the device
Group 2
Color Wheel, short touch or slide touch
to select R/G/B color
ALL ON/OFF button, short press to
broadcast to turn on/off all
Brightness button, press and hold down to
increase/decrease whole brightness
Play/pause button, short press direct control of
associated devices using Scene Activation Set,
Scene ID = 255. Press and hold down direct
control of associated devices using Scene Conf
Set, Scene ID = 255.
PWM1, short press to turn on/off, press and
hold down to increase/decrease intensity of
Red channel
PWM2, short press to turn on/off, press and
hold down to increase/decrease intensity of
Green channel
PWM3, short press to turn on/off, press and
hold down to increase/decrease intensity of
Blue channel
PWM4, short press to toggle between (A)
Warm White (Component ID = 0x00) on
(0xFF) with Cold White (ID 0x01) off (0x00)
and (B) Warm White off with Cold White on.
press and hold down to increase/decrease
intensity of Current (A) Warm white / (B) Cold
White channel. Double click to turn off Warm
White and Cold White.
Group 3
Group 4
Group 5


