


10. Find and Bind Mode
Step 1
: Short press “Prog.” button 3 times (Or reset power of the controller 3 times) to
set the device (initiator node) to start Find and Bind mode (LED indicator flashes
slowly) to find and bind target node, 180 seconds timeout, repeat this step.
Zigbee
Remote
Step 2:
Set the remote or touch
panel (target node) into find and
bind mode, and enable it
to find and bind initiator, please
refer to corresponding remote or
touch panel manual
.
Step 3
: There shall be indication
on the remote or touch panel that
it bind the device successfully
and can control it then
.
Note: Make sure the device and remote already added to the same zigbee network.
11. Learning to a Zigbee Green Power Remote
Step 1
: Short press “Prog.” button 4 times (Or reset power of the controller 4 times) to start
Learning mode (LED indicator flashes twice), 180 seconds timeout, repeat the operation.
Step 2:
Set the green power
remote into Learning mode,
please refer to its manual
.
Step 3
: LED indicator will flash twice to indicate successful learning. Then the remote can control the device.
Note: Each device can learn to max. 20 zigbee green power remote.
12. Delete Learning to a Zigbee Green Power Remote
Step 1
: Short press “Prog.” button 3 times (Or reset power of the controller 3 times) to start delete
Learning mode (LED indicator flashes slowly), 180 seconds timeout, repeat this step.
Zigbee
Green Power
Remote
Step 2:
Set the paired green
power remote into Learning
mode, please refer to its manual
.
Step 3
: LED indicator will flash 4 times to indicate successful deleting.
9. Factory Reset
through
a
Zigbee
Remote (Touch Reset)
Note
: Make sure the device already added to a network, the remote added to the same one or not added to any
network.
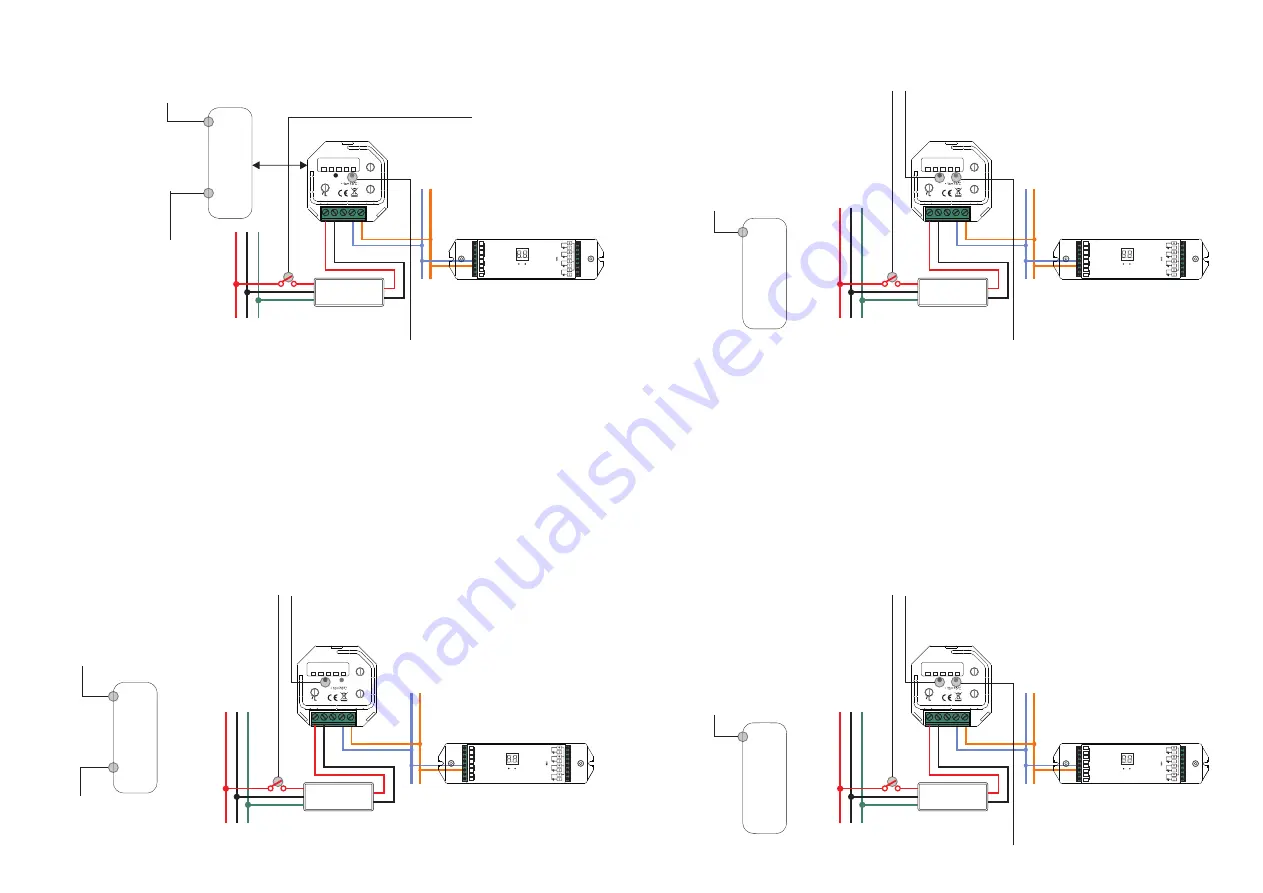
Step 1
: Reset power of the
controller to start
TouchLink Commissioning
of the device, 180 seconds
timeout, repeat this step.
Step 4:
There shall be indication on the remote and
LED indicator flashes 3 times for successful reset.
Step 2:
Bring the remote or touch panel
within 10cm of the lighting device
.
Step 3
: Set the remote or touch
panel into Touch Reset procedure
to reset the device, please refer to
corresponding remote or touch
panel manual to learn how
.
Zigbee
Remote
< 10cm
DALI bus
DA DA
DA
DA
ZigBee to DALI Controller
Prog.
Add.
Group
x1
x10
5
0
1
6
2
7
4
9
3
8
5
0
1
6
2
7
4
9
3
8
DC 12-24V
INPUT
V+
V-
DALI
OUTPUT
12V/24V
CV PSU
L
N
V+
O
U
T
P
U
T
IN
P
U
T
G
V-
L
N
G
Zigbee
Green Power
Remote
DALI bus
DA DA
DA
DA
ZigBee to DALI Controller
Prog.
Add.
Group
x1
x10
5
0
1
6
2
7
4
9
3
8
5
0
1
6
2
7
4
9
3
8
DC 12-24V
INPUT
V+
V-
DALI
OUTPUT
12V/24V
CV PSU
L
N
V+
O
U
T
P
U
T
IN
P
U
T
G
V-
L
N
G
DALI bus
DA DA
DA
DA
ZigBee to DALI Controller
Prog.
Add.
Group
x1
x10
5
0
1
6
2
7
4
9
3
8
5
0
1
6
2
7
4
9
3
8
DC 12-24V
INPUT
V+
V-
DALI
OUTPUT
12V/24V
CV PSU
L
N
V+
O
U
T
P
U
T
IN
P
U
T
G
V-
L
N
G
DALI bus
DA DA
DA
DA
ZigBee to DALI Controller
Prog.
Add.
Group
x1
x10
5
0
1
6
2
7
4
9
3
8
5
0
1
6
2
7
4
9
3
8
DC 12-24V
INPUT
V+
V-
DALI
OUTPUT
12V/24V
CV PSU
L
N
V+
O
U
T
P
U
T
IN
P
U
T
G
V-
L
N
G
DALI
Controller
1
2
3
4
0-6
0-9
DA
DA
DA
DA
D
A
L
I
D
A
L
I
V+
V-
V+
V-
1
2
-3
6
V
D
C
IN
P
U
T
DALI
Controller
1
2
3
4
0-6
0-9
DA
DA
DA
DA
D
A
L
I
D
A
L
I
V+
V-
V+
V-
1
2
-3
6
V
D
C
IN
P
U
T
DALI
Controller
1
2
3
4
0-6
0-9
DA
DA
DA
DA
D
A
L
I
D
A
L
I
V+
V-
V+
V-
1
2
-3
6
V
D
C
IN
P
U
T
DALI
Controller
1
2
3
4
0-6
0-9
DA
DA
DA
DA
D
A
L
I
D
A
L
I
V+
V-
V+
V-
1
2
-3
6
V
D
C
IN
P
U
T


