background image

11

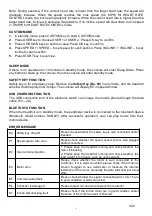
FOLDING INSTRUCTIONS

FOLDING

UNFOLDING:

Restore the incline to flat position

(Incline Level 0). Then turn off the

power. Place your hand at position “A”

and lift up the

Main Frame (No. 5)

to

push top of the running board forward

until the

Cylinder (No. 40)

locks into

the tube.

Note:

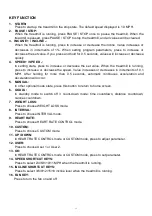
When the

Cylinder (No. 40)

successfully locks into the tube you will

hear a clicking sound.

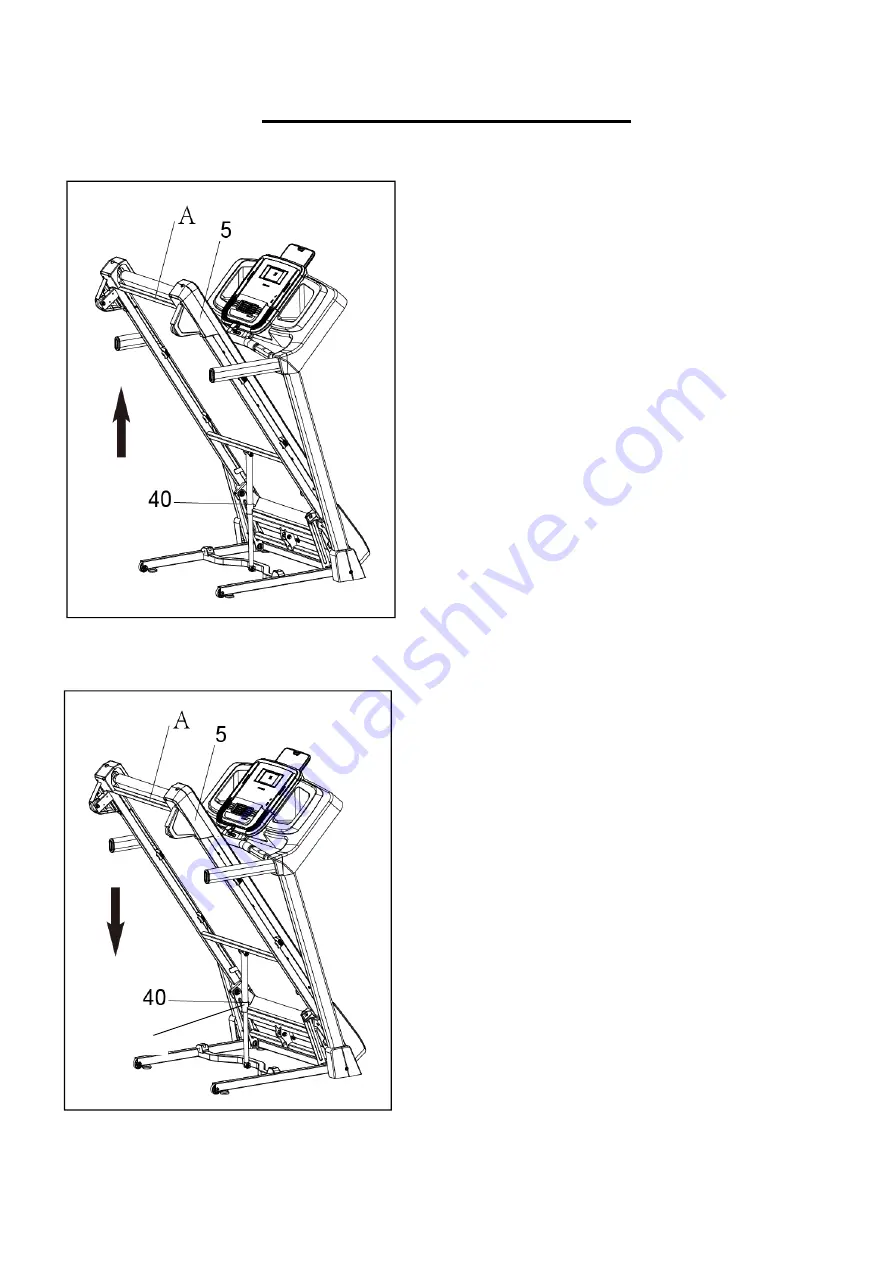
Before lowering the

Main Frame (No.

5)

, ensure that the space directly

underneath is clear of any objects and

the power is turned off.

Lift up the

Main Frame (No. 5)

at

position “A” with one hand. Next, using

your foot, firmly push against the

Cylinder (No. 40)

in position “C” and

press down on the

Main Frame (No.

5)

. Once the

Main Frame (No. 5)

starts to lower, it will automatically

continue to steadily lower itself until it

reaches level ground.

C

Summary of Contents for SF-T7955

Page 1: ...AL IMPORTANT Please retain owner s manual for maintenance and adjustment instructions Your satisfaction is very important to us PLEASE DO NOT RETURN UNTIL YOU HAVE CONTACTED US support sunnyhealthfitness com or 1 877 90SUNNY 877 907 8669 ...

Page 2: ...pet To ensure safety the equipment should have at least 8 feet 240CM of free space behind it and 2 feet 60CM on each side Do not place the treadmill on any surface that blocks air openings To protect the floor or carpet from damage place a mat under the treadmill 5 Ensure that all nuts and bolts are securely tightened before using the equipment The safety of the equipment can only be maintained if...

Page 3: ...2 EXPLODED DIAGRAM ...

Page 4: ...Screw ST3 9 14L 69 56 Console Bottom Cover 874 493 123 1 19 Screw ST3 9 45L 2 57 Console Front Cover 380 62 66 1 20 Screw ST3 9 13L 2 58 Handlebar Upper Cover 380 144 107 1 21 Bolt Φ12 M10 30L S10L 2 59 Handlebar Lower Cover 352 83 27 1 22 Screw Φ12 M10 28L 2 60 Left Handlebar Cover 71 99 45 1 23 Screw M4 10L 11 61 Right Handlebar Cover 71 99 45 1 24 Screw M8 12L 2 62 Fan Blade 147 60 20 1 25 Scre...

Page 5: ... Safety Key Wire 3P 350mm 1 86 Sensor Supporter PP 1 106 Fan 1 87 Hand Pulse 2 107 Speaker 2 88 Switch Supporter 49 13 16 1 108 Console 1 89 Safety Key 1 109 Signal Connecting Wire 2 5P 800mm 1 90 Controller B506DV13 110V 1 110 Ground Wire 3 800mm 1 91 Motor 1 5HP 105V 5200RP M 1 111 Upper Hand Pulse Wire 2P 400mm 2 92 Incline Motor JS64 3A 17N 110V 1 112 Lower Hand Pulse Wire 2P 300mm 2 93 Socket...

Page 6: ... the part s needed The model number found on cover of manual The product name found on cover of manual The part number found on the EXPLODED DIAGRAM and PARTS LIST found near the front of the manual Please contact us at support sunnyhealthfitness com or 1 877 90SUNNY 877 907 8669 12 M8 70L S20L 8PCS 13 M4 12L 2PCS 34 φ8 φ16 2T 12PCS 37 S6 1PC 25 M8 16L 4PCS ...

Page 7: ...le to do the assembly Open the carton and remove contents Place the Main Frame No 5 on level ground and ensure that you have a work area that is clean and has adequate space Do not cut the Packing Belt No B until the assembly is complete STEP 2 Remove 8 Screws No 118 from 2 Plastic Plates L R No 116 117 by using Allen Wrench No 37 You may save these 8 Screws No 118 and Plastic Plates L R No 116 No...

Page 8: ...at Washers No 34 and 4 Screws No 25 Tighten and secure with Allen Wrench No 37 Note Do not pinch or cut any wires when attaching the Console Bottom Cover No 56 to the Left Right Upright Tubes No 2 No 3 STEP 3 There are 2 joints for Signal Connecting Wire 1 No 97 Attach the twist tie provided to the Signal Connecting Wire 1 No 97 With the Signal Connecting Wire 1 No 97 attached use the twist tie to...

Page 9: ...bar Upper Cover No 58 Cut the Packing Belt No B Assembly is now complete IMPORTANT NOTE The running belt must be lubricated before the first use Please see Page 9 for instructions on how to properly apply lubricant STEP 5 Cover the Left Right Handlebar Covers No 60 No 61 to the handlebars for Left Right Upright Tubes No 2 No 3 Cover the Left and Right Upright Covers No 45 No 46 to the Left Right U...

Page 10: ... over the Running Board No 115 Repeat this process for the other side 2 The moving parts should turn freely and quietly Abnormality of moving parts will affect the safety of the equipment Inspect and tighten bolts regularly 3 To better maintain the treadmill and prolong its lifespan it is suggested that maintenance be done on a regular basis 4 DO NOT LOOSEN OR MAKE ANY ADJUSTMENTS TO THE RUNNING B...

Page 11: ...check if the Running Belt No 78 drifts from the center Adjust the Running Belt No 78 according to below instructions with Allen Wrench No 37 1 If the Running Belt No 78 moves to the right turn the Right adjustment bolt turn clockwise then turn the left adjustment bolt turn counter clockwise If the Running Belt No 78 does not move keep adjusting turn at a time until it centers Refer to Fig A 2 If t...

Page 12: ... 40 successfully locks into the tube you will hear a clicking sound Before lowering the Main Frame No 5 ensure that the space directly underneath is clear of any objects and the power is turned off Lift up the Main Frame No 5 at position A with one hand Next using your foot firmly push against the Cylinder No 40 in position C and press down on the Main Frame No 5 Once the Main Frame No 5 starts to...

Page 13: ...he treadmill Next place one foot at position M to hold the bottom end of the treadmill steady With your foot at M slowly tilt the top end of the treadmill downward towards the ground Once the treadmill reaches a low enough point the transportation wheels of the treadmill touch the ground To transport hold the treadmill at position P and tilt until the transportation wheels at M are able to move on...

Page 14: ...use an adaptor for this product This product is for use on a nominal 100 120V circuit and has a grounding plug that looks like the plug illustrated in sketch A DANGER Improper connection of the equipment can result in risk of electric shock Check with a qualified electrician or serviceman if you are unsure whether the product has been properly grounded Do not modify the plug provided with the prod...

Page 15: ...readmill Before attempting to use the treadmill take some time to stand alongside and familiarize yourself with the controls 1 Turn on the power switch 2 Once you get on you can stand with your feet on the side rails and stabilize yourself by holding onto the handlebars 3 Next attach the clip end of the Safety Key No 89 to your clothes and insert the magnetic end of the Safety Key No 89 into the H...

Page 16: ...e display window shows the incline value and heart rate 3 Time display window shows the time count down and count up when in running state 4 Distance display window shows distance count down and count up when in running state 5 Calories display window shows calories count down and count up when in running state ...

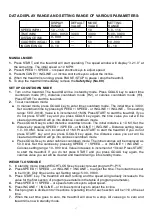
Page 17: ...ue increases or decreases in increments of 0 1 MPH After holding for more than 0 5 seconds automatic continuous acceleration and deceleration will occur 5 MANUAL In other optional mode state press this button to return to home screen 6 GOALS In standby mode to switch off 3 count down mode time countdown distance countdown calories countdown 7 WEIGHT LOSS Press to choose WEIGHT LOSS mode 8 INTERVAL...

Page 18: ...to enter distance countdown mode The initial distance is 1 0 MI Set the distance by pressing SPEED SPEED or INCLINE INCLINE Distance setting range 1 0 99 9 MI Value is in increment of 1 MI Press START to start the treadmill If you do not press START key and you press GOALS key again the distance value you set will be cleared and treadmill will go into calories countdown mode c Press GOALS key to e...

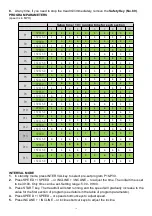
Page 19: ... 6 4 2 2 3 P10 SPEED 2 4 5 5 6 5 6 3 3 2 INCLINE 2 3 4 3 4 5 5 3 4 3 P11 SPEED 2 3 5 3 3 5 3 6 3 3 INCLINE 0 2 0 1 3 4 2 1 0 1 P12 SPEED 3 5 8 8 9 5 7 6 3 2 INCLINE 0 3 6 4 3 1 4 5 6 4 P13 SPEED 2 3 6 7 7 7 7 6 3 2 INCLINE 0 3 6 5 5 5 5 6 3 0 P14 SPEED 3 5 8 8 9 5 7 6 3 2 INCLINE 0 3 6 6 7 7 6 6 3 0 P15 SPEED 2 3 6 8 9 9 8 6 3 2 INCLINE 2 3 5 7 9 9 7 5 3 0 INTERVAL MODE 1 In standby mode press INT...

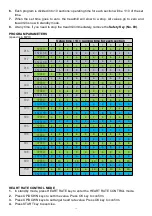
Page 20: ...NCLINE 1 7 2 7 2 7 3 7 2 7 P21 SPEED 4 9 4 9 4 9 4 9 4 3 INCLINE 1 8 2 8 2 8 3 8 2 8 P22 SPEED 2 6 2 6 2 6 2 6 2 6 INCLINE 3 8 3 8 3 8 3 8 3 8 P23 SPEED 2 7 2 7 2 7 2 7 2 7 INCLINE 4 7 2 6 2 6 3 6 2 4 P24 SPEED 3 7 3 7 3 7 3 7 3 7 INCLINE 1 2 2 6 2 6 3 6 2 3 P25 SPEED 4 7 4 7 4 7 4 7 4 7 INCLINE 1 5 2 8 2 5 3 5 2 8 P26 SPEED 4 8 4 8 4 8 4 8 4 8 INCLINE 1 6 2 5 2 8 3 7 2 8 P27 SPEED 5 8 5 8 5 8 5 8...

Page 21: ...TION The USB connection port of the electronic watch can charge the mobile phone through the data cable 5V 2A BLUETOOTH FUNCTION When the treadmill is in standby mode the peripheral device is connected to the bluetooth device Bluetooth model number SUNNY After successful operation user can play music from their mobile device ERROR MESSAGE E0 Safety key drop off Please check whether the safety key ...

Page 22: ...21 ...

Reviews: