Sunny Health & Fitness SF-B1401 User Manual Download Page 5


PARTS LIST 

No. 

Description 

Spec. 

Qty. 


No. 

Description 

Spec. 

Qty. 

Main Frame 


34 

Flat Roundhead Screw  

M10x25XS6 

Seat Post  


35L/R  Pedal  


1 pr. 

Seat Slider  


36 

Flywheel  


Handlebar Post  


37 

Flywheel Spindle  


Handlebar  


38 

Chain Adjuster Welding 

M8*83* Ø12*5 

Cap Nut 

M12*1.0 


39 

Sleeve 

Ø18*Ø12.1*18.5 

Rear Stabilizer  


40 

Nylon Nut  

M8*H7.5*S13 

Front Stabilizer  


41 

Brake Pad 


Brake Handle 


42 

Clamp Brake Holder  


10 

Washer  

d10*Ø25*2 


43 

Washer 

Ø11*Ø25*4 

11 

Tension Knob 


44 

Bearing  

6001-2RZ 

12 

Left Crank 


45 

Bearing 

6004-2RS 

13 

Cross Self-tapping Screw 

ST4.8*16 


46 

Bearing  

608ZZ 

14 

Chain Cover A 


47 

Small Chain Wheel 


15 

Chain Cover B 


48 

C-shaped Buckle  

d20 

16 

Base Leveler 


49 

Hexagon Screw  

M10*H7*S17 

17 

Post Housing 


50 

Inner Hexagon Hollow Bolt  

Ø7.8*30 

18 

Square Caps 

J80*40*1.5 


51 

Nut  

M6*38*S5 

19 

Square Caps 


F38*38*14 


52 

Flat Washer  

d5* Ø 10*1 

20 

Front Cover  


53 

Hexagon Flange Nut  

M10*1.25*H7.5*S14 

21 

Transportation Wheels  

Ø71* Ø19*24 


54 

Cross Recessed Countersunk 

Bolt 

ST4.8*25 

22 

Seat 


55 

Hexagon Thin Nut  

M12*1*H6*S19 

23 

Knob  


56 

Hexagon Flange Nut  

M6 *H7*S10 

24 

Round End Cap 

Φ22*16 


57 

Locknut  


25 

Square Cap  

F45*45*24 


58 

Nylon Nut  

M10*H9*S17 

26 

Washer  

 
Ø8* Ø25*6 


59 

Cross Pan Head Bolt  

M5*12* Ø 8 

27 

Screw 

t0.6*10.6 


60 

Inner Hexagon Flat Round 
Head Screw 

M6*12*S5 

28 

Silent Chain  


61 

Pedal Strap 


29 

Washer  

d12* Ø 24*1.5 


62 

Pedal Belt 


30 

Bottom Bracket Axle 


63 

Brake Cable 


31 

Right Crank With Chain Wheel   


64 

Clamp Brake Assembly 


32 

Crank Cover 

Ø 25*7 


65 

Brake Pad Holder 


33 

Washer 

d

10*Φ20* 1.5 


66 

Hexagon Flat Roundhead 
Screw  

M10*25*S6 

Summary of Contents for SF-B1401

Page 1: ...UAL IMPORTANT Please retain owner s manual for maintenance and adjustment instructions Your satisfaction is very important to us PLEASE DO NOT RETURN UNTIL YOU HAVE CONTACTED US support sunnyhealthfitness com or 1 877 90SUNNY 877 907 8669 ...

Page 2: ... the equipment The equipment is designed for adult use only 4 Use the equipment on a solid flat level surface with a protective cover for your floor or carpet To ensure safety the equipment should have at least 4 feet 1 2 M of free space all around it 5 Ensure that all nuts and bolts are securely tightened before using the equipment The safety of the equipment can only be maintained if it is regul...

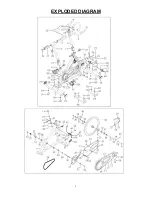
Page 3: ...2 EXPLODED DIAGRAM ...

Page 4: ...3 HARDWARE PACKAGE 34 M10 25 S6 4PCS 66 M10 25 S6 2PCS 67 d10 Φ20 1 5 2PCS 33 d10 Φ20 1 5 4PCS 75 S13 15 1PC 74 S6 1PC 76 S14 15 17 1PC 78 S8 14 22 1PC ...

Page 5: ... Hexagon Screw M10 H7 S17 4 17 Post Housing 3 50 Inner Hexagon Hollow Bolt Ø7 8 30 3 18 Square Caps J80 40 1 5 4 51 Nut M6 38 S5 1 19 Square Caps F38 38 14 1 52 Flat Washer d5 Ø 10 1 2 20 Front Cover 1 53 Hexagon Flange Nut M10 1 25 H7 5 S14 2 21 Transportation Wheels Ø71 Ø19 24 2 54 Cross Recessed Countersunk Bolt ST4 8 25 3 22 Seat 1 55 Hexagon Thin Nut M12 1 H6 S19 3 23 Knob 3 56 Hexagon Flange...

Page 6: ...rew ST4 2 16 2 73 Flat Washer D5 Φ13 1 2 80 Wave Washer 1 74 Allen Wrench S6 1 Ordering Replacement Parts U S and Canadian Customers only Please provide the following information in order for us to accurately identify the part s needed The model number found on cover of manual The product name found on cover of manual The part number found on the EXPLODED DIAGRAM and PARTS LIST found near the fron...

Page 7: ... No 69 NOTE You may discard the Front Rear Packing Bases No 68 No 69 or save them for future packaging or transportation STEP 2 Attach the Front Rear Stabilizer No 8 No 7 to the Main Frame No 1 using 4 Washers No 33 and 4 Flat Roundhead Screws No 34 Tighten and secure with Allen Wrench No 74 NOTE Always tighten parts by hand first then finish securing with the provided Allen Wrench No 74 ...

Page 8: ...o 31 Once properly screwed into the place use the Wrench No 75 to hold the bolt of the pedal and screw the Right Nylon Nut No 77R COUNTER CLOCKWISE to the thread end of the Pedal No 35R securely with Spanner No 78 STEP 4 Loosen the seat height adjustment Knob No 23 to slide the Seat Post No 2 into the seat post housing on the Main Frame No 1 Once you ve located the desired seat height tighten and ...

Page 9: ... Post No 2 Retighten the Knob No 23 to fix the Seat No 22 onto the Seat Slider No 3 with Wrench No 75 Attach the Handlebar No 5 onto the Handlebar Post No 4 using 2 Hexagon Flat Roundhead Screws No 66 and 2 Flat Washers No 67 Tighten and secure with Allen Wrench No 74 The assembly is complete ...

Page 10: ...ring an exercise users may stop the bike immediately by pushing down on the Brake Handle No 9 This is the emergency brake PEDAL STRAP ADJUSTMENT Your feet should be secured in the toe clips during exercise Place your feet as far forward into the toe clips as you can With your feet in place turn the crank to bring one foot to within arm s reach grasp the pedal strap and pull it upward to tighten th...

Page 11: ...4 up or down to the desired height Once adjusted re insert and tighten the Knob No 23 to secure the handlebar post in place CHECKING BRAKE PADS AND PEDALS Ensure all the Nuts Nut Caps and Pedals are secured and inspect the equipment regularly If you should find any defective parts do not exercise until they ve been repaired Pay close attention to easily damaged parts due to wear and tear Please in...

Page 12: ...ause extensive damage 3 Clean and lubricate pop pin assemblies Pull on the pin and spray a small amount of lubricant onto the shaft 4 Tighten the seat hardware making sure the seat is level and centered 5 Brush and treat the resistance pads Remove any foreign material that may have collected on the pads Spray the pads with silicone lubricant This helps to reduce noise from friction between the pad...

Reviews: