10
ADJUSTMENTS & USAGE GUIDE
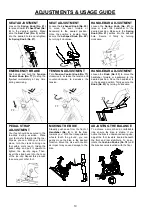
TENSION ADJUSTMENT
Turn
Tension Control Knob (No. 77)
clockwise
to increase the tension and
counter-clockwise
to decrease the
tension.
77
EMERGENCY BRAKE
Push down and hold the
Tension
Control Knob (No. 77)
to stop the
flywheel
immediately at any time
during exercising.
77
HANDLEBAR ADJUSTMENT
Loosen the
Spring Knob (No. 21)
to
raise or lower the handlebar to the
desired position. Make sure the
Spring
Knob (No. 21)
settles into the desired
hole. Secure it firmly by turning
clockwise
.
HANDLEBAR ADJUSTMENT
Loosen the
Knob (No. 23)
to move the
handlebar forward or backward to the
desired position. Once the handlebar is
in the desired position, firmly secure the
Knob (No. 23)
by turning it
clockwise
.
MOVING THE BIKE
Steadily push down from the front of
Handlebar (No. 6)
to tilt the bike
towards you. With the transportation
wheels touch the ground, you can
gently move the bike to the desired
location. Move the bike with caution
as impact may cause damage to the
bike.
SEAT ADJUSTMENT
Loosen the
Spring Knob (No. 21)
to raise or lower the
Seat Post (No.
5)
to the desired position. Make
sure the
Seat Post (No. 5)
settles
into the desired hole and retighten
the
Spring Knob (No. 21)
.
SEAT ADJUSTMENT
Loosen the
L-shaped Knob (No. 22)
to move the seat forward or
backward to the desired position.
Once the position is located, firmly
secure the
L-shaped Knob (No. 22)
by turning it
clockwise
.
PEDAL STRAP
ADJUSTMENT
Your feet should be secured in the
toe-clips during exercise. Place
your foot as far forward into the toe-
clips as you can. With your foot in
place, turn the crank to bring one
foot within arm’s reach. Grasp the
pedal strap and pull it upward to
tighten the toe-clip cage. Then,
insert the strap back into the hoop
of the toe-clip. Repeat this process
to secure your other foot.
ADJUSTING THE BALANCE
To achieve a smooth and comfortable
ride, ensure the bike is stable. If you
notice the bike is unbalanced during use,
adjust the foot levelers located beneath
the front and rear stabilizers. To do so,
rotate the
Cushion Knobs (No. 74)
until
the bike becomes levelled with the floor.
21
Summary of Contents for EVOLUTION PRO II
Page 3: ...2 EXPLODED DIAGRAM ...
Page 14: ......


