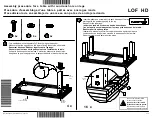
background image


Fig.1:

 Cover the Base Cover (C) to Post 1&2 (A1&A2). Assemble Base (B) to Post 1&2 (A1&A2) by 

       Bolt (AA) and Flat Washer (BB). 

Fig.2:

 Assemble Long Screen (H) and Short Screen (I) to Post 1&2 (A1&A2) by Bolt (CC) and 

            Flat Washer (BB). 

Fig.3:

 Insert Big Top Beam (D) to Big Top Connector (F2), screw Hook (K) to Big Top Connector (F2). 

Fig.4:

 Assemble Big Top Beam (D) to Post 1&2 (A1&A2) by Bolt (DD), Flat Washer (BB) and Nut (EE). 

Fig.5:


Insert Small Top Beam (G) to Small Top Connector (F1). 

Fig.6:


Cover Big Top Canopy (N) to the big top but don’t spread. Insert assembled small top to   

              intubation tube of Big Top Beam (D) through Small Top Beam (G). 


AA 

M6x15 Bolt 

3 PCS 


BB 

M6 Flat Washer 

7 PCS 


CC 

M6x20 Bolt 

4 PCS 


FF 

6X180 Stake 

8PCS 


Hardware Pack 2 

Fig.7:


Assemble the Small Top Canopy   

      (M) to buckle the 4 corners  

      of Small Top Beam (G).  

Summary of Contents for L-GZ238PST-11C

Page 1: ...ow each step carefully for safe and easy operation Keep this manual for future reference We would like to hear from you with any comments or suggestions You can call us toll free at 1 866 578 6569 from 8 00 a m EST to 8 00 p m PST You can also send the email to amazon sunjoygroup com or visit www sunjoyonline com to get tech assistance or to place your replacement part order form ...

Page 2: ... any kind in or near a tent 10 Build campfires downwind and several meters away from a tent and be sure to fully extinguish campfires before leaving a campsite or before retiring for the night 11 Exercise extreme caution when using fuel powered lanterns or heaters inside a tent and use battery operated lanterns whenever possible 12 Do not refuel lamps heaters or store flammable liquids inside a te...

Page 3: ... A2 2 Base B 4 Base Cover C 4 Big Top Beam D 4 Small Top Connector F1 1 Big Top Connector F2 1 Small Top Beam G 4 Long Screen H 2 Short Screen I 2 Table Top J 1 Hook K 1 Tooling Hook L 1 Small Top Canopy M 1 Big Top Canopy N 1 Parts List ...

Page 4: ...AA M6x15 Bolt 8 PCS BB M6 Flat Washer 32 PCS CC M6x20 Bolt 16 PCS DD M6x35 Bolt 4 PCS EE M6 Nut 4 PCS Z M6 Wrench 1 PC Hardware Pack 1 ...

Page 5: ...Connector F2 Fig 4 Assemble Big Top Beam D to Post 1 2 A1 A2 by Bolt DD Flat Washer BB and Nut EE Fig 5 Insert Small Top Beam G to Small Top Connector F1 Fig 6 Cover Big Top Canopy N to the big top but don t spread Insert assembled small top to intubation tube of Big Top Beam D through Small Top Beam G AA M6x15 Bolt 3 PCS BB M6 Flat Washer 7 PCS CC M6x20 Bolt 4 PCS FF 6X180 Stake 8PCS Hardware Pac...

Page 6: ...nsert the connection strap of Table Top J to the U shape slice of Post use Bolt CC and Flat Washer BB to lock tightly Fig 10 Assemble Tooling Hook L to Table top J by Bolt AA and Flat Washer BB Fig 11 Lift up the Base Cover C use Stake FF to fasten the assembled gazebo to lawn ...

Page 7: ...original purchaser and applies to defects in materials and workmanship of your item provided the item is maintained with care and used only for personal residential purposes The item is warranted to be free from defects in material or workmanship for a period of one 1 year We don t reimburse for transportation or delivery costs or compensate the individual or any outside party for assembling or di...

Reviews: