background image

11 

Assembly (continued)


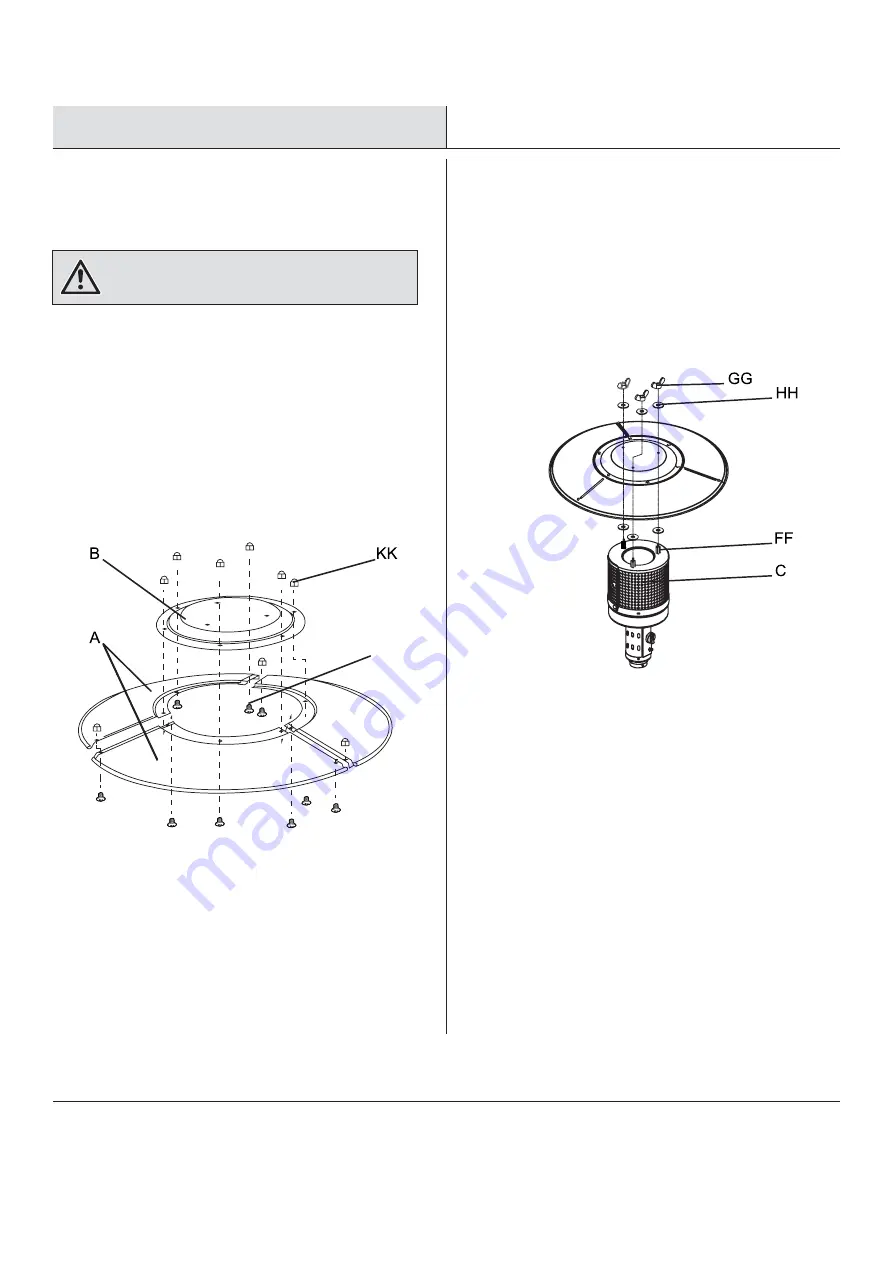
Slide two reflector panels (A) together and assemble the 
outer rim using one small screw (LL) and one cap nut (KK). 
Repeat this step with the third reflector panel (A). Once 
completed place the center reflector (B) in the middle and 
fasten using three small screws (LL) and three cap nuts (KK). 

Tighten all screws tightly.

Attach the reflector assembly made in step 7 to the top of
the reflector studs (FF) on the head assembly (C). Fasten
with six flat washers (HH) and three wing nuts (GG).

WARNING

Remove plastic protective coating on 

the reflector panel (A) and center the reflector (B)
before assembling!

Install reflector 

Attach the reflector to the head assembly 

LL

Summary of Contents for A306006402

Page 1: ...USE AND CARE GUIDE Patio Heater A306006402 ...

Page 2: ...nce An LP cylinder not connected for use shall not be stored in the vicinity of this or any other appliance WARNING For Outdoor Use Only WARNING Improper installation adjustment alteration service or maintenance can cause property damage injury or death Read the installation operating and maintenance instructions thoroughly before installing or servicing this equipment WARNING NEVER use indoors in...

Page 3: ...r ensure it is at a safe distance from other items in the event that the unit is blown over WARNING to be used with patio heaters WARNING Ensure the heater is at a safe distance from glass and PVC doors and windows to stop damage from any heat build up WARNING Read the warnings and use instructions before operation WARNING the patio heater in the tilt position during rain or windy conditions or wh...

Page 4: ... WARNING While every precaution has been made in the manufacture of this product care must be taken during assembly in case sharp edges are present NOTE Refer to the assembly diagrams as necessary NOTE Please lay out all nuts and bolts and check lengths before assembly Item AA BB CC DD EE Description M6x12 Bolt Qty 8 14 3 6 1 3 3 6 3 3 9 9 1 M6 Nut M8 Bolt M6x22 Bolt Wrench Reflector Stud Wing Nut...

Page 5: ...tinued PACKAGE CONTENTS Item A B C D E F Description Reflector Panel Center Reflector Head Assembly Qty 3 1 1 1 1 1 Part G H I Description Support Legs Quantity 3 1 1 Post Tank Housing Post Support Base Wheel Assembly I H ...

Page 6: ...t Qn Heater Gas Consumption Heater Injector Size Setting Pressure Regulator Outlet Pressure Standard Gas Supply Pressure 88 in approx 35 2 lbs 30 in 47 000 Btu h 1 77 Lbs per hour 0 0778 in 11 0 in per W C 11 0 in per W C ANSI Z83 26 2014 Gas Fired Outdoor infrared Patio heaters Max 150 PSI MIN 5 PSI ...

Page 7: ... to the base using two M6x12 bolts AA and two M6 nuts BB Mount the three anchoring arms Il to the holes on the base H using six M6x12 bolts AA and six M6 nuts BB The patio heater need fix by hammering the three anchoring nuts JJ into the ground through the anchoring arms after assembly H I H Attach ground fixtures to base BB AA AA BB AA BB II JJ ...

Page 8: ...ase 4 Attach post support to the support legs Attach the three support legs G to the top of the base H using three M8 bolts CC Attach the post support F to the top of the support legs G using six M6 x 22 bolts DD and six M6 nuts BB BB G CC H G DD F ...

Page 9: ...continued 5 Place the tank housing 6 Attach reflector studs to head assembly Place the tank housing E on top of the assembly Screw the threaded end of the reflector studs FF into the top holes of the head assembly C ...

Page 10: ...n the middle and fasten using three small screws LL and three cap nuts KK Tighten all screws tightly Attach the reflector assembly made in step 7 to the top of the reflector studs FF on the head assembly C Fasten with six flat washers HH and three wing nuts GG WARNING Remove plastic protective coating on the reflector panel A and center the reflector B before assembling Install reflector Attach the refle...

Page 11: ...D by inserting the regulator H into the post D Tightly fasten the previously removed screws back into the head assembly C through the slots at the top of the post D Remove the preassembled screws from the post support F and attach the post D to the post support F using those four screws Attach head assembly to post Attach post to the post support ...

Page 12: ...tor H to the cylinder valve by turning the regulator coupling nut clockwise Make sure it is fastened securely and tighten connections by hand only 11 Place the gas cylinder in the base Place the 20 lb gas cylinder in the center of the base and fasten it with the webbing MM Attach the regulator to the cylinder valve ...

Page 13: ...until the leak is repaired Do not use the heating unit without inspecting the gas hose If there are signs of wear or abrasion you must replace the hose if applicable 1 Turn on the valve on the gas supply cylinder 2 Press and turn the variable control knob to the Hl position 3 Press down the variable control knob and hold for 30 seconds 4 While holding down the variable control knob press the ignit...

Page 14: ... cloth Harsh weather conditions may cause stubborn stains discoloration and possibly rust pitting Permanent damage may occur if powder or solvent comes in contact with painted or plastic components on this heating unit Keep the heating unit stored away from direct sunlight If storing this unit inside disconnect the propane gas tank from the gas valve Not using manufacturer approved or supplied par...

Page 15: ...d in this manual Leak test annually and whenever the gas bottle is removed or replaced GAS AND REGULATOR The gas hose must be connected in accordance with these instructions When installed correctly all parts of the hose should be contained within the patio heater pole and gas cylinder chamber No part of the hose should be outside of the patio heater body where it could be a trip hazard or could b...

Page 16: ...ERVICE We recommend that servicing of this appliance should be performed either after every 100 hours of use or annually which ever is achieved soonest If your heater needs maintenance or is not working properly please contact your local authorized agent for service It is a necessity to contact an authorized source for replacement of parts and or servicing Spare parts may be obtained by contacting...

Page 17: ...ak The gas control is defective There is foreign matter in the gas or on the burner ports The heater is burning vapors from paint or impurities in the air There is gas leaking from the regulator and hose connection the valve and pipe connections and the pipes There is dirt or film on the reflector and flame screen Clean the burner injector Call your gas supplier Call your gas supplier Clean the main ...

Reviews: