Sungale cpf1909 Quick Start Manual Download Page 10


2. Contact Sungale Support team

1. Visit the support site.

For manual download, FAQs and more supports: www.sungale.com

Toll free number in the USA: 800-473-5156
Service email: [email protected]

For ongoing product improvement, this QSG is subject to modification without 
prior notice.

Tips

This QSG applies to Sungale Digital Signage products.

14

Wi-Fi Settings

15

Support

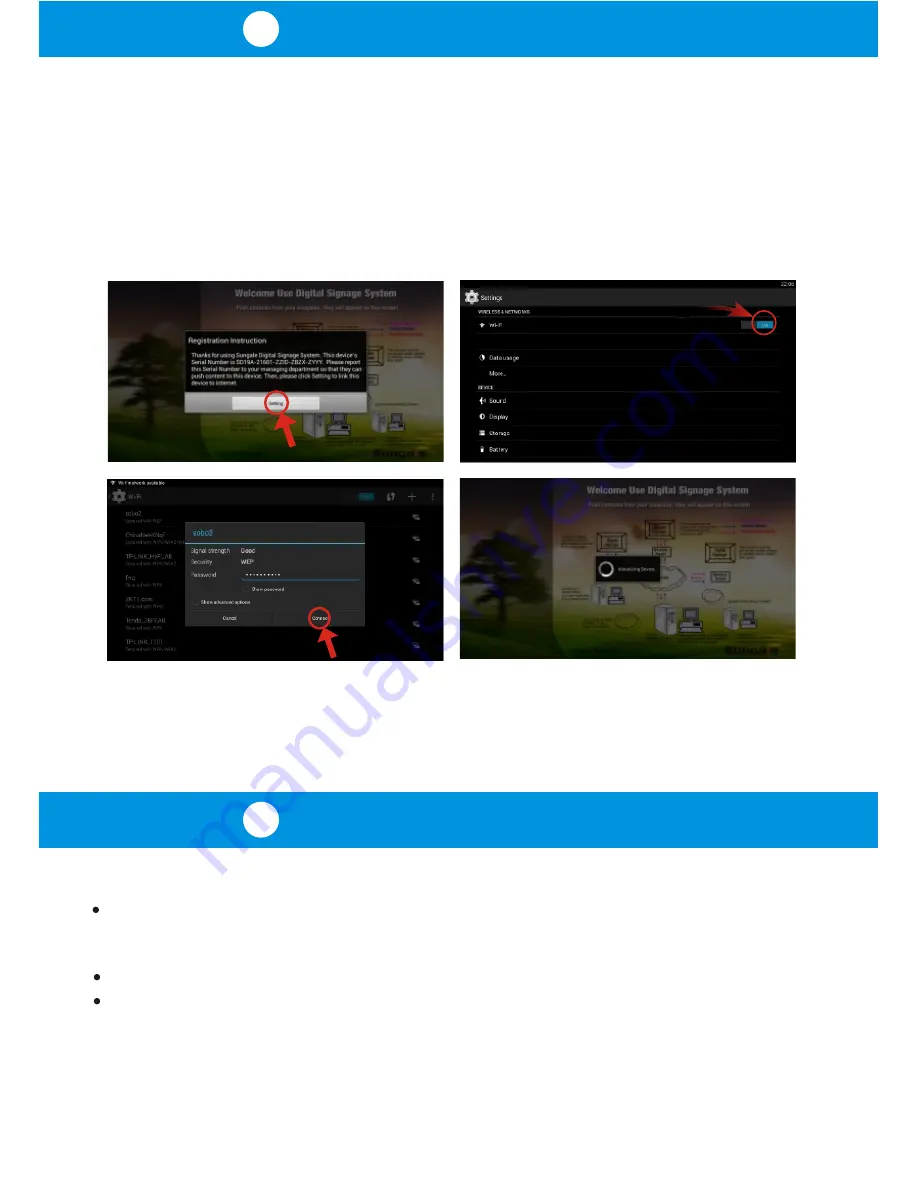
When each device is powered on for the first time, you'll see the 

"

Registration 

Instruction

"

 dialog box appear on the screen. Please carefully record the complete 

serial number shown in the dialog box for the use of online account setup. When 
ready, click the 

"

Settings

"


button, and follow the steps below to select your 

Wi-Fi network, and input password. After correctly setting the Wi-Fi network, 
click the 

"

Back

"

 button to go to the device's home screen. Once a device is 

associated with a digital signage management account, it can receive content 
updates from the cloud management portal.

Note: Some models are touch screen and others require a remote for inputting 
Wi-Fi Network and password information. 

Now you can manage and push content to the Digital Signage device through the 
cloud management system.

Summary of Contents for cpf1909

Page 1: ...Digital Signage Quick Start Guide...

Page 2: ...e and the right side is the login form Underneath the login form you ll find a Sign Up link First time users need to complete the initial sign up in order to proceed Please click the Sign Up link and...

Page 3: ...on you will need to input the serial numbers of your digital signage devices The serial number is displayed on each device when powering up for the first time Please refer to Step 14 for details Input...

Page 4: ...ructions click on Manage Content As shown below the first thing is to create a content folder as follows Click on Add New Folder and follow screen prompt instructions to create a new folder After gett...

Page 5: ...your manage content page will display like below where you will then click the button labeled Manage Content You will now come to the folder detail page where you can upload content to a folder Click...

Page 6: ...splay for and then click Submit Repeat this step if you have multiple content to upload Note 1 Only one content can be uploaded at a time These can be music files video clips or image files 2 Audio an...

Page 7: ...opup preview will display and show what was uploaded into the cloud storage Once you have finished uploading content to your folder click the Manage Content tab in the top navigation bar to go back to...

Page 8: ...y your folder s content After making the selection click the OK button and the folder s content will be pushed to the individual digital signage units you ve selected Note Digital Signage units will b...

Page 9: ...the top navigation bar to go to the account settings page where you can update your password and business name Plug the Power Adapter into the Digital Signage and also into a power outlet Once connect...

Page 10: ...screen Please carefully record the complete serial number shown in the dialog box for the use of online account setup When ready click the Settings button and follow the steps below to select your Wi...

Reviews: