www.sunflower-trimmer.com
16
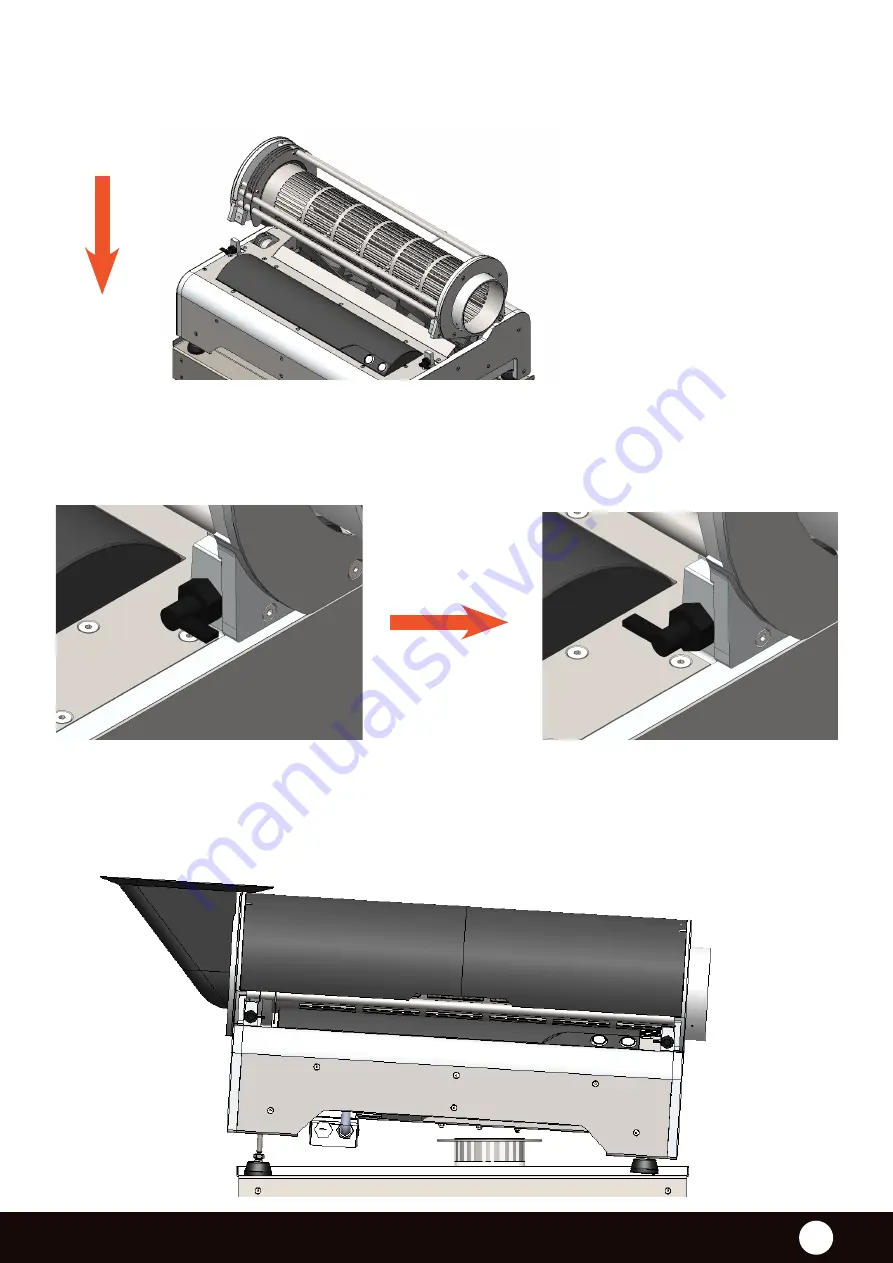
2. Let the upper frame sit on the machine.
3. Lock the levers
4. Install the upper cover, the chute and you are ready
Page 1: ...www sunflower trimmer com 1 AUTOMATIC L SUNFLOWER TRIMMER TRIMMING IS EASY USER MANUAL and WARRANTY FORM...
Page 2: ...SUNFLOWER TRIMMER 1 USER MANUAL AND WARRANTY FORM SUNFLOWER TRIMMER TRIM LIKE A PROFESSIONAL...
Page 3: ...cause injury to your eyes 1 POTENTIAL RISKS AND SAFETY WARNING 1 1 PROTECTIVE EQUIPMENT 1 Potential risks and safety warning 2 1 1 Protective equipment 2 1 2 Machine unpacking and installation 3 1 3 P...
Page 4: ...MACHINE UNPACKING AND INSTALLATION 1 Unpacking the table including ventilator 2 Unpacking the machine 3 Installation of the machine on the table When unpacking the machine out of the box please follo...
Page 5: ...www sunflower trimmer com 4 4 Unpacking the upper frame 6 Unpacking the chute 7 Mounting the chute to trimmer body 5 Installation of the upper frame on the machine more info in section 3 6...
Page 6: ...SUNFLOWER TRIMMER 5 8 Ventilator connection 9 Bag installation Connect the ventilator to the machine using a plastic hose...
Page 7: ...part of the trimmer in case of malfunction Keep clean the machine and it s storage place The trimmer machine can be used in interior only The use in exterior is not recommended The trimmer is not wat...
Page 8: ...frame is made of eloxed aluminum profiles which are connected together with special connectors The case of the trimmer is made of stainless steel and fastened to the main frame from all sides The elec...
Page 9: ...RMATION The machine can be used only for purposes specified by manufacturer We strongly advise you to read all safety warnings before use of the trimmer The machine is designed to remove the leaves fr...
Page 10: ...E Euro connector 1 The connector for power input is on the side of the trimmer Connect the proper end of the power cable into the euro con nector Connect the other end of the cable into wall socket Eu...
Page 11: ...evers in locked position The machine starts up by right ON OFF switch on the front side of the frame The ventilator starts up by the ON OFF switch next to the machine power on button Keep in mind all...
Page 12: ...smaller Always turn the wheels not more than of the circle Pay close attention during the process 3 You can test the optimal position with piece of paper Insert the paper between the rotor and cutting...
Page 13: ...r com 12 3 4 FLOWERS INFEEDING The flowers are inserted into the machine using the black chute Never insert dirty flowers into the machine Insert clean flowers without stalks or other parts which coul...
Page 14: ...e cleaning of the machine We don t recommend to clean the surface with hard materials especially iron tools There is a risk of damage to the surface which may result in corrosion Pay close attention t...
Page 15: ...upper frame and follow these instruction Make sure the machine is uplugged from electricity and its parts are not moving 1 Turn the levers Before cleaning of the ventilator unscrew the winged screws...
Page 16: ...both hands see picture Installation of the upper frame 3 Move the frame towards you and remove it completely 4 Put the upper frame aside carefully During installation make sure the upper frame bar is...
Page 17: ...www sunflower trimmer com 16 2 Let the upper frame sit on the machine 3 Lock the levers 4 Install the upper cover the chute and you are ready...
Page 18: ...commend the following 1 Clean all dirty spots of the machine using alcohol based cleaner or other solvent 2 Make sure no cut pieces of the plant getting outside of the cutting area 3 Clean the rotor o...
Page 19: ...end a confirmation of purchase to info sunflower trimmer com latest within 30 days from the date of purchase Include name of the retailer date of purchase and serial number of the machine You will rec...
Page 20: ...WWW SUNFLOWER TRIMMER COM...