background image

8013ADELUXE/8013ABKDELUXE/8013ABLDELUXE Rev. A

2

7/3/14

Do not fully tighten fasteners 
until prompted.

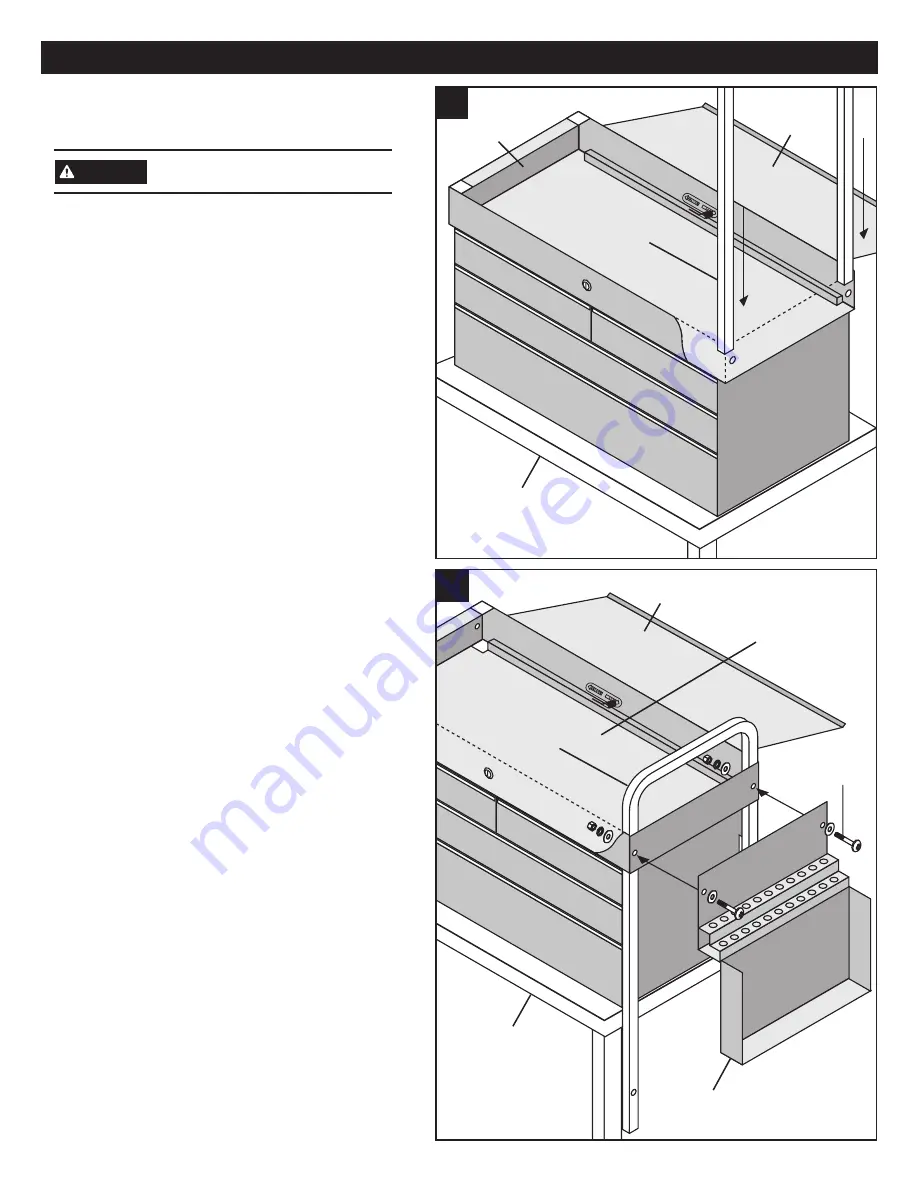
Step 1: Assembly preparation.

Clear table top and set Locking Drawer Assembly 
on table top, with lid facing up. Position the Locking 
Drawer Assembly so that one end hangs off of the 
table enough to allow the chrome legs to go through 
the square holes. Insert one set of chrome legs 
through the overhanging holes as shown in Figure 1. 
Do not bolt legs to top. 

Step 2: Connecting legs and side 

accessory to drawer assembly

Choose one of the side accessories (Pry Bar Holder 
or Side Work Bench - Figure 2 shows Pry Bar Holder) 
for attachment to the overhanging end of the service 
cart. Align the outermost bolt holes in the accessory 
with the bolt holes in the end of the cart and with 
the uppermost holes in the chrome legs. Position a 
washer and insert a 6mm bolt through the washer, 
bolt holes, and legs as shown. Secure bolts with  
a flat washer, lock washer, and nut on inside of  
Locking Drawer Assembly. Tighten bolts until parts  
fit together firmly.

Repeat steps 1 and 2 for other end of cart, 
using remaining side accessory.

Locking

Drawer Assy.

Chrome

Legs

Table or 

workbench

6mm

Bolt

Table or 

workbench

Pry Bar

Holder

Chrome

Legs

Locking

Drawer Assy.

1.

2.

Locking

Top

Locking

Top

ASSEMBLY INSTRUCTIONS

NOTE

Summary of Contents for 8013ADELUXE

Page 1: ...2 Locking Drawer Assembly Bottom Tray Pry Bar Holder Side Work Bench Rubber Mallet Table or Workbench 6mm Wrench Phillips Head Screwdriver 2 People Long Drawer Handle 1 Drawer Handle Screws 14 Short Drawer Handles 4 TOOLS NEEDED Read and follow all instructions in User s Manual It is the responsibility of the owner to make sure all personnel read this manual prior to using the device It is also th...

Page 2: ...ories Pry Bar Holder or Side Work Bench Figure 2 shows Pry Bar Holder for attachment to the overhanging end of the service cart Align the outermost bolt holes in the accessory with the bolt holes in the end of the cart and with the uppermost holes in the chrome legs Position a washer and insert a 6mm bolt through the washer bolt holes and legs as shown Secure bolts with a flat washer lock washer a...

Page 3: ...ottom drawer so that the channel in the handle covers all six holes in the front of the drawer Insert screws through each hole from inside the drawer and into the drawer handle channel Tighten the screws Repeat for all remaining drawers using short handles Do not allow the handles to over hang the ends of the drawer faces as they will interfere with the operation of the drawer Step 6 Attaching cas...

Page 4: ...r Handle RS8006HDLS Handle Screws Set of 6 RSRBSLIDEC2 Clip On Roller Bearing Slide pr 8045RSLD Red Replacement Small Left Drawer without Slides 8045BKSLD Black Replacement Small Left Drawer without Slides 8045BLSLD Blue Replacement Small Left Drawer without Slides 8045RSRD Red Replacement Small Right Drawer without Slides 8045BKSRD Black Replacement Small Right Drawer without Slides 8045BLSRD Blu...

Reviews: