background image

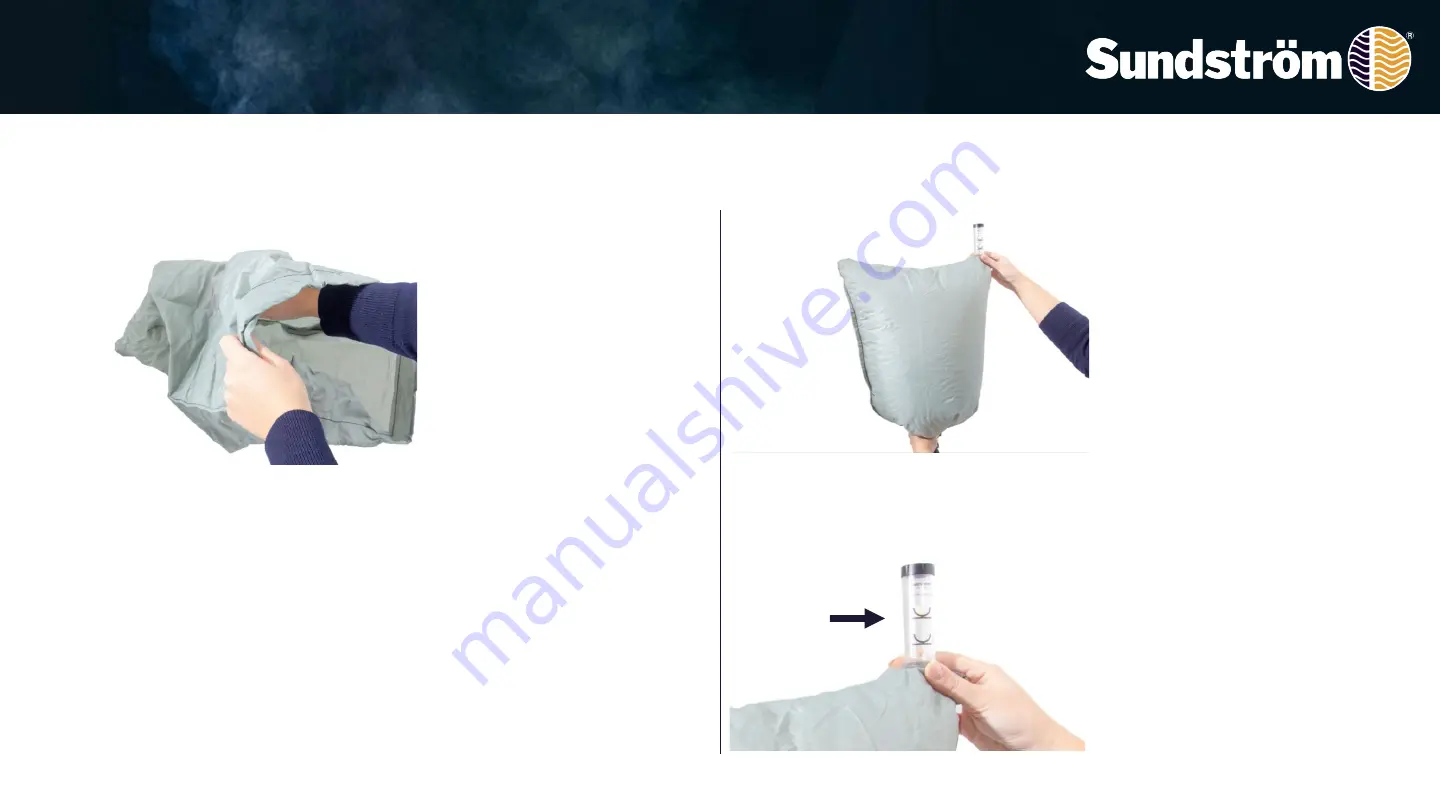
2. Functional check before use

2020-04-24

OI06H-0218 SR 520

5

2.1 

Turn the flow meter bag 

inside out and the flow meter 
appears.

2.2 

Place the head-top in the 

flow meter and start the fan 
unit. Grip the bag to seal 
around the breathing hose. 
Grip the flow meter tube with 
the other hand, the tube will 
point upwards from the bag

Read the position of the ball 

in the tube. This should hover 
at a level with or slightly 
above the upper marking on 
the tube, (175 l/min).

If minimum flow is not 
achieved, check that 

-the flow meter is held 
upright,
- the ball moves freely,

- the bag seals well around 

the hose.

Summary of Contents for H06-0221

Page 1: ...2020 04 23 OI06H 0218 SR 520 1 Operation instruction SR 520 Hood Revision 03...

Page 2: ...user instructions or label on fan unit for classification SR 520 together with compressed air attachment SR 507 and breathing hose SR 358 SR 359 SR 360 are included in the Sundstr m compressed air fe...

Page 3: ...Unpacking Packing list Hood with breathing hose User instructions Cleaning tissue 2020 04 23 OI06H 0218 SR 520 3...

Page 4: ...bly 2020 04 23 OI06H 0218 SR 520 4 1 1 Remove the protective film on the visor 1 2 Check that the O ring of the hose is in place 1 3 Connect the hose to the fan unit and turn it clockwise about 1 8 of...

Page 5: ...p the bag to seal around the breathing hose Grip the flow meter tube with the other hand the tube will point upwards from the bag Read the position of the ball in the tube This should hover at a level...

Page 6: ...or the SR 500 SR 500 EX or SR 700 3 2 Grip the hose mounting with one hand and with the other hold the strap in the lower part of the hood 3 3 Put your chin into the hood Keep hold of the strap and pu...

Page 7: ...7 4 1 Snap off the valve cover 4 2 Slip off the membrane 4 3 Press the new membrane onto the pin Carefully check that the membrane is in contact with the valve seat all way round 4 4 Press the valve c...

Page 8: ...218 SR 520 8 5 1 Pick away one end of the sweatband so that it is removed together with the tape Pull sweatband off 5 2 Remove the protective paper 5 3 Fit the new sweatband The forehead strap and the...

Page 9: ...on for disinfection N B Never use a solvent for cleaning 6 1 Sundstr m cleaning tissues SR 5226 are recommended for daily care 6 2 If the equipment is more heavily fouled use a soft brush or sponge mo...

Page 10: ...520 10 6 4 Snap off the valve cover from the valve seat 6 5 Remove the membrane Clean the exhalation membrane 6 6 Clean the valve seat and check that the valve seat is ok 6 7 Clean the valve cover on...

Page 11: ...1 The schedule represents the minimum requirements for maintenance routines in order to ensure that equipment will always be in functional condition Before use After use Annually Visual inspection Fun...

Reviews: