background image

Page 6

Supplied Accessories
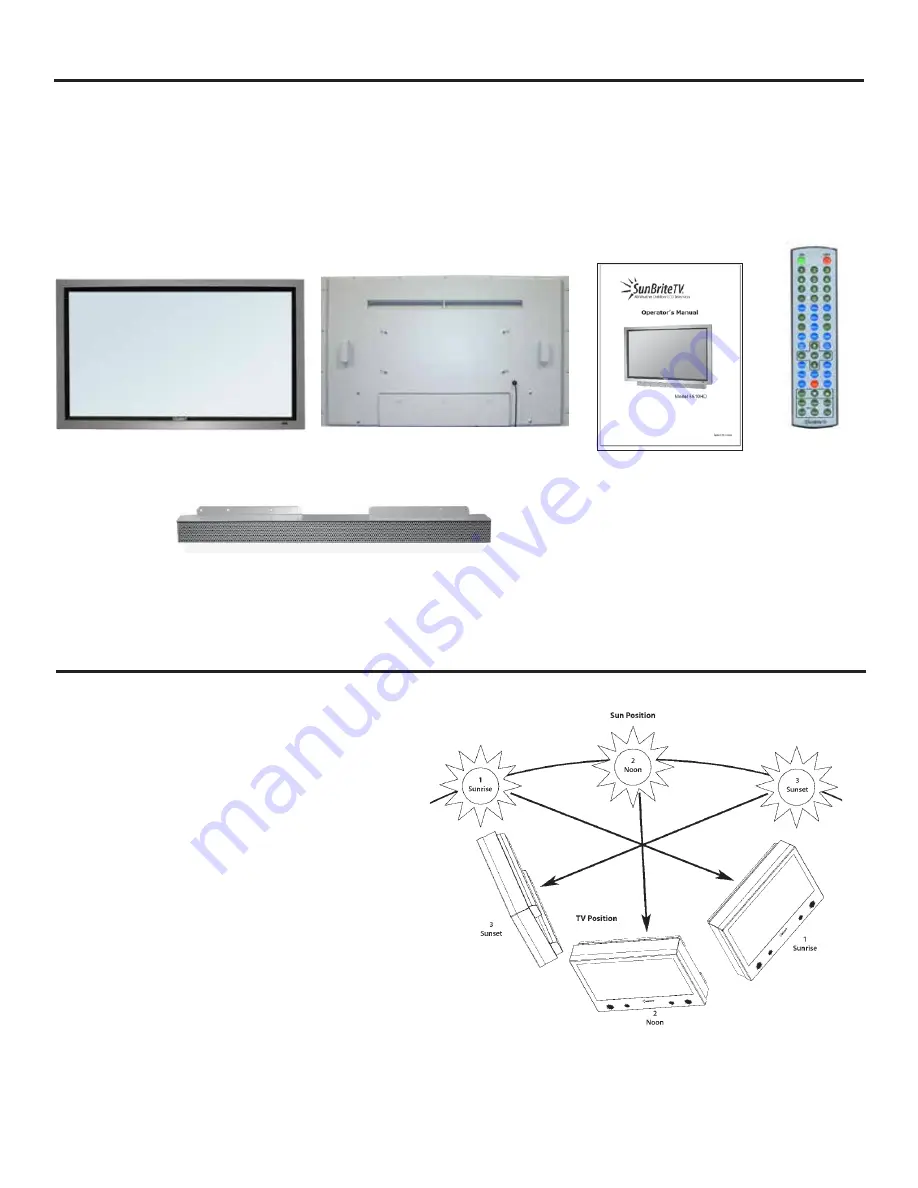
Unpacking

After unpacking the SunBriteTV television, please make sure that the following items are included in the carton and 

that they are in good condition. If items are damaged or missing, contact your dealer immediately.
 

SunBriteTV LCD Television Model 5510HD


Remote Control with Batteries


Operator’s Manual


Speaker Module

Water-Resistant

Wireless Remote 

Control

Model 5510HD

Operator’s 

Manual

Choose a location for the TV

Important: The TV must be installed at least 5 

feet from pool, spa, or other body of water.

The TV should be installed so the screen is not facing 
direct sunlight,  or can be easily turned away from 
direct sunlight. 

Ideal placement is in an area where the TV is shaded 
by trees, landscape and/or structures, or under a patio 
cover or gazebo.

If the sun shines directly on the screen for long periods 
of time, dark areas may develop on the screen. This is a 
normal reaction for the LCD panel, and will not cause 
damage to the screen. Either turn the screen away from 
the sun, or apply shade to the TV, and the dark areas 
will quickly disappear.

Speaker Module

TV Installation - Choose a Location for the TV

Summary of Contents for SB-5510HD

Page 1: ...Operator s Manual Model SB 5510HD Rev 5510HD Rev318 120801 PN M55 002 01 All Weather Outdoor LCD Television ...

Page 2: ...uipment Note to CATV system installer This reminder is provided to call the CATV system installer s attention to Article 820 40 of the National Electrical Code that provides guidelines for proper grounding and in particular specifies that the cable ground shall be connected to the grounding system of the building as close to the point of cable entry as practical WARNING To reduce the risk of fire ...

Page 3: ...nable protection against harmful interference in a residential installation This equipment generates uses and can radiate radio frequency energy and if not installed and used in accordance with the instructions may cause harmful interference to radio communications However there is no guarantee that interference will not occur in a particular installation If this equipment does cause harmful inter...

Page 4: ...s garden hoses etc However it is not designed to withstand pressure washers high pressure water jets or hurricane type weather Do not service SunBriteTV yourself Removal of the television screen cover may expose you to high voltage or other dangerous risks Refer all servicing to a qualified service professional Warranty will not be honored if you service the unit yourself Repair If any of the foll...

Page 5: ...te Control Guide On Screen Display Controls Adjusting On Screen Displays Picture Menu Sound Menu Setting Menu Channel Menu Trouble Shooting Care of SunBriteTV Specifications Features Information and Instructions Extreme Climate Warning Programming Other Manufacturers Universal Remote Control Devices SunBriteTV Pixel Quality Policy IR Emitter Installation Appendix A RS232 Control Cable Pinout Appen...

Page 6: ...must be installed at least 5 feet from pool spa or other body of water The TV should be installed so the screen is not facing direct sunlight or can be easily turned away from direct sunlight Ideal placement is in an area where the TV is shaded by trees landscape and or structures or under a patio cover or gazebo If the sun shines directly on the screen for long periods of time dark areas may deve...

Page 7: ...ailure to do so will allow water to seep inside your TV This can cause serious injury and can damage your TV 5 Turn the Speaker Module with the speaker grill facing the floor and align the Speaker Mounting Holes to the TV Mounting Holes Replace Pan Head Mounting Screws through Speaker Mounting Holes and TV Mounting Holes Figure 2 6 Screw securely Figure 3 7 Unscrew the three Thumb Screws and pull ...

Page 8: ...humb Screws Figure 1 and pull the cover towards you 2 Route the cables to the proper inputs and place the cable cords over the Rubber Sealing Gasket Figure 2 Note There is an Indentation on the Rubber Sealing Gasket on the bottom portion of the right and left sides Make sure cable cords are not placed on the Indentation 3 Close the cover 4 Press firmly on the cover and screw the Thumb Screws tight...

Page 9: ...dio red for right channel audio Use the Source Button to select YPbPr1 to review this connection 8 COMPONENT 2 Upper his connection ports are for DVD players or satellite cable set top boxes that use component cables From left to right connect green blue and red for video and then connect white for left channel audio red for right channel audio Use the Source Button to select YPbPr2 to review this...

Page 10: ...Page 10 TV Installation Rear Panel Connections Red Green Blue Yellow Green Red White Connection Descriptions Cable Descriptions ...

Page 11: ...f the TV 5 Use the On Screen Display to scan for channels Connecting to Digital Cable without Cable Box or Antenna Connecting to Cable or Antenna 1 Make sure the power of the TV is turned off 2 Connect the Coaxial RF cable from your antenna or cable to the ATSC NTSC port off the back of the TV 3 Turn on the TV 4 Select TV Air for antenna or TV Cable for cable from either your remote control s sour...

Page 12: ... TV to switch to HDMI Please Note Refer to the DVD player s manual to make sure the DVD player is configured to output correctly to the TV 1 Make sure the power ofTV and your DVD player is turned off 2 With a Component Cable connect the green connector to the DVD player and Component 1 s green connector port on theTV 3 Connect the blue color connector to your DVD player and Component 1 s blue conn...

Page 13: ...e TV and your DVD player is turned off 2 Obtain a Yellow Video Cable Connect the Yellow Video connector to both your DVD player and Composite s Yellow Video connector port off the back of your TV 3 Obtain a RCA Audio Cable Connect the white color connector to both your DVD player and Composite s white connector port off the back of your TV 4 Connect the red color connector to both your DVD player ...

Page 14: ...V 3 Connect the blue color connector to both your set top box and Component 1 s blue connector port off the back of your TV 4 Connect the red color connector to both your set top box and Component 1 s red connector port off the back of your TV 5 Obtain a RCA Audio Cable Connect the white color connector to both your set top box and Component 1 s white connector port off the back of your TV to the ...

Page 15: ... manufacturer list look up SONY s codes in your universal remote s hand book 4 This TV will turn off automatically if there s no signal present for more than 15 minutes 1 Make sure the power of the TV and your set top box is turned off 2 Connect a Yellow Video connector to both your set top box and Composite s Yellow Video connector port off the back of your TV 3 Connect a white color connector to...

Page 16: ...st picture set your PC resolution to 1920 x 1080 at 60 Hz Refer to the PC or graphic card manual for further instructions on how to set your resolution and refresh rate 2 Refer to your PC manual for video output requirements of the video card 3 The TV will turn off automatically if there s no signal present for more than 15 minutes 4 If HDMI 1 is already occupied use HDMI 2 as your connection port...

Page 17: ...e VGA Stereo Input port 4 Turn on the power of the TV and your PC 5 Use the remote control s source button or the source button the TV to switch to VGA Please Note 1 For the best results please set your PC resolution to 2 1920 x 1080at 60 Hz Refer to the PC or graphic card s manual for further instructions on how to set your resolution and refresh rate 3 Refer to your PC manual for video output re...

Page 18: ...e used to navigate within menu Vol is used to select the highlighted options IR Sensor Connect the power cord to a GFCI protected AC outlet with in use waterproof cover Warning TV must be installed at least 5 feet away from standing water such as but not limited to a pool or spa Connecting the Power Cord WARNING TV AND GFCI RECEPTACLE MUST BE INSTALLED AT LEAST 5 FEET AWAY FROM STANDING WATER SUCH...

Page 19: ...electing digital channels directly R Returns to the previous channel FREEZE Freezes the TV picture Press the button again to unfreeze the picture SLEEP Sets time for the TV to turn Off CC Selects Closed Caption CC only works under sources TV AV1 and AV2 V Functions the Volume Up V Functions the Volume Down MUTE Mutes the TVs Audio MENU Opens Exits the TV menu CH Functions the Channel Up CH Functio...

Page 20: ...es Parental Controls Time Closed Caption Menu Settings Language and Transparency Channel This menu manages Channel functions such as Scanning Channels Editing Channels Checking Signal Strength etc Your TV has been factory set to plug in and enjoy your programming In the event you turn on the TV and get the message Please run Channel Auto Scan press your remote s Menu button press the Channel funct...

Page 21: ...Sharpness then use t u to adjust the sharpness level of picture Advanced Video see below Press qp buttons to Advanced Video then use t u to adjust the selections for Color Temper Zoom Mode Noise Reduction and Overscan and Adaptive Contrast 1 Press qp buttons to move the cursor to the item to be selected 2 Press t u buttons to make the desired adjustments 3 When you are satisfied with your adjustme...

Page 22: ...e Treble Press qp buttons and then use t u buttons to increase or decrease the level of the Treble sounds Balance Pressd qp buttons and then use t u buttons to adjust the audio output level between Left and Right Speakers Surround Surround Sound is not supported on this model AVC Automatic Volume Control Press qp buttons and then use t u buttons to select AVC On or Off Digital Out Press qp buttons...

Page 23: ...me Press qp buttons to Time then use u button to change Time settings Follow sub menu directions on following pages Closed Caption Press qp buttons to Time then use u button to change Closed Caption settings Follow sub menu directions on following pages Menu Settings Press qp buttons to Menu Settings then use u button to change Menu settings Follow sub menu directions on following pages VGA Settin...

Page 24: ...e password will be changed Note If you change the password write down the new password and keep it in a safe place System Lock The TV is set with the System Lock in the Off position To turn the System Lock ON press qp buttons and then use t u buttons to select system lock ON When you do this the menu options will light up The Menu Items are Unrated Lock US Canada Reset RRI Parental Control Sub Men...

Page 25: ... TV PG Children can watch with guardian TV 14 Need parent guide TV MA Only for adult ALL Select all functions above FV Fantasy Violence L Language abusive sexual S Sexual V Violence D Dialog sexual MPAA From the US Menu press qpbuttons to block or unblock the following ratings G PG PG 13 R NC 17 X N A None Note The curser is set to rest on the N A rating As you press the p button you will automati...

Page 26: ...ns to select Daylight Saving Time ON or OFF When Daylight Saving Time is ON the clocks are set one hour ahead of local standard time Clock The time is decoded from the digital signal and displayed such as DTV HDMI This item is available only in English Adjusting On Screen Displays Setting Menu Canada English Press the t u button to select one of C C8 G PG 14 18 Canada French Press the t u button t...

Page 27: ...ys to select one of the Defaults and from Font0 to Font7 Font Size press t u to select one of Default Normal Large Small Font Edge Style press t u keys to select one of Default None Raised Depressed Uniform Left Shadow Right Shadow Font Edge Color press t u keys to select one of Default Black White Red Green Blue Yellow Magenta Cyan FG Color press t u keys to select one of Default White Black Red ...

Page 28: ...lect option To search Air Cable Press t u buttons to select Air or Cable Auto Scan Press the u button to enter the submenu list below 1 Press qp buttons to move the cursor to the item to be selected 2 Press t u buttons to make the desired adjustments 3 When you are satisfied with your adjustments press MENU or EXIT to exit the main menu Auto Scan Cable system Press the t u button to select the cab...

Page 29: ...press the qp buttons to select Show Hide Press the u button to enter the submenu shown left Press qp keys to your desired channel Press OK to show or hide the specified channel If the channel is Hidden user will be unable to see the channel by pressing CH or CH They can select the channel by pressing the channel number directly From the Channel Menu press the qp buttons to select the following fun...

Page 30: ...minutes to plug the power back in to see if that works HDCP video has no audio Make sure you have a 3 5 mm mini jack cable connected from your HDCP video device sound output to theTV sVGA stereo input If your HDCP video device uses RCA audio jacks you ll need to obtain a RCA audio converted into a 3 5 mm mini jack cable Cannot get 1920 x 1080 from PC VGA The screen s max resolution is 1920 x 1080 ...

Page 31: ...ightly against the side Figure 3 CAUTION NEVER SPRAY OR DIRECT A HOSE INTOTHEVENT AREA OFTHETV To Order Replacement Filters contact SunBriteTV s Customer Care Center at 800 331 4626 Important Information About the Anti Reflective Window on your SunBriteTV Outdoor Television The anti reflective window on your all weather TV is designed to dramatically reduce reflection and improve the contrast of t...

Page 32: ...R Audio Inputs x1 YPbPr plus Stereo Audio x2 15 pin D subVGA plus Stereo Audio Control Set RS232Serial DiscreteIRControl ConcealedIRWindow Audio Out SPDIF Digital fixed output 1 8 Stereo mini jack Analog variable output Speakers 10 watt x 2 channels water resistant detachable speaker module Exterior Powder coated aluminum Input Power 100 240VAC 50 60Hz4 0AMax OperatingTemp 24o to 122o F 31o to 50o...

Page 33: ...sold within USA and Canada only SunBriteTV LCD screens are manufactured with rigorous standards to maintain optimal viewing However the LCD screen may have minor defects that appear as a small bright or dark pixel This is common to all LCD screens used in display and television products and is not specific to SunBriteTV Bright dots are dots that appear bright and unchanged in size when a LCD TV sc...

Page 34: ... the emitter to the appropriate control block Neither the emitter or control block are supplied by SunBriteTV See instructions that come with your IR Emitter and control block to determine how to make the connections Tie Down Block Tie Down IR Emitter Place IR Emitter Cable over right or left side of the cable box IR Window Appendix A RS232 Control Cable Pinout 1 6 Ground Rx Data From control syst...

Page 35: ...S Video Input 2 ESC G 1B 47 G AV2 S VIDEO Component1 Input ESC H 1B 48 H YpbPr1 Component2 Input ESC I 1B 49 I YpbPr2 HDMI Input 1 ESC J 1B 4A J HDMI1 VGA Input ESC K 1B 4B K VGA HDMI Input 2 ESC L 1B 4C L HDMI2 Mute ESC X 1B 58 X MUTE Vol Up ESC Y 1B 59 Y VOL Vol Down ESC Z 1B 5A Z VOL Channel Up ESC V 1B 56 V CH Channel Down ESC W 1B 57 W CH 1 ESC 1 1B 31 1 na 2 ESC 2 1B 32 2 na 3 ESC 3 1B 33 3 ...

Page 36: ...www sunbritetv com ...

Reviews: