Attaching the Sun StorEdge
TM
5210 NAS and Expansion Units
Part Number / Numéro de pièce:
817-7513-11 Revision A
Date: 11-2004
2
1
1
2
Expansion Unit
Power
Power
Network connections
Configuring 5210 Expansion Unit RAID Sets
After answering all the questions asked by the
Configuration
Wizard, the Sun StorEdge 5210 NAS will be
configured for file sharing using the storage provided by its internal disk drives.
To add the storage capacity provided by the Expansion Unit, open a web browser from a client on the same
network. Type the address of the Sun StorEdge 5210 NAS in the address/location field to access the Web
Administrator. Then perform the following steps:
1. In the navigation panel, select RAID > Manage RAID.
Both the Sun StorEdge 5210 NAS and expansion unit storage should be displayed and the 'Unconfigured'
Capacity should be approximately 1680 GB for one expansion unit, 3360 GB for two expansion units, and
5040 GB for three expansion units.
2. Click Add LUN to open the Add LUN dialog box.
Selected drives are highlighted in blue, unselected drives in grey.
3. Select 6 drives from the expansion unit (bottom box). Make sure only 6 drives are highlighted in blue.
Recommended: select 6 drives, column 1 and column 2.
4. Verify fields are filled in as follows:
a. RAID Level: RAID 5
b. Controller: 0
c. Select "New Volume", add name "ch2vol02"
5. Click Apply. (Progress window should briefly open "Adding Lun.")
(Status for dac1d010: "Processing Add LUN", "Making file system") The RAID volume will initialize in the
background for several hours. After it begins, you can perform other NAS management tasks, but cannot
initiate another RAID operation until the current one completes.
6. Verify dac1d010 Status is: "Online" and RAID5 Capacity is 700025 MB
7. Click Add LUN.
8. Select 5 drives from the expansion unit (bottom box). Make sure only 5 drives are highlighted in blue.
Recommended: select 5 drives, column 3 and column 4 except 3rd row 4th columns.
d. RAID Level: RAID 5
e. Controller: 0
f. Select "New Volume", add name "ch2vol03"
9. Click Apply. (Progress window should briefly open "Adding Lun.")
(Status for dac1d020: "Processing Add LUN", "Making file system") The RAID volume will initialize in the
background for several hours. After it begins, you can perform other NAS management tasks, but cannot
initiate another RAID operation until the current one completes.
10. Verify dac1d010 Status is: "Online" and RAID5 Capacity is 560020 MB.
11. Click Add HS to open the Add Hot Spare dialog box.
12. Select 12th drive in expansion unit (4th column, 3rd row).
13. Click Apply.
14. Verify Hotspare Status is: "Online". Capacity is 140005 MB.
15. For any additional expansion units, repeat Steps 3-14 and select Controller: 1 in Step 4.b.
The successful RAID setup creates one file storage segment per LUN automatically. You may use these new
storage volumes immediately. Additional storage segments from the available LUNs may be added to them
now or as needed in the future to increase their capacity.
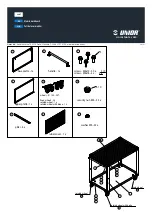
Connecting a Single Expansion Unit to the Sun StorEdge 5210 NAS
Sun StorEdge 5210 NAS with One RAID Card
Caution —
always power up the expansion unit prior to powering up the Sun StorEdge 5210 NAS.
Note:
Once configured as a pair, a Sun StorEdge 5210 NAS and 5210 expansion unit must be kept as a pair—-switching an expansion unit to
another NAS head will prevent normal system operation.
If you are connecting two or three expansion units, please refer to instructions on the back of this poster.
On the expansion unit, be sure the power switches are off. Then insert the two power cables into the two power connectors and connect them to an
AC power source. Turn on the power switches. All front panel LEDs should turn solid green.
Caution —
connect all SCSI cables, power cables, and network cables before powering up the systems. Always power up the expansion units
prior to powering up the NAS head.
Caution —
when you power off the expansion unit, wait five seconds before you power it back on. If you power the expansion unit off and on too
quickly, unexpected results may occur.
Power
connector
#1 powers
module A
Power
connector
#2 powers
module B
On the NAS head, be sure the front power button (behind the front panel) is in the off position. Check that the network cables are securely
connected between the unit and the network. Insert the two power cables into the two power connectors and connect them to an AC power source.
Press the power button.
The Configuration Wizard will start automatically.
Refer to the
Sun StorEdge 5210 Hardware Installation, Configuration, and User Guide
for more detail on connecting and powering up.
If you are using the Sun StorEdge 5210 NAS with one or more expansion units, the systems must be fully connected before powering them up.
The Sun StorEdge 5210 NAS and expansion unit connect through a pair of SCSI cables and ports. The left SCSI connector on the Sun StorEdge
5210 NAS connects to the bottom right SCSI connector on the EU (1). The bottom left SCSI connector on the expansion unit connects to its top
right SCSI connector (2), as shown in the above illustration.
Copyright 2004 Sun Microsystems, Inc. All rights reserved. Use is subject to license terms. Third-party software, including font technology, is copyrighted and licensed from Sun suppliers. Portions may be derived from Berkeley BSD systems, licensed from U. of CA. Sun, Sun Microsystems, the Sun logo, Sun StorEdge, Java, and Solaris are trademarks or registered trademarks of Sun Microsystems, Inc. in
the U.S. and in other countries. All SPARC trademarks are used under license and are trademarks or registered trademarks of SPARC International, Inc. in the U.S. and in other countries. U.S. Government Rights—Commercial use. Government users are subject to the Sun Microsystems, Inc. standard license agreement and applicable provisions of the FAR and its supplements.
Copyright 2004 Sun Microsystems, Inc. Tous droits réservés. Distribué par des licences qui en restreignent l’utilisation. Le logiciel détenu par des tiers, et qui comprend la technologie relative aux polices de caractères, est protégé par un copyright et licencié par des fournisseurs de Sun. Des parties de ce produit pourront être dérivées des systèmes Berkeley BSD licenciés par l’Université de Californie. Sun,
Sun Microsystems, le logo Sun, Sun StorEdge, Java, et Solaris sont des marques de fabrique ou des marques déposées de Sun Microsystems, Inc. aux Etats-Unis et dans d’autres pays. Toutes les marques SPARC sont utilisées sous licence et sont des marques de fabrique ou des marques déposées de SPARC International, Inc. aux Etats-Unis et dans d’autres pays.