SUMMIT BOILER OR WATER HEATER
Page 23
a.
Ignition/Water temperature control
b.
Automatic gas valve
c.
Internal Pump
6.
Low water cutoffs, if installed, should be
inspected and flushed periodically.
WARNING
Do not use this appliance if any part has been
under water. Immediately call a qualified service
technician to inspect the appliance and to
replace any part of the control system and any
gas control that may have been under water.
7.2 Appliance Maintenance and
Component Description
7.2.1 Appliance Pump
The appliance pump operates whenever there is
a call for heat / hot water.
It is a wetted-rotor type pump and should always
be filled with water when it is operating so that it will
cool properly.
If a pump change is required for any reason,
valve off the boiler and drain approximately 1 or 2
gallons (approx. 4-8L) of water from it. Turn off the
main disconnect switch and unplug the pump wires,
remove the pump motor. The pump housing need not
be removed. The replacement pump motor should be
installed in the reverse order. After filling the system
be sure the combustion chamber coil is vented through
the air vent located on top of the mixing valve.
7.2.2 Gas Valve
The gas valve is a solenoid operated, negative
pressure regulated ratio valve. If necessary it may be
adjusted as described in Section 7.2.2.1 below. It is
designed to operate with supply pressures of 4-13
inches w.c. (1.0 to 3.2 kPa). To remove the gas valve,
shut off 120-volt power and the gas shutoff valve.
Remove the four screws from the upper flange, the
three venturi mounting screws and remove the
retaining screw and gas valve rectifier. The valve may
now be removed. After the valve has been removed,
replace with a new valve in the reverse order. Turn on
gas shutoff valve and 120 volt power and check
appliance operation and gas tightness of gas valve
connections. Set the gas valve offset pressure.
7.2.2.1 Offset and Throttle Adjustment
If poor combustion is suspected because of a
strong exhaust smell, pulsation in the exhaust, or
nuisance flame failure lockouts, the gas valve throttle
and offset pressure and exhaust CO
2
or O
2
should be
checked and adjusted, if required. A Magnehelic®
pressure gauge (with 0.02-in. W.C. divisions) and a
CO
2
or O
2
tester are required for this adjustment.
CO
2
or O
2
sampling may be taken at the exhaust
terminal or at the sample port on the 3" exhaust
located inside the front cover. If the CO
2
or O
2
is out
of specification, the throttle adjustment should be
checked. The most effective method of checking is by
clocking the gas meter. Improper throttle adjustment
resulting in low input and low CO
2
(or high O
2
) can be
corrected by turning the throttle adjustment screw
counter clockwise. Turn clockwise to decrease input
and CO
2
(or increase O
2
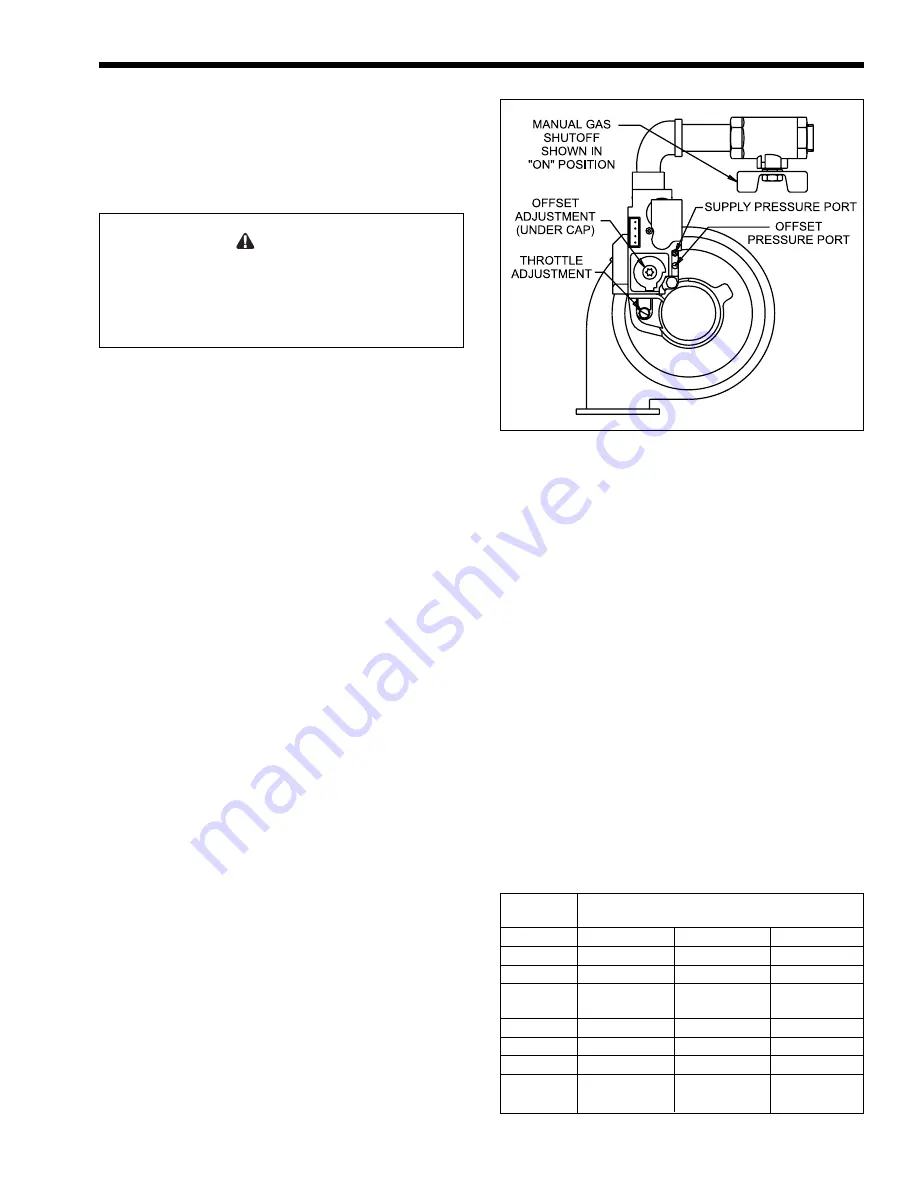
). See Figure 20 for the
location of the offset pressure port and the offset and
throttle pressure adjustment. After the throttle
adjustment has been completed and the input and CO
2
or O
2
are properly set, the offset pressure should be set
to the values shown in Table 4.
When adjusting the offset pressure, the CO
2
will
reduce slightly or the O
2
will increase slightly as the
offset pressure is adjusted more negative. Adjust
throttle adjustment again to obtain desired CO
2
or O
2
.
Offset pressure will not change when this adjustment
is done.
Figure 20. Gas Valve and Venturi Adjustment Points.
Equivalent Feet of Vent &
Combustion Air Pipe Combined
Natural Gas
Up to 20 ft. (6m)
21-89 ft. (6-27m)
90-110 ft. (27-34m)
CO
2
Percent
9.1 +_ 1
9.0 +_ 1
8.9 +_ 1
O
2
Percent
5.0 +_ 0.6
5.1 +_ 0.6
5.2 +_ 0.6
Offset Pressure -0.016+_0.004 in. WC -0.020+_0.004 in. WC -0.024+_0.004 in. WC
-0.04+_0.04 mbar
-0.05+_0.04 mbar
-0.06+_0.04 mbar
Propane Gas
Up to 20 ft. (6m)
21-89 ft. (6-27m)
90-110 ft. (27-34m)
CO
2
Percent
10.2 +_ 1
10.1 +_ 1
10.0 +_ 1
O
2
Percent
5.5 +_ 0.7
5.7 +_ 0.7
5.8 +_ 0.7
Offset Pressure -0.020+_0.004 in. WC -0.024+_0.004 in. WC -0.028+_0.004 in. WC
-0.05+_0.04 mbar
-0.06+_0.04 mbar
-0.07+_0.04 mbar
Table 4. CO
2
and Offset Pressure Set Points.
Summary of Contents for SMB-200
Page 28: ...Page 28 LAARS HEATING SYSTEMS POWER UP FAULT TREE ...
Page 29: ...SUMMIT BOILER OR WATER HEATER Page 29 SYSTEM TEMPERATURES FAULT TREE ...
Page 31: ...SUMMIT BOILER OR WATER HEATER Page 31 IGNITION FAULT TREE ...
Page 33: ...SUMMIT BOILER OR WATER HEATER Page 33 Figure 21 Parts Identification ...
Page 34: ...Page 34 LAARS HEATING SYSTEMS ...


