8
P
A
R
T
N
M
E
S
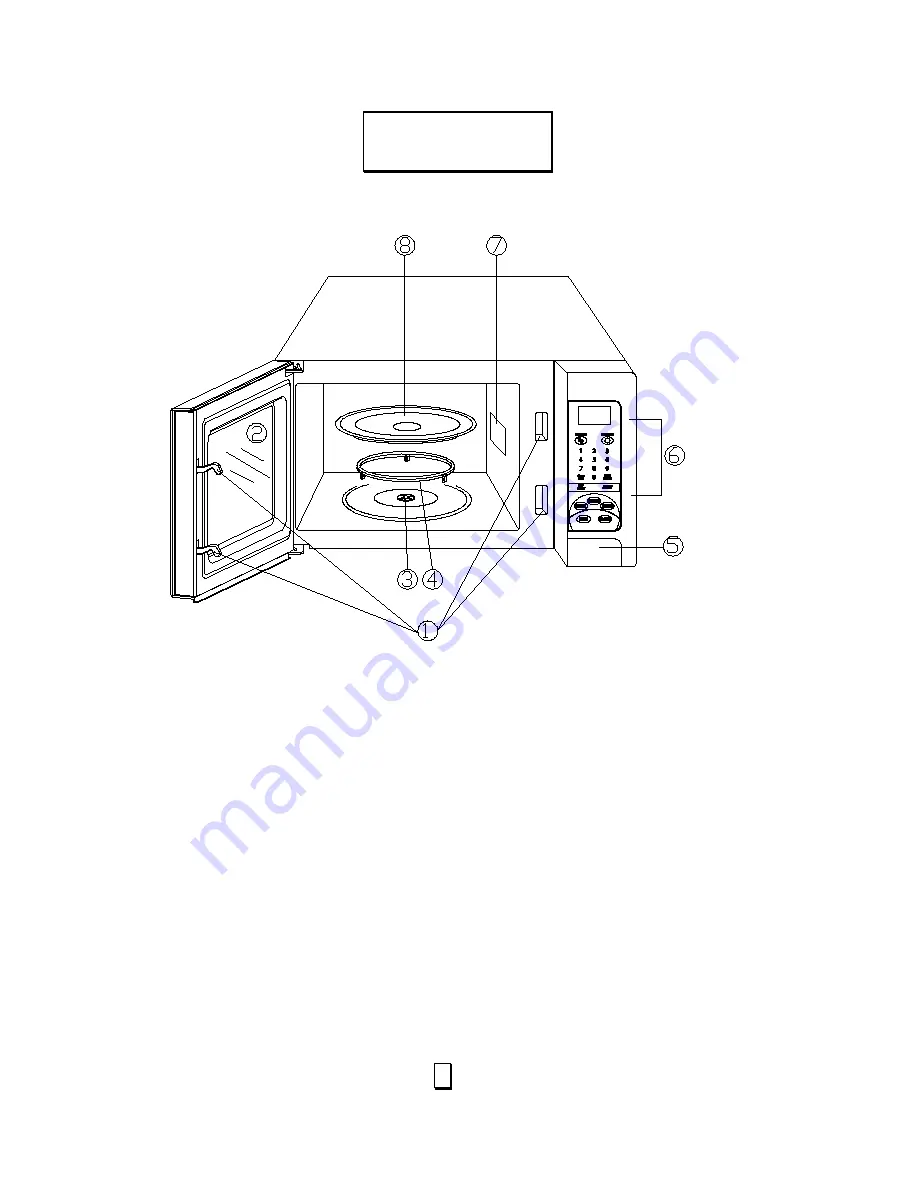
1. Door Safety Lock System 2. Oven Window 3. Shaft 4. Roller ring 5. Door Release Button 6. Control Panel 7. Wave Guide
(Please do not remove the mica plate covering the wave guide)
8. Glass tray
Page 1: ...n Felix Storch Inc Summit Appliance Division 770 Garrison Avenue Bronx New York 10474 www summitappliance com In the space below record the SERIAL NO found on the nameplate on your oven Keep this manu...
Page 2: ...ng surfaces 4 The oven should not be adjusted or repaired by anyone except properly qualified service personnel Table of Contents PRECAUTIONS TO AVOID POSSIBLE EXPOSURE TO EXCESSIVE MICROWAVE ENERGY 1...
Page 3: ...oven off and disconnect the power cord or shut off power at the fuse or circuit breaker panel d Do not use the cavity for storage purposes Do not leave paper products cooking utensils or food in the...
Page 4: ...facility for examination repair or adjustment 22 When cleaning surfaces of door and oven that come together on closing the door use only mild nonabrasive soaps or detergents applied with a sponge or...
Page 5: ...ic shock by providing an escape wire for the electric current WARNING Improper use of the grounding plug can result in a risk of electric shock Consult a qualified electrician or serviceman if the gro...
Page 6: ...owning dish Use to brown the exterior of small items such as steaks chops or pancakes Follow the directions provided with your browning dish Microwaveable plastic wrap Use to retain steam Leave a smal...
Page 7: ...n mind STIRRING Stir foods such as casseroles and vegetables while cooking to distribute heat evenly Food at the outside of the dish absorbs more energy and heats more quickly so stir from the outside...
Page 8: ...fore serving When heating baby food stir well at removal and test the temperature before serving ADDING MOISTURE Microwave energy is attracted to water molecules Food that is uneven in moisture conten...
Page 9: ...R RT T N NA AM ME ES S 1 Door Safety Lock System 2 Oven Window 3 Shaft 4 Roller ring 5 Door Release Button 6 Control Panel 7 Wave Guide Please do not remove the mica plate covering the wave guide 8 Gl...
Page 10: ...level TIMER CLOCK Press to set the timer function and to set the oven clock STOP CLEAR Press to clear entry before setting a cooking program Press once to temporarily stop cooking or twice to cancel c...
Page 11: ...press STOP CLEAR to cancel it MICROWAVE COOKING To cook with microwaves time and power level should be set The longest cooking time is 99 min 99 sec By pressing the POWER pad a number of times you ca...
Page 12: ...osted into the oven 2 Press DEFROST pad once 3 Press number pad 1 for Ground Meat 4 Press number pad to enter the weight 5 Press START pad Note During the defrosting program the system will pause and...
Page 13: ...odes it is not necessary to program the time and cooking power It is sufficient to indicate the type of food that you want to cook as well as the weight of this food POPCORN Press POPCORN pad once to...
Page 14: ...1 2 unit Fresh Vegetables 2 2 Once twice 1 2 unit Frozen Vegetables 3 3 Once twice 1 2 unit Frozen Entrees 4 4 Once twice 1 2 unit REHEAT In standby mode press REHEAT pad once The display shows Food P...
Page 15: ...n is operated under conditions of high humidity 7 It is occasionally necessary to remove the glass tray for cleaning Wash the tray in warm sudsy water or in a dishwasher 8 The roller ring and oven flo...
Page 16: ...tor 4 Replacement parts or repair labor costs for units operated outside the United States 5 Repairs to parts or systems resulting from unauthorized modifications made to the appliance 6 Expenses for...