Summit Professional 761101052267 Instruction Manual Download Page 11


11 


The audible alarm is automatically silenced and the temperature display stops flashing when the 
temperature is sufficiently cold again. 


If the door has been left open for more than 60 seconds, the alarm will sound. Pressing the 

POWER 

key once can switch off the audible alarm. 


DOOR LOCK 

Your unit is provided with a lock and key combination. 

The keys are located inside the plastic bag that contains the 

Instruction Manual

. Insert the key into the 

lock and turn it counter-clockwise to unlock the door. To lock the door, do the reverse operation, making 
sure the metal pin is engaged completely. Remove the key and put it in a secure place for safekeeping. 
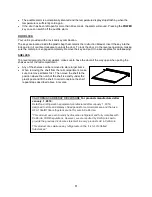
 
SHELVES 

To prevent damaging the door gasket, make sure to have the door all the way open when pulling the 
shelves out of the rail compartment. 


Any of the shelves can be removed to store larger items. 


When removing the shelf from the rail compartment, make 
sure to remove all items first.  Then move the shelf to the 
position where the notch of the shelf is exactly under the 
plastic post and lift the shelf. In order to replace the shelf, 
repeat steps described above in reverse. 


CALIFORNIA CARB/SNAP DISCLOSURE


For products manufactured after 

January, 1, 2019:


Retail food refrigeration equipment manufactured after January 1, 2019, 
designed to store and display chilled goods for commercial sale, and that use 
HFC-134a/R134a refrigerant are not


for sale in California.


*This product uses eco-friendly hydrocarbon refrigerant and fully complies with 
California CARB regulations. However, we are required by California Law to 
provide the previous disclosure statement in every product sold in California.


This product does 

not 

use any refrigerants on the “List of Prohibited 

Substances.”


Summary of Contents for 761101052267

Page 1: ...SE READ AND FOLLOW ALL SAFETY RULES AND OPERATING INSTRUCTIONS Felix Storch Inc An ISO 9001 2008 registered company 770 Garrison Avenue Bronx NY 10474 www summitappliance com Write Serial Number on lo...

Page 2: ...Appliance 7 8 Adjusting the Height of the Unit 8 Adjusting the Kick plate 8 Installing the Stainless Steel Handle 8 Operating Your Appliance 9 11 Control Panel 9 Sabbath Mode 10 Temperature Memory Fu...

Page 3: ...let do not remove grounding prong do not use an adapter and do not use an extension cord Replace all panels before operating It is recommended that a separate circuit serving only your appliance be pr...

Page 4: ...re is between 72 and 78 F 23 to 26 C The appliance should not be located next to ovens grills or other sources of high heat The appliance must be installed with all electrical water and drain connecti...

Page 5: ...5 LOCATION OF PARTS Digital Control Panel Shelves 3 Ventilation Grille Adjustable Legs LED Light Security Lock Stainless Steel Door Stainless Steel Handle Door Racks 2 Kick plate...

Page 6: ...electrical consumption Don t install in a location where the temperature will fall below 44 F 7 C For best performance do not install the appliance behind a cabinet door or block the base grille Avoi...

Page 7: ...grounding type appliance extension cord having a grounding type plug and outlet and that the electrical rating of the cord be 115 volts and at least 10 amperes REVERSING THE DOOR SWING OF YOUR APPLIA...

Page 8: ...the upper section In order to adjust the kick plate height follow the instructions below 1 Remove the screws 1 from both the top left and top right hand sides of the kick plate 2 Loosen or remove the...

Page 9: ...the set temperature by 1 C 1 F DOWN Used to decrease cool the set temperature by 1 C 1 F F C Selector Select the temperature display in Fahrenheit or Celsius degrees To change the temperature from Fa...

Page 10: ...osts automatically in normal operating conditions The evaporator behind the rear wall of the unit defrosts automatically The condensate collects in the drainage channel behind the rear wall of the uni...

Page 11: ...lves out of the rail compartment Any of the shelves can be removed to store larger items When removing the shelf from the rail compartment make sure to remove all items first Then move the shelf to th...

Page 12: ...iance will not be used for several months remove all items and turn off the appliance Clean and dry the interior thoroughly To prevent odor and mold growth leave the door open slightly blocking it ope...

Page 13: ...en The door is not closed completely The door gasket does not seal properly Put the appliance in a cooler place Leave the appliance to work for a while until the set temperature has been reached Do no...

Page 14: ...ion opening being covered or too dusty A lengthy interruption in the power supply A large amount of items have been added to the unit If yes close the door Do not open the door more often than necessa...

Page 15: ...15 NOTES...

Page 16: ...nited States 5 Repairs to parts or systems resulting from unauthorized modifications made to the appliance 6 The removal and reinstallation of your appliance if it is installed in an inaccessible loca...

Reviews: