background image


10 

Care and Maintenance


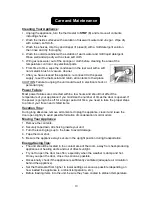
Cleaning Your Appliance

1.


Unplug the appliance, turn the thermostat to 

STOP

 (

0

) and remove all contents, 

including shelves. 

2.


Wash the inside surfaces with a solution of lukewarm water and vinegar.  Wipe dry 
with a clean, soft cloth. 

3.


Wash the shelves, drip tray and crisper (if present) with a mild detergent solution, 
then rinse and dry thoroughly. 

4.


Wash the outside cabinet with a solution of warm water and mild liquid detergent. 
Rinse well and wipe dry with a clean soft cloth. 

5.


Wring excess water out of the sponge or cloth before cleaning the area of the 
temperature control or any electrical parts. 

6.


From time to time, wipe the condenser on the rear wall with a soft 
non-metallic brush or vacuum cleaner. 

7.


After you have cleaned the appliance, reconnect it to the power 
supply, reset the thermostat and return all contents to their place. 

CAUTION: Failure to unplug the unit could result in electrical shock or 

personal injury. 

Power Failure

Most power failures are corrected within a few hours and should not affect the 
temperature of your appliance if you minimize the number of times the door is opened. If 
the power is going to be off for a longer period of time, you need to take the proper steps 
to protect your frozen and chilled items. 

Vacation Time

During long absences, remove all contents. Unplug the appliance, clean it and leave the 
door open slightly to avoid possible formation of condensation, mold or odors. 

Moving Your Appliance

1.  Remove the contents. 

2.  Securely tape down all shelving inside your unit. 
3.  Turn the leveling legs up to the base to avoid damage. 
4.  Tape the door shut. 
5.  Be sure the appliance stays secure in the upright position during transportation.  

Energy-Saving Tips


The unit should be located in the coolest area of the room, away from heat-producing 
appliances or heating ducts and out of direct sunlight. 


Try not to open the door too often, especially when the weather is damp and hot.  
Once you open the door, close it as soon as possible. 


Occasionally check if the appliance is sufficiently ventilated (adequate air circulation 
behind the appliance). 


Set the thermostat from higher to lower settings as soon as possible (depending on 
how loaded the appliance is, ambient temperature, etc.). 


Before loading items into the unit, be sure they have cooled to ambient temperature. 


Summary of Contents for Accucold FF6BI Series

Page 1: ...S Models Modèles FF6BI series ACCUCOLD FF7BI series ACCUCOLD SCR600LBI series ACCUCOLD SCR600BLBI series SUMMIT Commercial CM411L Instruction Manual Mode d emploi BEFORE USE PLEASE READ AND FOLLOW ALL SAFETY RULES AND OPERATING INSTRUCTIONS AVANT L EMPLOI LIRE ET SUIVRE LES RÈGLES DE SÉCURITÉ ET INSTRUCTIONS D UTILISATION FELIX STORCH INC 770 Garrison Avenue Bronx NY 10474 www summitappliance com ...

Page 2: ...educe the risk of fire electrical shock or injury when using the appliance follow basic precautions including the following Plug into a grounded 3 prong outlet Do not remove grounding prong do not use an adapter and do not use an extension cord It is recommended that a separate circuit serving only your refrigerator be provided Use receptacles that cannot be turned off by a switch or pull chain Ne...

Page 3: ... to operate play with or crawl inside the refrigerator Do not use solvent based cleaning agents or abrasives on the interior These cleaners may damage or discolor the interior Do not use this apparatus for other than its intended purpose THE FF6BI AND FF7BI SERIES MODELS AS WELL AS MODEL SCR600LBI ARE DESIGNED FOR MEDICAL OR PHARMACEUTICAL USE ONLY THEY ARE NOT INTENDED FOR USE AS HOUSEHOLD REFRIG...

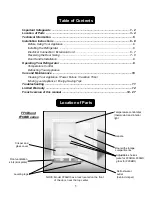
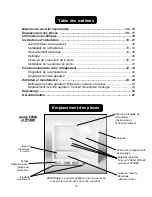
Page 4: ...aintenance 10 Cleaning Your Appliance Power Failure Vacation Time Moving your Appliance Energy Saving Tips Troubleshooting 11 Limited Warranty 12 French version of this manual 14 27 Location of Parts Temperature control dial thermostat and interior light Door with storage compartments Front ventilation slots kick plate Leveling legs Adjustable shelves wire for FF6BI FF6LBI glass for FF6BBI Defrost...

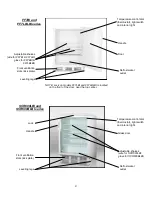
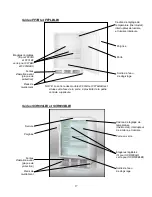
Page 5: ...ost water outlet NOTE Lock on models FF7LBI and FF7LBLBI is located on the front of the door near the top center Handle FF7BI and FF7LBLBI series Temperature control dial thermostat light switch and interior light Glass door Front ventilation slots kick plate Leveling legs Adjustable shelves wire for SCR600LBI glass for SCR600BLBI Defrost water outlet Handle SCR600LBI and SCR600BLBI series Lock ...

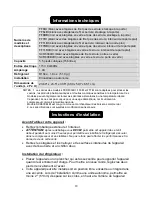
Page 6: ...helves and lock glass door SCR600BLBI black with glass shelves and lock glass door Capacity 5 5 cu ft Electrical Input 115V AC 60Hz Rated Current 1 0A Refrigerant R134a 1 8 oz Installation Built in or Freestanding Unit Dimensions W x D x H 23 63 x 23 5 x 33 5 NOTES 1 FF6BI and FF7BI series models and SCR600LBI are suitable for storing vaccines pharmaceuticals and other temperature sensitive materi...

Page 7: ...r Even when built in the unit requires at least 2 of clearance at the back 1 8 3mm at both sides and 1 16 1 6mm at the top Take care that the air vents at the front of the appliance are never covered or blocked in any way Locate the unit away from direct sunlight and sources of heat oven heater radiator etc Direct sunlight may affect the acrylic coating and heat sources may increase electrical con...

Page 8: ...iance If the power cord is too short have a qualified electrician or service technician install an outlet near the appliance Reversing the Door Swing select models only If you find the direction of opening the door of the appliance inconvenient you can change it Holes on the opposite side have already been prepared at the factory This appliance can be opened from either the right side or the left ...

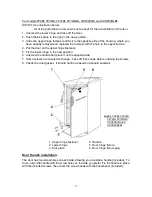
Page 9: ...Fix the lower hinge in the new position 6 Unscrew the handle and place it on the opposite side 7 Some screws are covered with caps Take off these caps before undoing the screws 8 Check the door gasket It should not be creased and should seal well 1 Upper hinge fastener 4 Handle 2 Lower hinge 5 Door hinge fixture 3 Kick plate 6 Door hinge fixture plug Door Handle Installation The door has two screw...

Page 10: ...the compressor NOTES 1 Shelves are adjustable Certain models include glass shelves see Technical Information page 5 These shelves stop short an inch before the back wall which is essential for air flow and the proper operation of the automatic defrost system Do not block these gaps 2 a Interior lighting on the FF6BI series models is controlled by a switch that is activated by the opening and closi...

Page 11: ...your appliance if you minimize the number of times the door is opened If the power is going to be off for a longer period of time you need to take the proper steps to protect your frozen and chilled items Vacation Time During long absences remove all contents Unplug the appliance clean it and leave the door open slightly to avoid possible formation of condensation mold or odors Moving Your Applian...

Page 12: ...e air circulation behind the appliance and wipe the dust from the condenser Noise Cooling in refrigeration appliances is enabled by the refrigerating system with a compressor which produces noise How noisy the appliance is depends on where it is placed how it is used and how old the appliance is During the operation of the compressor the noise of liquid is heard and when the compressor is not oper...

Page 13: ... approved by warrantor 4 Replacement parts or repair labor costs for units operated outside the United States 5 Repairs to parts or systems resulting from unauthorized modifications made to the appliance 6 Expenses for travel and transportation for product service in remote locations 7 The removal and reinstallation of your appliance if it is installed in an inaccessible location or is not install...

Page 14: ...13 Notes ...

Page 15: ... appareil La taille du fusible ou disjoncteur doit être de 15 ampères Ne pas utiliser une rallonge Veiller à ne pas brancher dans les prises contrôlées par des interrupteurs muraux Le réfrigérateur doit être nivelé afin de fonctionner correctement Vous pouvez avoir besoin de faire plusieurs ajustements pour y arriver Pour assurer une bonne ventilation de votre appareil l avant de l appareil doit ê...

Page 16: ...r le contenu de se gâter Si le service doit être interrompu pendant plus de 24 heures retirer le contenu et stocker dans un casier réfrigéré ou autre réfrigérateur DANGER Risque de piégeage d enfants Les anciens appareils peuvent représenter un danger d étouffement pour les enfants Enlevez la porte s de votre ancien appareil Laissez les étagères ou des paniers en place Si votre ancien appareil con...

Page 17: ...il 23 Entretien et maintenance 23 24 Nettoyage de votre appareil Panne de courant Vacances 23 Déplacement de votre appareil Conseil d économie d énergie 24 Dépannage 25 Garantie limitée 27 Emplacement des pièces FF6BI Cadran de réglage de température thermostat et l éclairage intérieur Porte avec compartiments de stockage Fentes d aération avant plaque de protection Pieds de nivellement Étagères r...

Page 18: ...LBI verre pour FF7BBI et FF7LBLBI Sortie de l eau de dégivrage NOTE La serrure des modèles FF7LBI et FF7LBLBI est située sur la face de la porte à proximité de la partie centrale supérieure Poignée Cadran de réglage de température thermostat interrupteur de lumière et lumière Porte en verre Fentes d aération avant plaque de protection Pieds de nivellement Étagères réglables fil pour SCR600LBI verr...

Page 19: ...l de se tenir debout pendant au moins 2 heures pour permettre aux lubrifiant et réfrigérant à écouler dans le compresseur et se stabiliser Ne pas le faire peut affecter les performances et la durée de vie de cette unité Retirez les étagères et les nettoyer et les surfaces intérieures de l appareil avec de l eau tiède et un chiffon doux Installation du réfrigérateur Placez l appareil sur un planche...

Page 20: ...e troisième pôle terre du cordon d alimentation Toutes les questions concernant la puissance et ou mise à la terre doivent être adressées à un électricien certifié ou au centre de service autorisé Raccordement électrique Cet appareil doit être correctement mis à la terre pour votre sécurité Le cordon d alimentation de cet appareil est équipé d une fiche à trois broches qui s accouple avec une pris...

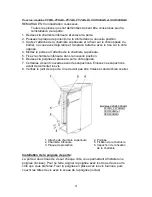
Page 21: ...ructions appropriées Pour les modèles FF6BBI FF7BI et FF7BBI 1 Retirez le couvercle supérieur de la charnière de la porte et enlever les vis qui maintiennent la charnière supérieure 2 Soulevez la charnière droite pour dégager l axe de charnière de la prise dans le haut de la porte 3 Soulevez la porte en haut et loin pour libérer son logement de fond de l axe de charnière 4 Retirer les vis de la ch...

Page 22: ...nouvelle position 6 Dévissez la poignée et placez la sur le côté opposé 7 Certaines vis sont couvertes avec des capuchons Enlevez ces capuchons avant de démonter les vis 8 Vérifiez le joint de la porte Il ne devrait pas être froissé et devrait bien sceller 1 Attache de charnière supérieure 4 Poignée 2 Charnière inférieure 5 Fixation de la charnière 3 Plaque de protection 6 Capuchon de la fixation ...

Page 23: ...a lumière fonctionne toujours La température à l intérieur du réfrigérateur dépend aussi de combien de fois vous ouvrez la porte Dans tous les petits réfrigérateurs sans ventilateur intérieur les températures sont plus froides près du fond et parfois près de l arrière Placez le contenu en conséquence Il est préférable de ne pas faire fonctionner ces unités presque vides Si les températures sont er...

Page 24: ...r les étagères et bac si présent avec une solution de détergent doux puis rincer et sécher soigneusement 4 Lavez l extérieur avec une solution d eau chaude et un détergent liquide doux Rincez bien et séchez avec un chiffon doux et propre 5 Essorez bien de l éponge ou du chiffon avant de nettoyer la zone du contrôle de la température ou des pièces électriques 6 De temps en temps nettoyez le condens...

Page 25: ...in des appareils produisant de la chaleur ou des conduits de chauffage et des rayons du soleil Essayez de ne pas ouvrir la porte trop souvent surtout quand le temps est humide et chaud Une fois que vous ouvrez la porte fermez la dès que possible Vérifiez de temps si l appareil est suffisamment ventilé circulation d air suffisante derrière l appareil Réglez le thermostat des réglages plus élevés au...

Page 26: ...une circulation d air suffisante derrière l appareil et essuyer la poussière du condenseur Bruit Refroidissement dans les appareils de réfrigération est activé par le système de réfrigération comportant un compresseur qui produit un bruit Comment l appareil est bruyant dépend de l endroit où il est placé comment il est utilisé et quel âge l appareil a t il Pendant le fonctionnement du compresseur ...

Page 27: ...26 Notes ...
Page 28: ...reils utilisés hors des États Unis 5 Les réparations aux pièces ou systèmes résultant de modifications non autorisées apportées à l appareil 6 Les frais de déplacement et de transport pour le service produit dans des endroits éloignés 7 Le retrait et la réinstallation de votre appareil s il est installé dans un endroit inaccessible ou n est pas installé conformément aux instructions d installation...

Reviews: