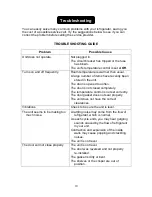
Summit Appliance Accucold CM411L Owner'S Manual Download Page 7


Reversing the Door Swing: 


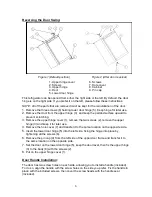
 Figure 1 (Default position)                             Figure 2 (After door reversal) 


1. Upper hinge cover  

6. Screws 


2. Screws  

7. Hole cover 


3. Upper hinge  

8. Cabinet 


4. Door 

9. Pin cap 


5. Lower door hinge 

This refrigerator can be opened from either the right side or the left. By default, the door 
hinge is on the right side. If you prefer it on the left, please follow these instructions: 

NOTE: All of the parts that are removed must be kept for the reinstallation of the door. 

1. 

Remove the three screws (6) holding lower door hinge (5). Keep hinge for later use. 

2. 

Remove the door from the upper hinge (3), and keep the padded surface upward to 
prevent scratching. 

3. 

Remove the upper hinge cover (1), remove the two screws (2), remove the upper 
hinge (3) and keep it for later use. 

4. 

Remove the hole cover (7) and transfer it to the same location on the opposite side. 

5. 

Insert the lower door hinge (5) into the left side, fixing the hinge into place by 
tightening all the screws (6). 

6. 

Remove the pin cap (9) from the left side of the upper door frame and transfer it to 
the same location on the opposite side. 

7. 

Set the door on the lower door hinge (5), keep the door level, then fix the upper hinge 
(3) to the body (8) with the screws (2). 

8. 

Put on the upper hinge cover (1). 


Door Handle Installation: 

The door has two screw holes on each side, allowing you to install a handle (included).  
To do so, align the handle with the screw holes on the side you prefer. Fix the handle in 
place with the included screws, then cover the screw heads with the handle seal 
(included). 


Summary of Contents for Accucold CM411L

Page 1: ...RATORS with ICE COMPARTMENT Models CM405 CM411L CM421BL Owner s Manual BEFORE USE PLEASE READ AND FOLLOW ALL SAFETY RULES AND OPERATING INSTRUCTIONS FELIX STORCH INC An ISO 9001 2008 registered compan...

Page 2: ...re not followed Before the refrigerator is used it must be properly positioned and installed as described in this manual so read the manual carefully To reduce the risk of fire electrical shock or inj...

Page 3: ...te and local codes A standard electrical supply 115V AC only 60 Hz properly grounded in accordance with the National Electrical Code and local codes and ordinances is required Do not kink or pinch the...

Page 4: ...r Refrigerator 7 8 Temperature Control Ice Cube Tray The Ice Compartment Light Switch Care and Maintenance 8 9 Defrosting Your Refrigerator Cleaning Your Refrigerator 8 Power Failure Vacation Time Mov...

Page 5: ...s and handle seal 2 keys Before connecting the unit to the power source let it stand for approximately 2 hours This will reduce the possibility of a malfunction in the cooling system from handling dur...

Page 6: ...s unit should be properly grounded for your safety The power cord of this unit is equipped with a three prong plug which mates with a standard three prong wall outlet to minimize the possibility of el...

Page 7: ...upper hinge cover 1 remove the two screws 2 remove the upper hinge 3 and keep it for later use 4 Remove the hole cover 7 and transfer it to the same location on the opposite side 5 Insert the lower do...

Page 8: ...mostat setting for ice making is position 6 Fill the ice cube tray two thirds full of cold water or with any liquid suitable for freezing and place the tray on the floor of the ice compartment to free...

Page 9: ...under the ice compartment 7 Defrosting usually takes a few hours After defrosting return the thermostat dial to the desired position 8 To defrost quickly a container of warm water may be placed inside...

Page 10: ...r unit 3 Turn the leveling legs up to the base to avoid damage 4 Tape the door shut 5 Be sure the unit stays secure in the upright position during transportation Also protect the outside of the unit w...

Page 11: ...t The door is opened too often The door is not closed completely The temperature control is not set correctly The door gasket does not seal properly The unit does not have the correct clearances Vibra...

Page 12: ...ectrical or plumbing codes or use of products not approved by warrantor 4 Replacement parts or repair labor costs for units operated outside the United States 5 Repairs to parts or systems resulting f...

Reviews: