2
3
7 :2 3$ 1 ( / 6 ( 7 8 3 ) 2 5
2 3 ( 1 , 1 * 6
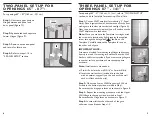
For openings 65" – 87" (165 cm - 221 cm)
6WHS
Unscrew upper knob on
Hinge between end panel and
door panel (Figure O).
6WHS
Squeeze tabs and separate
Lower Hinges (Figure P).
6WHS
Remove entire end panel
and retain for future use.
6WHS
Refer to steps 1-14 in
“3 PANEL SETUP” section.
&
%
7 + 5 ( ( 3$ 1 ( / 6 ( 7 8 3 ) 2 5
2 3 ( 1 , 1 * 6
6WHS
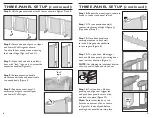
Cut out Wall Template (for mounting “3” Panel
Gate). Place it against the wall, bottom even with the floor,
making sure that sides are vertical and straight (Figure A).
Next, tape it temporarily in place (you will need to use the
Wall Template more than once).
1RWH
Once you are sure the Template is straight, mark
the screw hole locations by lightly tapping the supplied
screw through the hole guides ( ) shown on the
Template. Carefully remove the Template for use on
the other end of gate.
,03257$17127(
Screws are provided for mounting the Hinges and Latches
directly to wood. If mounting into wallboard, use the Wall
Anchors and Screws provided. If you are mounting the gate
to another surface, purchase and use the appropriate
hardware.
1RWH
If wall anchors are needed:
a) Pre-drill a hole in the wall (3/16" or 5mm drill bit).
b) Insert the wall anchors (included) into the hole
with a hammer, tap gently on the end until the wall
anchor is flush with the wall.
6WHS
Mount one Lower Wall Hinge using 2 Wood
Screws in the bottom position, marked in Step 1.
Be sure that the hinge post faces up as shown in Figure B.
6WHS
Repeat the mounting procedure with the Upper
Wall Hinge at the top position, marked in Step 1.
Be sure that the Hinge faces up as shown in Figure C.
$
6WHS
Locate wall that the other end of the gate
will mount to and repeat Steps 1-3.
For openings 65" - 87" (165 cm - 221 cm), refer to “TWO PANEL SETUP”
section, and use Template for mounting 2 Panel Gate.


